Active Matter explains the basics during its opening tutorial, but many of the systems that matter most during actual raids are learned through experience. In this guide, I focus on the mechanics, habits, and tactical decisions that helped me avoid unnecessary deaths, manage my gear more efficiently, and understand what is happening during a raid.
PvE & PvP Guide 100%
I am not trying to turn this into a list of exact balance values. Active Matter continues to change between patches, so I focus instead on the mechanics and tactical ideas that remain useful even when individual stats are adjusted.
Controls and Keybinds
Everyone has different control preferences, but I found that several default bindings can slow me down during combat. Since a few seconds can decide a fight, I prefer to move important actions to keys that I can reach without taking my fingers away from movement controls.
- Action Wheel: I move it away from the default K key. I prefer either ~ or a combination such as Alt + a side mouse button.
- Tactical controls: If my mouse has extra buttons, I use combinations with Alt for frequently used actions such as activating a tactical flashlight or laser, changing the weapon’s fire mode, and drawing a knife or axe.
- Free look: I bind free look to C. It allows me to look around while continuing to move toward my current position.
There are many control options in Active Matter, and setting them up can feel overwhelming at first. I still find it worthwhile because the game also provides control search and a configuration file, and a comfortable setup becomes much more valuable once combat starts.
Base, Stash and Economy
The base can feel crowded when I first start playing, but after getting used to its layout I can prepare for a raid very quickly. A few inventory shortcuts also make stash management much easier.
Stash and Inventory Shortcuts
- Shift + Click: I use this to quickly move an item or an entire stack between my inventory and stash without dragging it manually.
- Alt + Drag: I use this to split a stack of ammunition, medicine, or other supplies in half.
- Restock Ammo and Repair: Before leaving the base, I use the small restock and repair buttons in the stash interface so my magazines are filled and my equipment is repaired.
Stash Space and Investigations
Stash space becomes limited quickly, so I treat storage expansion as an early priority.
- Expand storage early: I prioritize tasks and investigations that reward additional stash slots. Otherwise, stored loot can begin preventing me from comfortably managing new items.
- Matter-infused items: I do not keep these sitting in storage. I send them to the Replicator for processing so I can use the resulting resources for crafting.
- Green and blue activities: I try to unlock access to these early because they provide a steady source of tokens.
- Legacy of the Fallen: I make use of this daily activity because it lets me convert three regular tokens into 1,000 Monolith tokens once per day.
Monolith and Wipes
Active Matter does not force me into a complete progression wipe every three months. Progression instead includes the voluntary Self-Sacrifice prestige reset. After reaching the Monolith limit, I can decide when to reset my accumulated progress in exchange for permanent status benefits and unique Replicator branches while keeping the blueprints I have already unlocked.
Free Loadout vs. My Own Gear
Free Loadout
The Agency lets me enter a raid with a free loadout even when I do not want to risk my own equipment. I mainly use it for three purposes:
- Exploring an unfamiliar area.
- Collecting basic crafting materials.
- Learning map routes without risking my own gear.
There is one important catch. Loot extracted with a Free Loadout goes into the Temporary Stash. If I start another raid before moving those items into my main storage, I lose them.
Free weapons also come without suppressors, and the provided armor offers limited protection. Because of that, I use these runs mainly to gather resources and learn the map rather than deliberately looking for PvP fights.
My First Reliable Combat Loadout
When I am ready to bring my own equipment, one practical starting setup is an AK-103 with a suppressor, a stable grip, a comfortable stock, and an OKP-7 sight, combined with either a Beast or Alfa shell using L-class armor plates.
This does not make me heavily armored, but it gives me much more protection and combat capability than a basic Free Loadout.
Check the Weather Before a Raid
- Night and fog: Long-range optics become less useful, so I prefer the OKP-7 and a flashlight. I still use the light carefully because its beam can reveal my position through trees and windows from a considerable distance.
- Anomalous storm: Thunder can cover the sound of footsteps and suppressed shots, giving me an opportunity to approach from another direction or use a melee weapon.
- Spatial disturbance: I keep metal bolts in my quick-access slots and throw them ahead of me to interact with dangerous anomalies before moving forward.
Pulse, Arm Fatigue and Injuries
In Active Matter, my weapon accuracy is closely connected to the physical condition of my character. Movement, fatigue, and injuries can all affect how well I can fight.
How Pulse Affects Accuracy
Instead of a traditional stamina bar, I pay attention to my pulse. Sprinting, jumping, and climbing make my heart rate rise.
- The higher my pulse becomes, the more unstable my aim becomes.
- I cannot expect to finish a sprint and immediately make a precise long-range shot.
- Before taking an accurate shot, I stop for two or three seconds and crouch or go prone so my breathing and pulse can settle.
Arm Fatigue
Weapons have weight, and keeping one raised for too long tires my character’s arms.
- If I hold a sector in ADS for more than about five seconds, my arms begin to tire, the weapon becomes less stable, and recoil becomes harder to control.
- Instead of staying in ADS continuously, I track the target with the weapon lowered and use the laser when available. I aim down sights when the target actually appears.
Injuries and Healing
- Arm injuries: Damaged arms make aiming more difficult and increase reload time.
- Leg injuries: Damaged legs reduce my movement speed and can prevent me from jumping. Dropping from the second floor while carrying a heavy backpack can also break my bones.
- Healing: Treatment takes time and occupies my hands, so I cannot instantly heal while moving. Before an assault, I sometimes apply healing gel in advance so it can gradually deal with lighter injuries during the fight.
Shells and Armor Plates
A shell is more than a cosmetic outfit. It affects inventory capacity, movement characteristics, and the locations where I can install armor plates.
The most important thing I keep in mind is that armor protection is location-based. Armor plates come in XL, L, and S sizes, and each plate only protects the body area where it is installed. If I place an L plate over my chest but leave the arm slots empty, my arms remain exposed.
Active Matter Shell Types
- Beast: I see this as a practical option for solo raids. It is inexpensive and provides solid torso protection, making it useful when I do not want to risk more valuable equipment.
- Alfa: This is a lighter and faster assault-oriented shell. It improves mobility while still providing useful protection.
- Ghost: I use its strengths for sniping and careful reconnaissance. It reduces movement noise and helps with arm fatigue while aiming for longer periods.
- Knight: This is the heavy protection option. It covers the limbs more effectively and helps against nearby grenade explosions, but I give up movement and jumping performance. It suits tight bunkers and corridors well.
- Viper: I prefer this shell for longer raids because of its storage capacity, recoil handling, and reduced weapon fatigue.
- Rhino: This heavy shell uses a large XL plate and works well when I am carrying a machine gun or extracting with a heavy load because additional weight has less effect on my pulse.
Weapons, Calibers and Shooting
How Calibers and Armor Work
Active Matter does not give me several armor-piercing, incendiary, or explosive versions of ammunition for the same caliber. Each caliber uses a unified ammunition type. Whether I can defeat an opponent’s armor depends on the caliber, the distance, and the condition of the armor plate.
- Pistol calibers such as 9×18, 9×19 and .45 ACP: These perform poorly against heavy L and XL plates. If I am using a submachine gun against a heavily armored opponent, I avoid shooting the protected chest and instead target exposed arms or legs.
- Intermediate calibers such as 5.45×39 and 7.62×39: I treat these as the middle ground. They handle light S plates effectively and can break heavier L plates with several accurate hits.
- Rifle calibers such as 7.62x54R, 7.62×51 and 12.7×55: These can penetrate very heavy protection and cause serious damage behind the armor.
- Subsonic weapons such as the VSS Vintorez, ASH-12 and Vykhlop: These are extremely quiet, but their projectiles have a much more pronounced drop. At longer ranges, I compensate vertically and adjust the sight for distance.
Special Weapons
- Melee weapons: These let me attack without creating gunfire noise. With a careful approach from behind, I can kill several unaware mutants without firing a shot.
- Flamethrower: I find it especially effective in enclosed spaces because the flames ignore armor plates and damage health directly. It is also highly effective against dendroids and flower creatures that can absorb a large amount of normal gunfire.
- Crossbow: It is quiet, but I find standard bolts unreliable enough in normal combat that I leave it for later rather than depending on it early.
Tactics, Sound and Terrain
Good positioning and understanding what is happening around me often decide a fight before I fire the first shot.
- I think before I shoot: I have lost fights simply because I opened fire as soon as I saw someone even when my position gave me no advantage. Sometimes waiting and allowing an enemy to move closer is safer than immediately revealing where I am.
- I use headphones: Sound is one of my main sources of information. I want to hear which side of a wall a sound came from, which floor someone is moving across, and where an opponent is heading.
- I disable virtual 5.1 and 7.1 processing: I rely on the game’s own audio system instead of additional virtual surround effects.
- I listen to the environment: If a creature reacts in the distance or a seed mine activates, I treat it as a sign that another player may have moved through that area.
- I use seed fields as alarms: Instead of charging through them and making noise myself, I sometimes position a seed field behind or beside me. If another player tries to approach from that direction, the seeds can reveal the movement.
Using Map Markers
I try to place markers immediately whenever I receive useful information.
- Fallen: I use this for a body that I have not safely checked or looted yet.
- Contact: I use this for a living enemy I have directly seen.
- Noise: I use this to mark the direction of gunfire, suspicious footsteps, or triggered traps.
- Numbers: I can use numbered markers to help predict an opponent’s movement based on hacks, sounds, or previously known positions.
When I play with a regular group, we can develop our own communication system. The basic rule stays the same: I want important information communicated both by voice and through map markers.
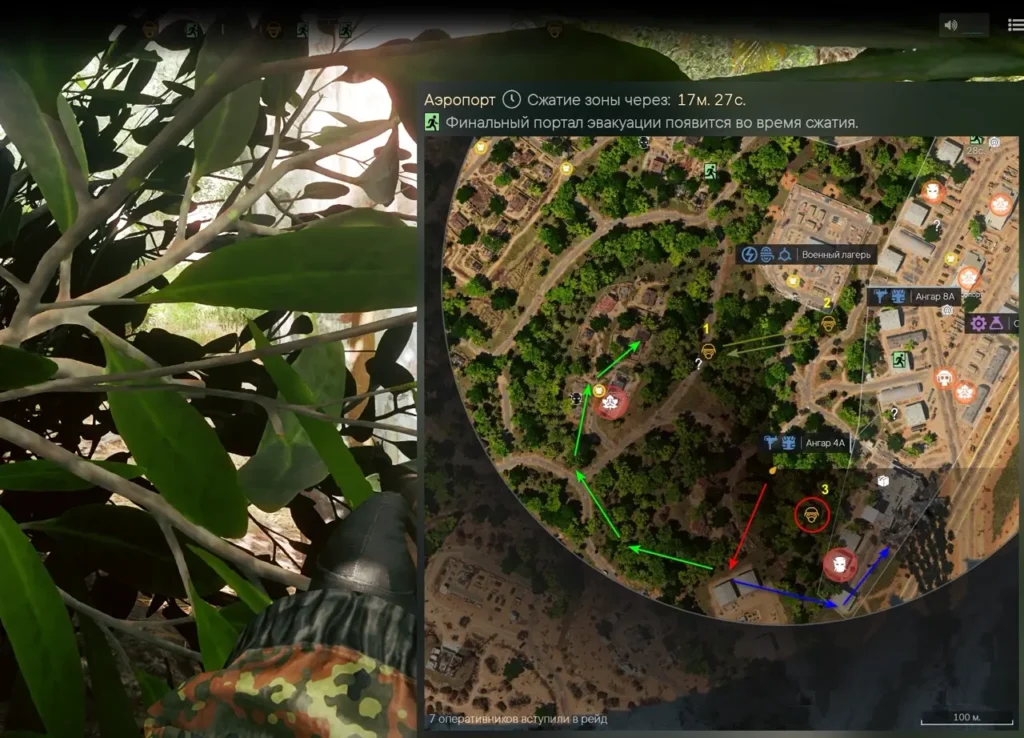
Example of a Tactical Decision
One situation from the guide shows how quickly new information can change my plan.
- A slow firefight starts about 150 meters north between positions 1 and 2. I mark it on the map and stay hidden instead of immediately joining the fight.
- I then hear another operator running close to my right before stopping in a bush at position 3. I mark that position as well. I am now between several possible threats, so my original plan changes.
- Instead of forcing the fight, I can pull back and flank either west through the area I previously crossed or east so that position 3 may become exposed to fire from more than one direction.
Neither I nor another player will always make the most logical choice, but people usually try to reduce their own risk while improving their position. Learning to anticipate what another player may do is one of the most important parts of winning fights.
Death, Mindvault Hacking and Beacons
How Mindvault Hacking Actually Works
One misunderstanding I often see is the idea that hacking a dead player’s Mindvault sends that player back to the menu and prevents teammates from reviving them. That is not how it works. Hacking the body does not prevent revival.
The purpose of hacking is to extract the accumulated matter and take the token. The process is also noisy and sends a visible signal to nearby players’ maps.
If I down one member of an enemy three-player group, I do not stop in the middle of the firefight to hack the body. Instead, I can quickly open the player’s inventory, take the primary weapon, and throw it far away into vegetation, mud, or water. If the player’s teammates revive them, they return without their main weapon.
Respawn Beacons
- I pick my beacon back up: If I place one in a safe area and later continue deeper into the map, I return it to my inventory. Otherwise, dying later can send me back to an old position far away from my equipment.
- If I never place a beacon: I respawn back at the original raid entry point.
- Enhanced Beacons: These allow me to respawn at the location in Agency equipment, giving me a chance to rejoin the fight and recover my backpack.
Safe Container
When I am close to death, I can disable the automatic protection of the items inside my Safe Container. I may choose to do this when I am playing with trusted teammates because, if they win the fight and revive me, the items remain with me. The risk is that if the entire team dies, the unprotected contents can be taken by the enemy.
Robo-Dog
Shortly before release, the Agency updated the robo-dogs so they can independently run to extraction while carrying their payload.
Chronogens
Chronogens are natural modifiers obtained from the remains of anomalous creatures. I can equip up to four of these modifiers at the same time.
- Tier 1 and Tier 2 Chronogens: These provide permanent useful effects. Examples include reducing the sound of running or increasing the speed of magazine loading and healing actions.
- Tier 3 Chronogens: These provide much stronger combat effects, including effects such as recovering damaged arms and legs, but they only have 10 charges. Each death during a raid permanently consumes one charge.
I cannot restore those charges through normal repair. They can only be replenished by combining matching Chronogens at the laboratory table, so I prefer to save Tier 3 effects for important raids with my group.
PvE vs. PvP and Team Communication
I do not treat PvE raids as wasted time. Active Matter can be played through solo exploration and slower loot runs, and I prefer to move into heavier PvP once I understand the map routes, know my escape options, and feel comfortable with my weapon.
Team Communication
When I play in a duo or trio, clear communication is often more important than simply shooting well. I keep callouts short and include the direction, distance, and a recognizable landmark.
“Contact at 90. About 100 meters, near the garage behind the blue car. I can shoot.”
“Wait. Stay quiet. I’ll move left through the house and get an angle.”
“Copy. I’m holding.”
“In position. Shoot first and I’ll follow with a grenade.”
I avoid filling voice chat with unnecessary information. A precise direction, distance, and landmark is usually enough. A coordinated three-player team that gives each other useful information can be extremely effective.
If I enter a raid alone with a random teammate or meet an unfamiliar player, I also keep voice communication in mind. Sometimes both sides prefer to communicate and move away from each other rather than risk losing their equipment.