This walkthrough covers The Mermaid Mask Prologue and Chapter One, beginning at the Stonetop Inn and continuing until the investigation reaches the start of Chapter Two. It follows an efficient room order, identifies the important clues and conversations, includes optional achievement steps, and gives the exact puzzle answers when they are needed.
This is a direct walkthrough rather than a spoiler-free puzzle guide. Puzzle solutions are shown in full, using the completed solution images from our main The Mermaid Mask puzzle guide.
The Mermaid Mask Walkthrough
- Prologue Walkthrough
- Chapter One Walkthrough
- Child’s Room and First Interviews
- Control Room and Sinthia
- Symmetry and Sinthia’s Bunk Room
- Dream Chamber and Zephyr
- Dirk and Wirman’s Bunk Room
- Engine Room and Gripp
- Cargo Hold and Mariana
- Return to the Illusion Theatre
- Airlock Grotto and Tadpole
- Bilge Power Puzzle
- Captain’s Cabin and Captain’s Quarters
Prologue Walkthrough
Stonetop Inn
The game begins at the Stonetop Inn with Sally asleep nearby. Before leaving, inspect the fantasy novel beside her, the bar stools, and the red Case File resting on the bar.
The novel is Hex of the Helmsmen. The Case File explains why Sally and Detective Grimoire were hired: Captain Magnus Mortuga was discovered dead inside a room that appeared to have been locked from within. Captain Sinthia Seafoam, the submarine’s second captain, recorded the known details and requested the investigation.
Close the Case File, interact with Sally to wake her, and use the map button in the lower-left corner. Select the question-mark location to travel to the Town Square.
Town Square
Inspect the signs and other objects around the abandoned square, then speak to Sally. When you are ready to continue, interact with the far end of the dock and wait for the strange green light to appear in the water. Select the light again to reveal the Mortuga Submarine.
Optional achievement — Silversnake Sleuth: Examine the statue in the Town Square. This is one of four objects required for the achievement; the others are the Mess Hall serpent statue, the Newspaper Page, and the Family Photo.
After checking the square, select the submarine to move to its Fore Deck.
Submarine Fore Deck
Inspect the wooden buoy, the rowboat, the yellow writing, and the open entrance. The carved eyes on the buoy emit light, making it resemble a warning beacon that attracts ships instead of directing them away.
Enter through the open doorway and descend into the submarine. Grimoire hears an unsettling noise during the descent, although Sally does not appear to notice it.
Submarine Parlor
Sally finds a lever and illuminates the dark room with pink fire. Inspect the HER Painting above the fireplace and the blocked Control Room door. Looking through the window reveals a note instructing the detectives to stay away from the Control Room and the murder floor.
The Control Room cannot be entered yet. Open the map and travel one floor down to the Mess Hall.
Mess Hall and Snake Cabinet Puzzle
Inspect the scattered cards, cooking equipment, lamps, candles, and the snake-shaped cabinet on the left. Select the cabinet and choose to look closer to begin the first puzzle.
Optional achievement — Silversnake Sleuth: Examine the serpent statue in the Mess Hall before finishing the cabinet puzzle.
Mess Hall Snake Cabinet Solution
Each numbered window must contain a shape or combination of shapes with the same total number of sides. A triangle has 3 sides, a square has 4, and a pentagon has 5.
| Window | Correct Shape or Shapes |
|---|---|
| 3 | Triangle |
| 9 | Square + Pentagon |
| 7 | Square + Triangle |
| 4 | Square |
Rotate the four dials until every window matches the table, then press the lock button in the upper-right corner.
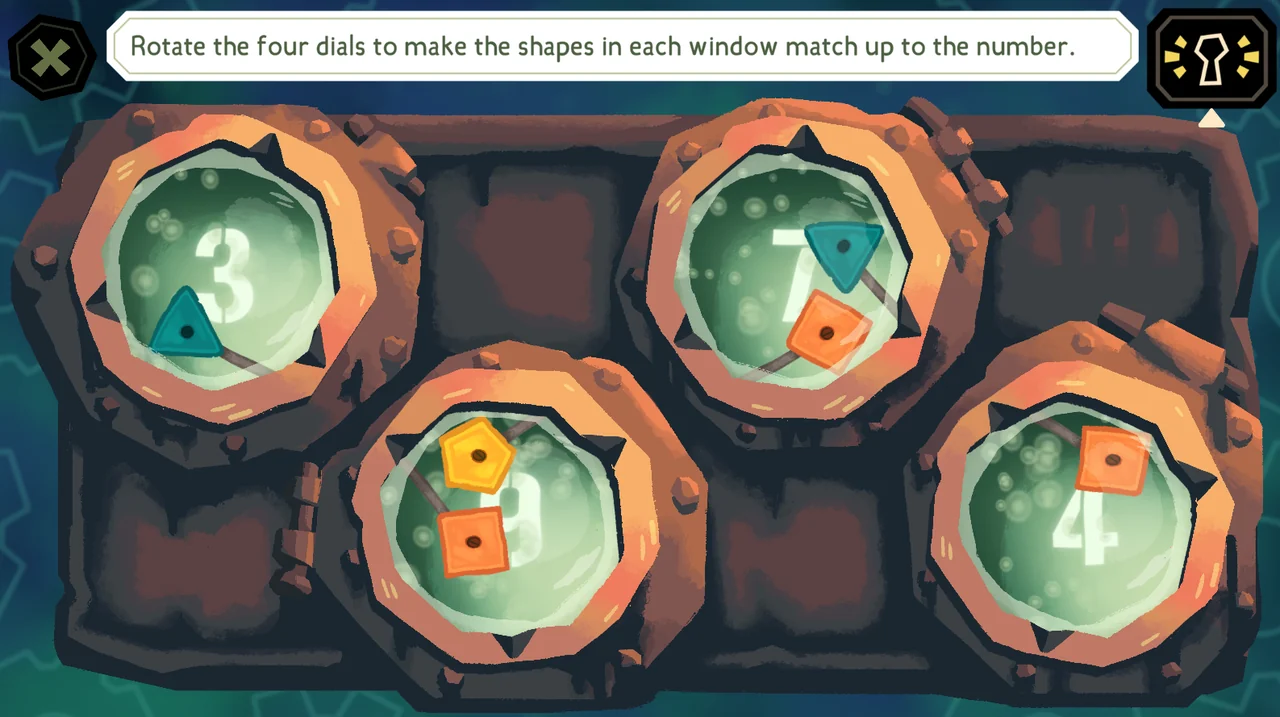
The cabinet opens and adds the Sun Tablets to your clues. Open the map and travel to the Illusion Theatre on the murder floor.
Illusion Theatre Crime Scene
The Illusion Theatre contains the cauldron where Mortuga was found. Examine the upside-down poster, the wall panel, the broken stool, the Moon-marked vial, the blood, the banner, the tapestry, the cauldron, and the chalk body outline.
When inspecting the broken stool, connect it to the Stonetop Inn. The same style of stool appears in both locations. Inspect the cauldron closely and note the deep scratches inside it.
It is best to select the body outline after examining the other objects because it begins the first deduction.
Cauldron Deduction Solution
Complete the deduction with the following sentence:
Magnus Mortuga unlocked the cauldron and was killed by what was inside.
During the follow-up inspection, rotate the cauldron and select the scratches when the game asks what stands out inside it.
Achievement — The Curse in the Cauldron: Completing the deduction and identifying the scratches finishes the Prologue and begins Chapter One.
The Mermaid Mask Chapter One Walkthrough
Chapter One opens most of the submarine. Several rooms can be visited in different orders, but the route below minimizes backtracking and places each puzzle near the conversations that unlock it.
Child’s Room and First Interviews
Explore the Child’s Room
Travel to the Child’s Room beside the Illusion Theatre. Examine the Newspaper Page, the portrait of the girl, and the Wooden Chest in the lower-left area.
Optional achievement — Silversnake Sleuth: Inspect the Newspaper Page. Together with the Town Square statue, Mess Hall serpent statue, and Family Photo, this completes the required set of observations.
Wooden Chest Puzzle Solution
- Arrange the six cards into three vertical girl-and-doll pairs.
- Place one warping eye lens over the left girl so she looks toward the middle.
- Place the second warping eye lens over the right girl so she also looks toward the middle.
- Place the small lens over the left girl’s doll.
- Place the large lens over the right girl’s doll.
- Leave the middle girl and her doll without lenses, then press the lock button.
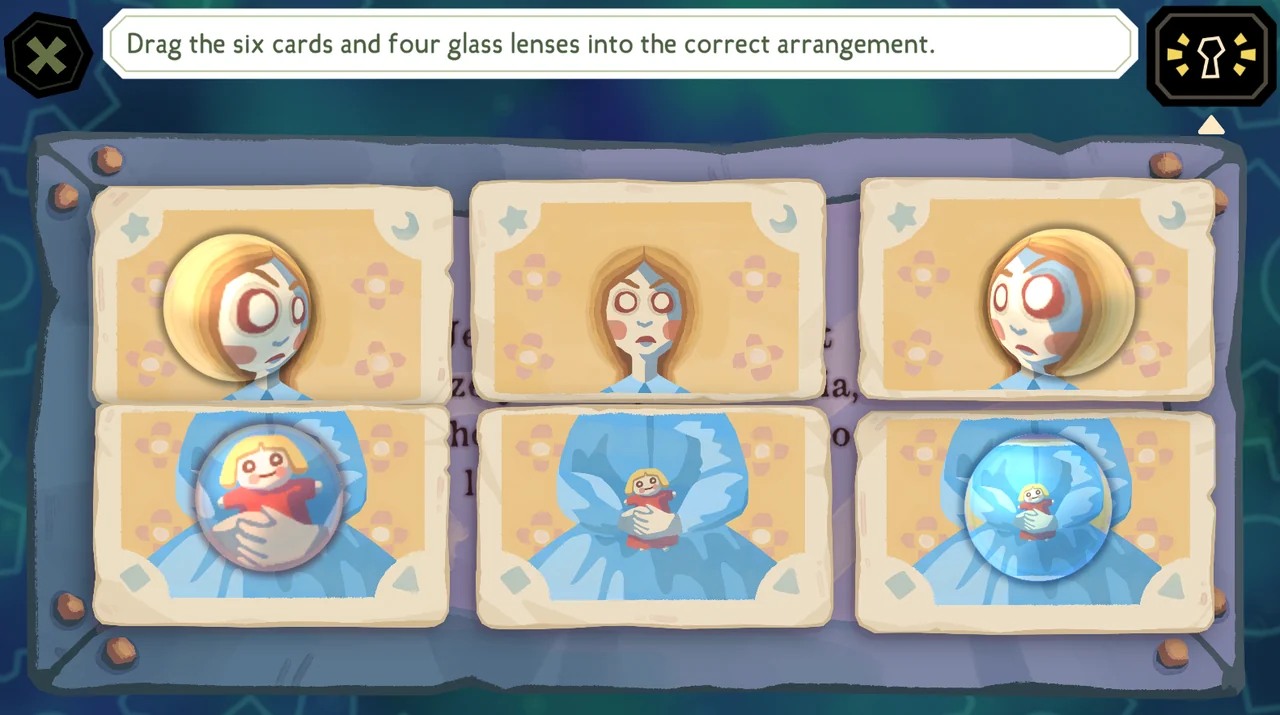
Collect the Glass Eyeball from the opened chest.
Unlock the Control Room
Return to the Parlor. A face now appears behind the Control Room window and instructs you to speak with Symmetry. Go back to the Child’s Room and select the girl standing inside the frame.
For a thorough investigation, ask Symmetry about the following available topics:
| Category | Topics |
|---|---|
| Basics | Yourself, the Mortuga Submarine, Night of the Murder |
| Suspects | Symmetry, Magnus Mortuga |
| Clues | HER Painting, Illusion Poster, Newspaper Page, Sail Cloth, Glass Eyeball, Stone Cauldron, Moon Vial, Wooden Buoy |
Some symbolic questions allow more than one valid interpretation. For The Unblinking Eye, Fear, Obsession, or Resolve can be selected. For The Turning Wheel, choose A Change of Fate, Meeting Your Destiny, or Taking Control.
Return to the Parlor and speak through the Control Room window again. After confirming that you met Symmetry, the door opens.
Control Room and Sinthia
Explore the Control Room
Before questioning Sinthia, inspect the Submarine Blueprint, Ship’s Wheel, Captain’s Jacket, and Command Contract. Then examine the main control panel to the right of the helm.
Optional achievement — Lever Lover: Pull both the red and yellow levers on the Control Room panel.
Control Room Electrical Switchboard Solution
Select the wire puzzle in the lower-right area of the panel. Insert the matching colored plug pairs into these numbered sockets:
| Plug Pair | Correct Sockets |
|---|---|
| Red Triangle | 1 and 12 |
| Yellow Circle | 4 and 6 |
| Blue Square | 7 and 11 |
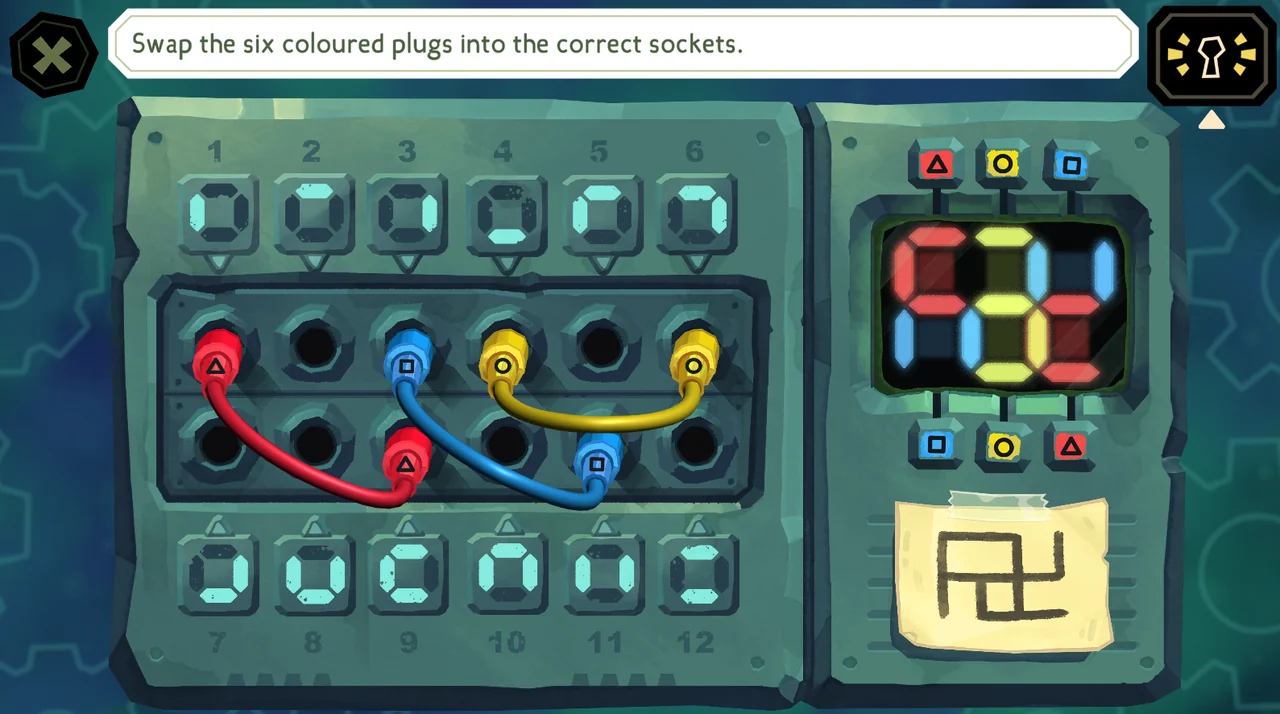
The completed display opens a compartment containing the Captain’s Logbook.
Question Sinthia
Speak to Sinthia and cover the following available topics:
| Category | Topics |
|---|---|
| Basics | Yourself, the Mortuga Submarine, Night of the Murder |
| Suspects | Magnus Mortuga, Symmetry, Sinthia |
| Clues | Command Contract, Captain’s Jacket, Captain’s Logbook, Ship’s Wheel, Glass Eyeball, Stone Cauldron, HER Painting, Wooden Buoy, Case File |
Optional achievement — Tangle Tower: Ask Sinthia about the Case File.
Sinthia directs you back to Symmetry to discuss the Golden Locket. Return to the Child’s Room, ask Symmetry about it, inspect the locket, and press Open.
Optional achievement — A Witch of Some Infamy: Open the Golden Locket during this inspection.
After the first interviews with both sisters, their shared Bunk Room becomes available on the left side of the middle map row.
Symmetry and Sinthia’s Bunk Room
Inspect the Movie Magazine, Family Photo, and Pig Safe.
Optional achievement — Break Time: Read every page of the Movie Magazine.
Optional achievement — Silversnake Sleuth: Examine the Family Photo above Sinthia’s bunk. If you also inspected the Town Square statue, Mess Hall statue, and Newspaper Page, this completes the achievement requirements.
Pig Safe Puzzle Solution
From the puzzle’s starting positions, use the following inputs:
- Click the hat three times.
- Click the left eye twice.
- Leave the right eye unchanged.
- Click the left cheek once.
- Leave the right cheek unchanged.
- Click the nose twice.
- Click the tongue once.
The finished front view has the hat pointing right, the left eye pointing right, the right eye facing forward, the nose pointing down, the left cheek illuminated, and the tongue extended. Rotate the pig and verify that every white row and column total matches the corresponding red value.
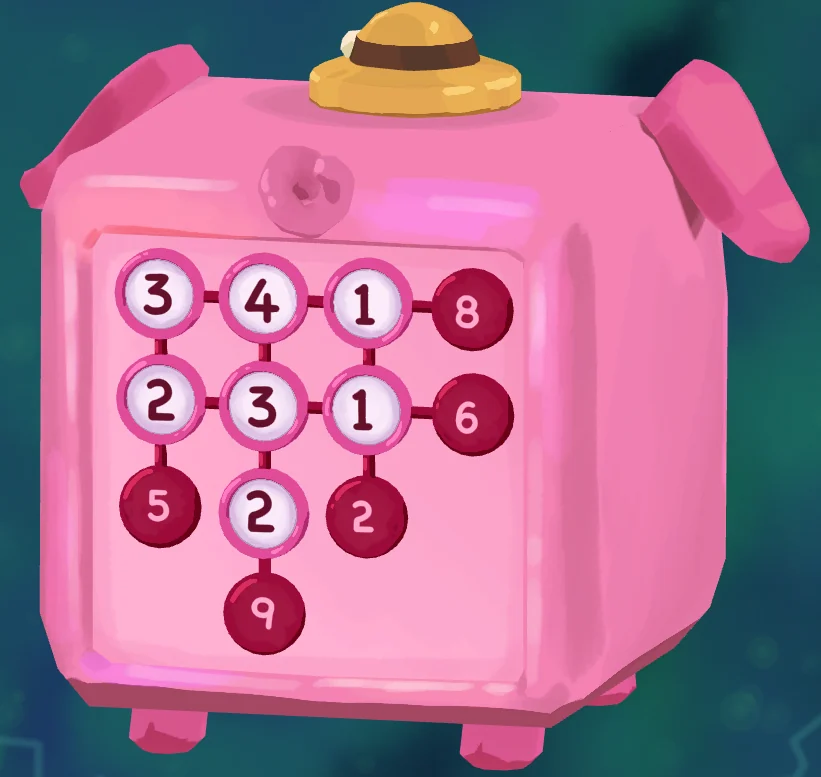

Collect the Underwater Photo from the opened safe.
Follow Up with Symmetry and Sinthia
Ask Sinthia about the Family Photo, Underwater Photo, and Golden Locket. When she asks whether you opened the locket, either response can be selected.
Ask Symmetry about the Underwater Photo and Sinthia. For The Leaden Crow, choose Taking Responsibility, A Poisoned Chalice, or A Heavy Burden.
After the follow-up conversation, inspect the sisters’ room again and look beneath Sinthia’s mattress to collect the Inn Deeds.
Dream Chamber and Zephyr
Travel to the Dream Chamber and inspect the Hex Bottle, Dream Helmet, and Fog Ball before speaking with Zephyr.
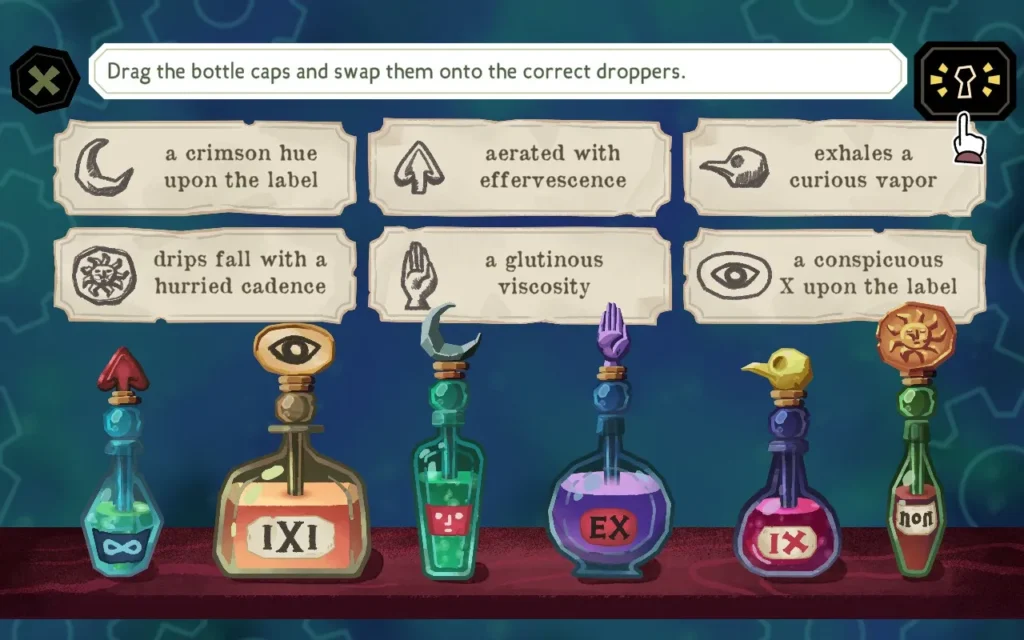
Dream Chamber Perfume Shelf Solution
Look closer at the bottles behind the glass panel on the lower-right shelves. Match the bottle pieces to the written descriptions and arrange them from left to right in this order:
- Arrow
- Bird Skull
- Moon
- Hand
- Eye
- Sun
The six positions correspond to the liquids described as effervescent, marked with an X, marked with crimson, highly viscous, releasing vapor, and dripping rapidly.
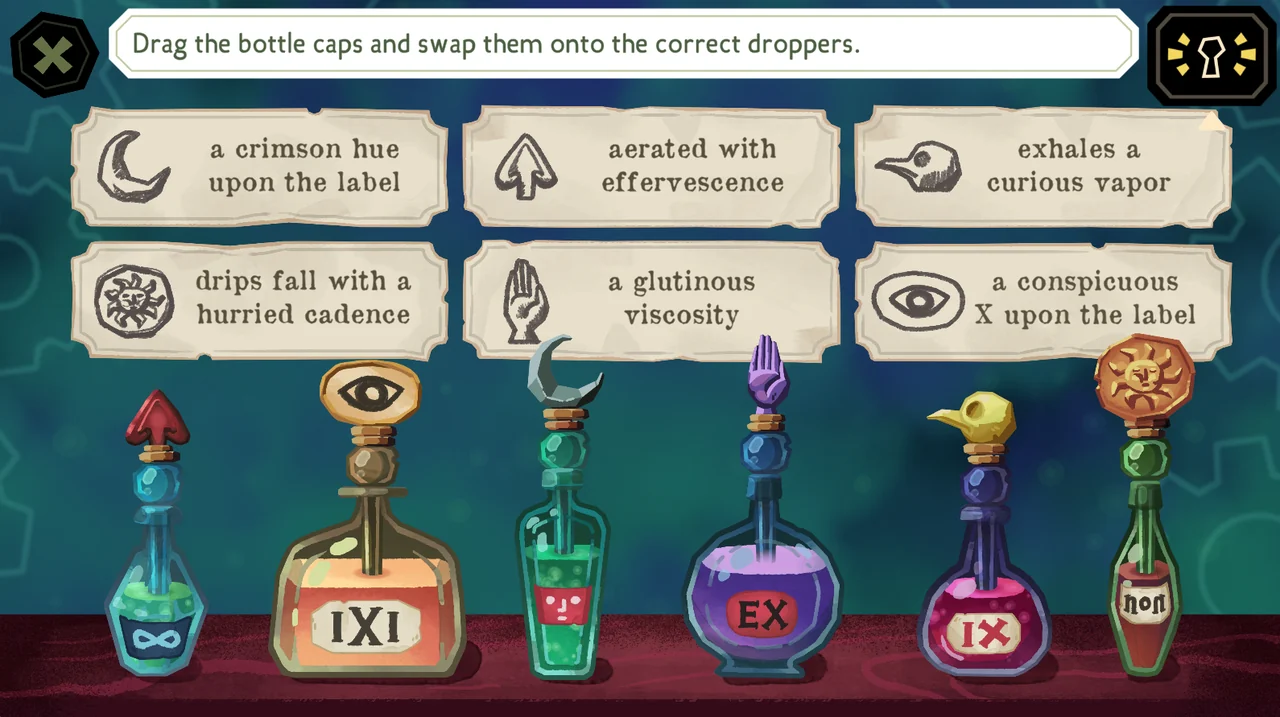
After opening the panel, inspect the bookshelf directly above it to collect the Caretaker’s Journal.
Optional achievement — Who’s There…?: Select the dark gap between the books after completing the perfume puzzle.
Question Zephyr
Ask Zephyr about the available basic topics, every suspect currently listed, and the following clues: HER Painting, Underwater Photo, Stone Cauldron, Moon Vial, Wooden Buoy, Newspaper Page, Glass Eyeball, Sail Cloth, Caretaker’s Journal, Hex Bottle, Dream Helmet, and Fog Ball.
When the interview is complete, travel to Dirk and Wirman’s Bunk Room.
Dirk and Wirman’s Bunk Room
Inspect the Action Figure and the Cellphone hidden in the tuxedo. Also inspect the Typewriter in front of Wirman; it contains a separate puzzle and clue reward.
Dirk’s Cellphone Puzzle Solution
The symbol pieces work like a crossword: each placement contributes to one horizontal shape and one vertical shape. Build the sequences as follows.
| Sequence | Pieces in Order |
|---|---|
| A Across | <, backward L turned on its side, V, >, straight line |
| B Down | Backward L, /, < |
| C Down | U, ^, V |
| D Down | Upside-down U, L turned on its side, straight line |
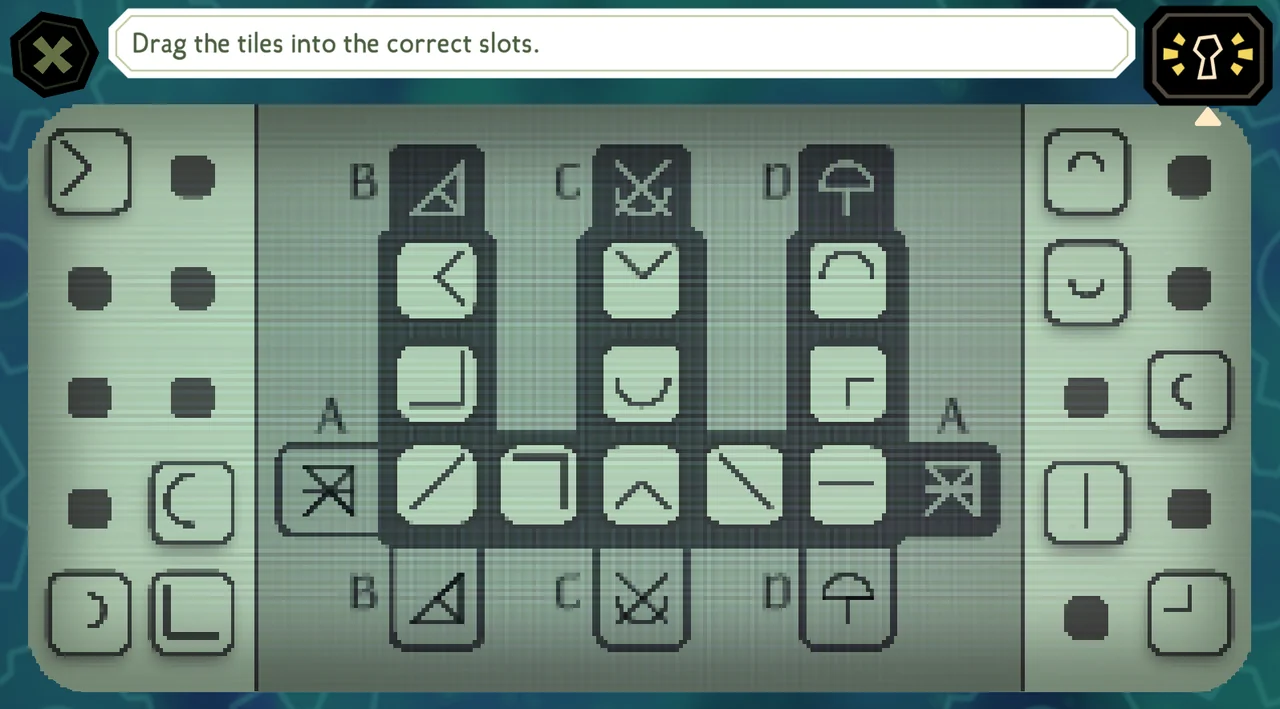
The phone unlocks after the completed arrangement.
Optional achievement — Prying Eyes: Select Use on the unlocked phone and inspect every available message, contact, call entry, and screen.
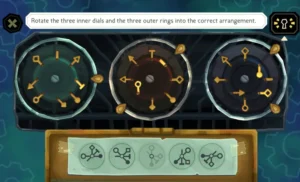
Wirman’s Typewriter Puzzle Solution
Rotate the symbols and the outer notches on all three dials. The final combined pattern must place the symbols in these positions:
- Open circle at 12 o’clock
- Diamond at 3 o’clock
- T symbol at 5 o’clock
- Closed circle at 6 o’clock
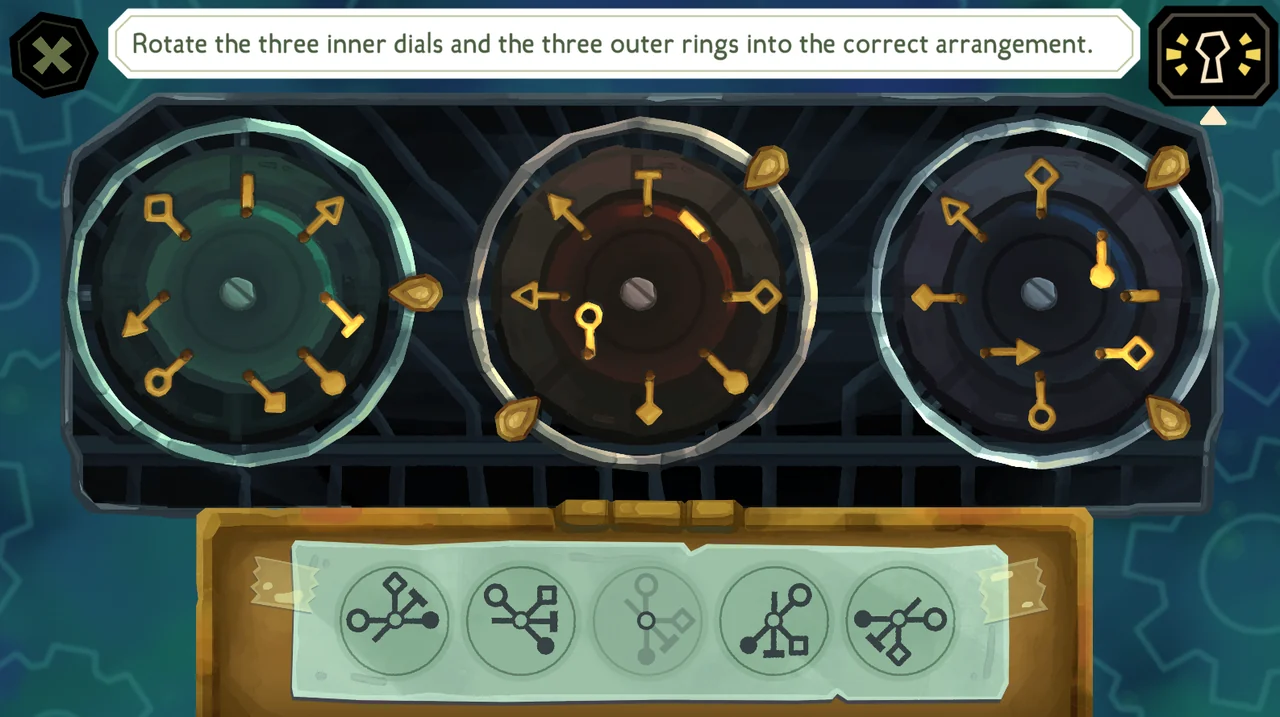
Solving the Typewriter reveals the Handwritten Letter.
Question Dirk and Wirman
Ask Dirk about the basic topics, all currently available suspects, and the Cellphone, Action Figure, Underwater Photo, Sun Tablets, HER Painting, Movie Magazine, Hex of the Helmsmen, and Stone Cauldron.
Ask Wirman about the basic topics, all currently available suspects, and the Action Figure, Underwater Photo, HER Painting, Movie Magazine, Hex of the Helmsmen, Stone Cauldron, Newspaper Page, Illusion Poster, and Handwritten Letter.
When the interviews are complete, travel to the Engine Room.
Engine Room and Gripp
Inspect the Broken Compass and the Compass Panel before speaking with Gripp.
Engine Room Compass Puzzle Solution
| Position | Compass | Behavior |
|---|---|---|
| Top left | Yellow | Points away from the others |
| Bottom left | Purple | Refuses to behave normally |
| Top right | Pink | Acts like a clock |
| Bottom right | Red | Points toward the others |
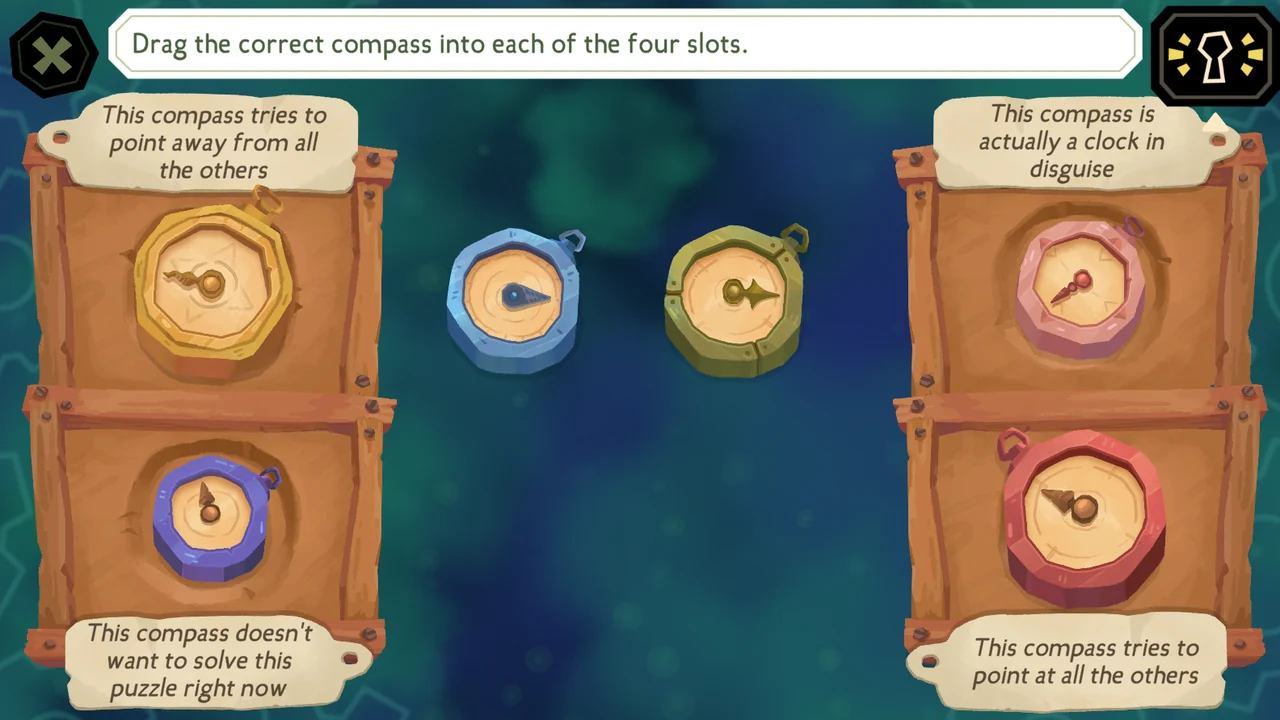
Open the crate beneath the completed panel and collect the Ocean Map.
Question Gripp
Gripp initially keeps returning to his shop. Select any item or leave the shop three times, after which the normal questioning options become available.
Ask him about the basic topics, all suspects currently listed, and the Ocean Map, Broken Compass, Underwater Photo, HER Painting, Golden Locket, Ship’s Wheel, Stone Cauldron, Dream Helmet, and Inn Deeds.
Continue to the Cargo Hold after the interview.
Cargo Hold and Mariana
Inspect the Silkwirm Map, the Pin Board, and Mariana’s tent. The board cannot be completed until you have spoken with Mariana.
Question Mariana
Ask Mariana about the basic topics, all suspects currently listed, and the Silkwirm Map, Ocean Map, Caretaker’s Journal, Inn Deeds, Underwater Photo, HER Painting, Newspaper Page, Hex Bottle, Moon Dial, and Sun Tablets.
Cargo Hold Pin Board Puzzle Solution
After the first conversation with Mariana, return to the board. Place every living character in the room where they are currently located. Sally and Grimoire should be placed with Mariana in the Cargo Hold.
Magnus Mortuga belongs outside the submarine map. Copy the remaining portrait positions from the completed layout.
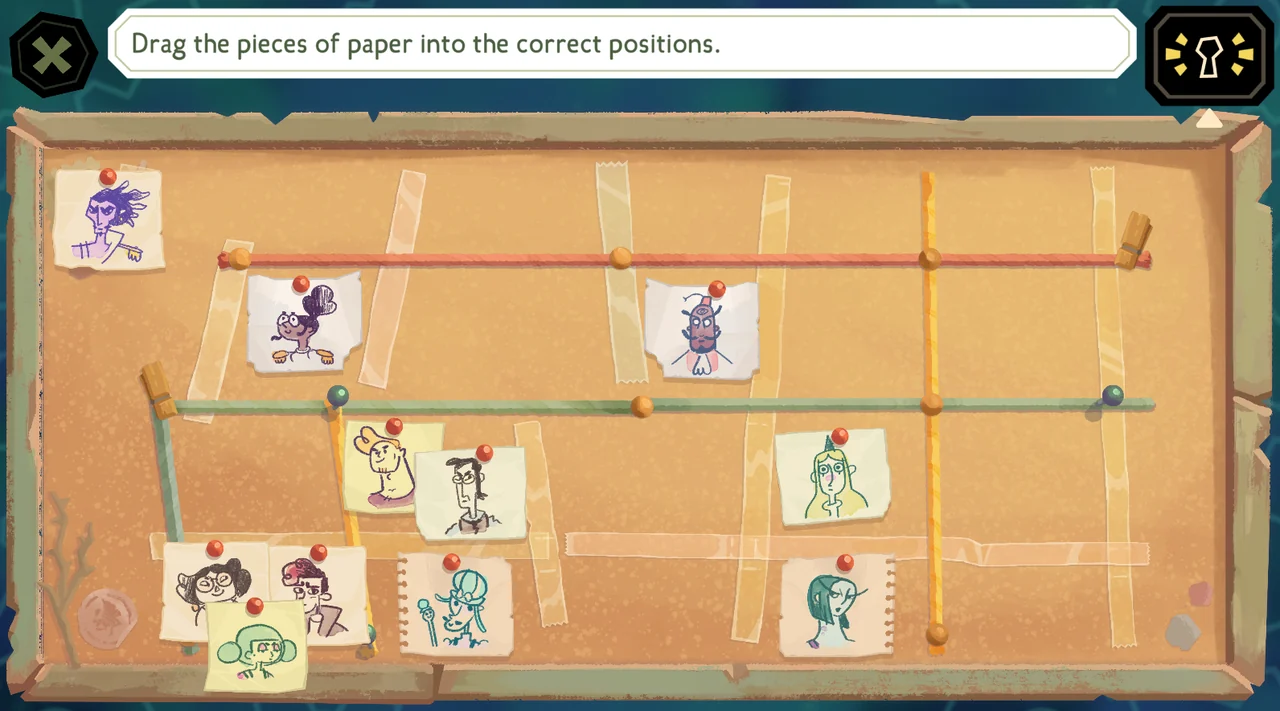
The completed board awards the Moon Photo.
After Mariana’s first interview, the investigation directs you back to the Illusion Theatre because Symmetry appears to be hiding something.
Return to the Illusion Theatre
Select the wooden panel on the wall to the left of the Stone Cauldron. If the panel is not yet active, ask Wirman about the Illusion Poster and return afterward.
Illusion Theatre Wooden Panel Solution
Arrange the card suits by row and orient each column according to the indicator above it:
| Column | Required Orientation |
|---|---|
| 1 | Heart, diamond, clover, and spade facing up |
| 2 | The upper halves of all four suits mirrored |
| 3 | The lower halves of all four suits mirrored |
| 4 | All four suits facing left |
| 5 | All four suits facing right |
| 6 | All four suits upside down |
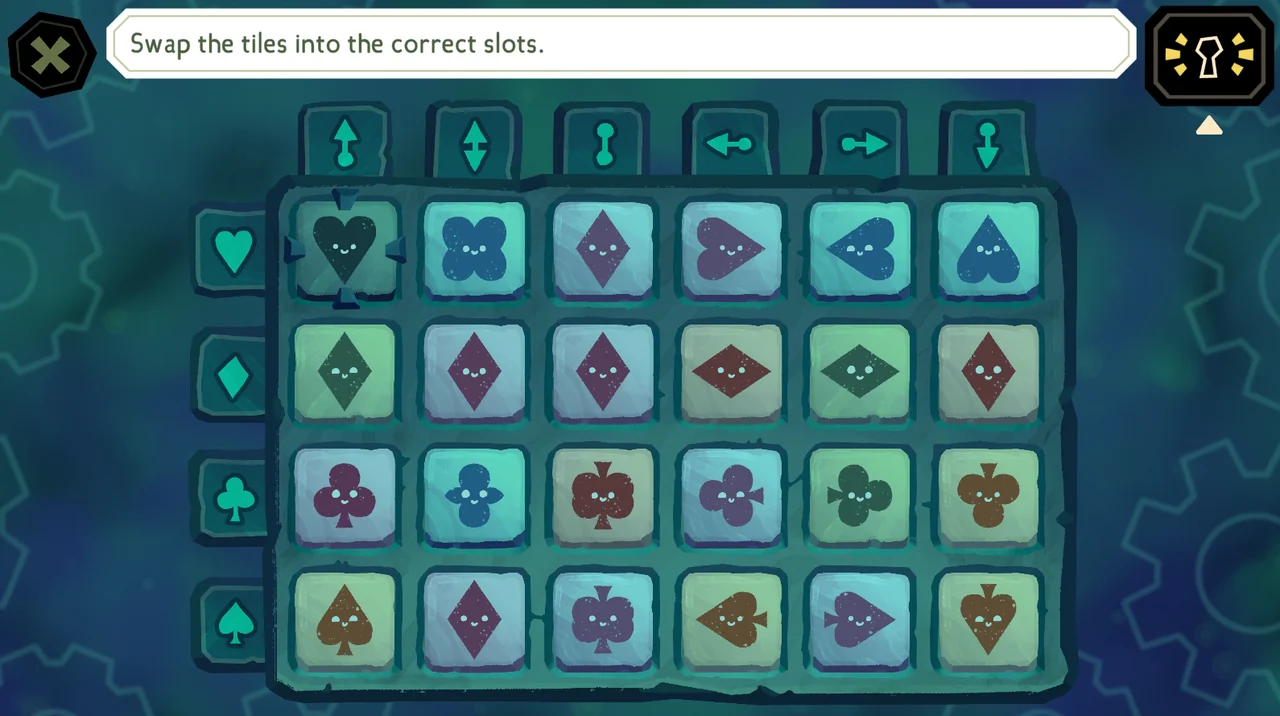
The panel opens and reveals the Lifesize Doll. Lift the doll’s locket during its inspection to collect the Film Projector. Select Use on the projector to watch the available film.
Return to Symmetry in the Child’s Room and ask her about the Film Projector and Lifesize Doll. Then travel to the Airlock Grotto.
Airlock Grotto and Tadpole
Inspect the Message in a Bottle, Treasure Chest, and Diving Helmet before speaking with Tadpole.
Diving Helmet Puzzle Solution
Rotate the helmet and adjust every dial until the symbols match at each connection point. Starting with the innermost dial and working outward makes the sequence easier to manage.
The following three images show the complete correct alignment from each required view:
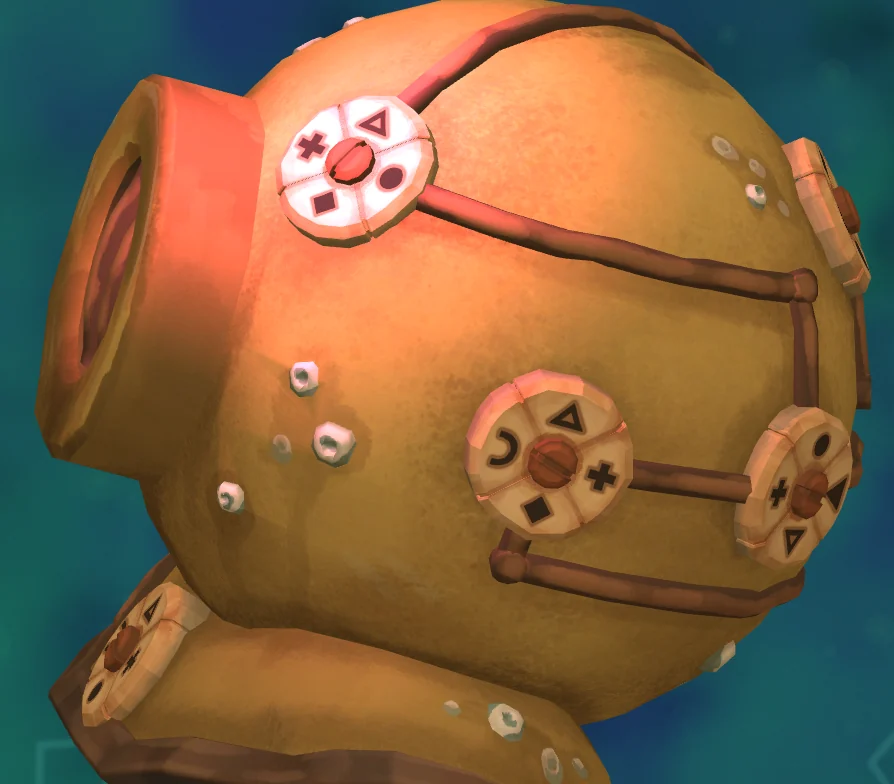
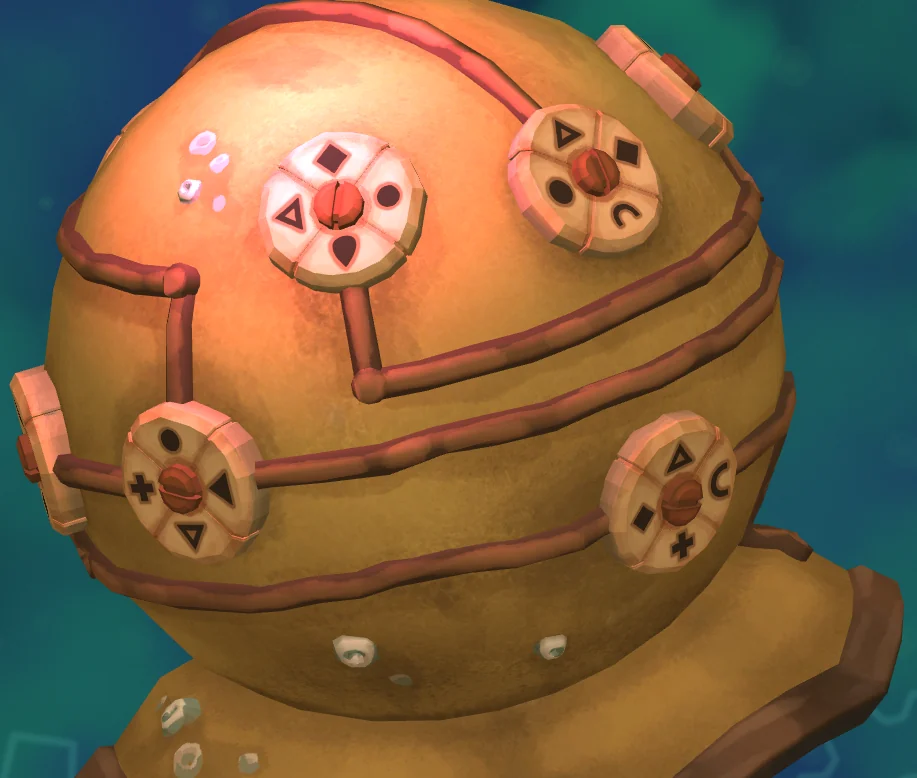
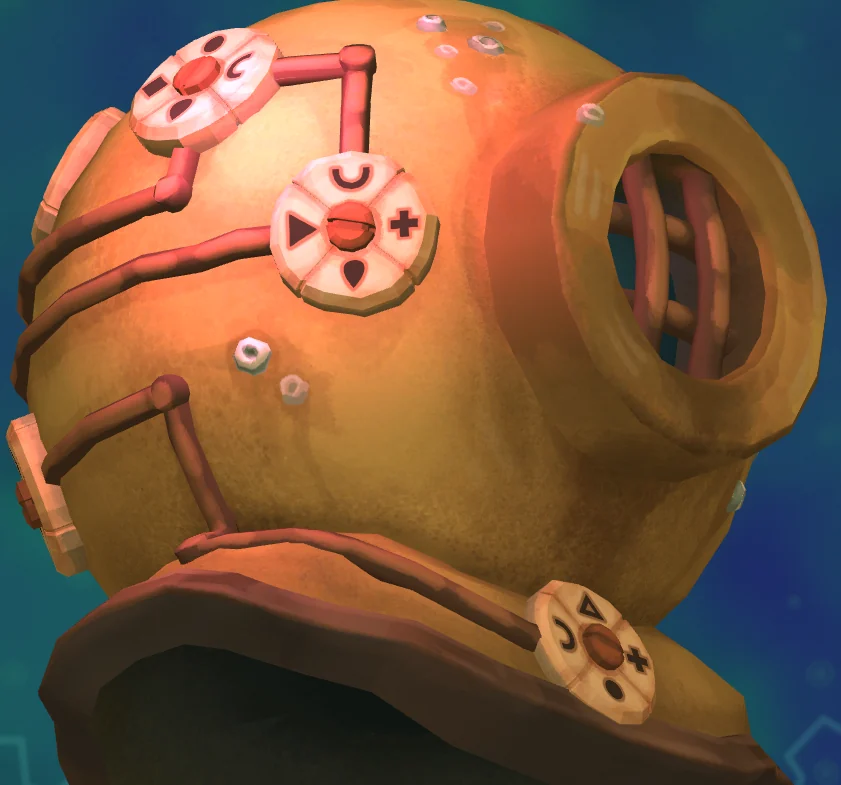
Collect the locked Pocketbook from inside the helmet.
Question Tadpole
Ask Tadpole about the basic topics, all currently available suspects, and the Pocketbook, Message in a Bottle, Silkwirm Map, Ocean Map, Hex Bottle, Underwater Photo, HER Painting, Moon Vial, Stone Cauldron, Wooden Buoy, Glass Eyeball, Command Contract, and Inn Deeds.
Tadpole provides the information needed to identify the Pocketbook code. Return to Dirk and ask him about the Pocketbook; he opens it using Tadpole’s birthday.
After reading the Pocketbook, travel to the Bilge.
Bilge Power Puzzle
The Bilge is initially too dark to explore. Select Dirk’s Cellphone as the light source. Continue interacting with the switch area until Sally moves the light into the correct position and the mechanism becomes visible.
Bilge Switch Puzzle Solution
Move and rotate the orbs inside the two metal dials so they reproduce the two target patterns in the center. The left dial must match the upper target, while the right dial must match the lower target.
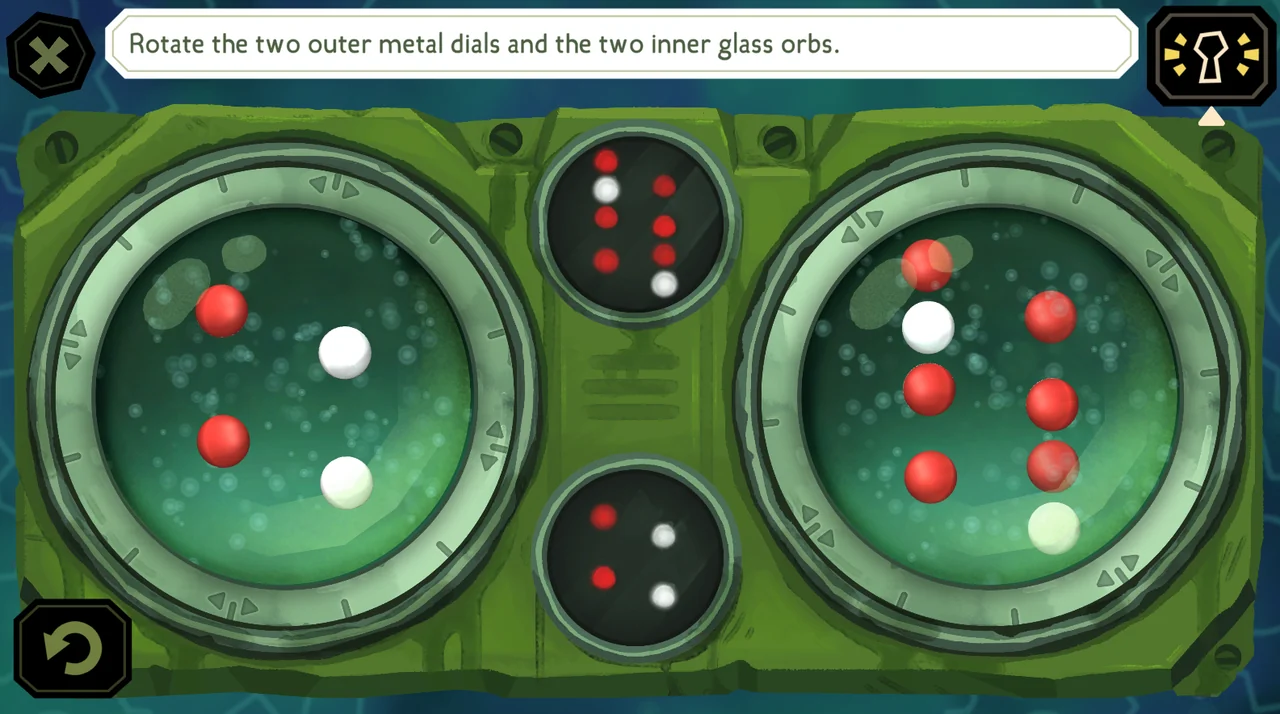
Restoring the power allows you to inspect the room and collect the Strange Device and Diving License.
Captain’s Cabin and Captain’s Quarters
Unlock the Captain’s Cabin
After exploring the accessible rooms and completing the first interviews, select the locked room at the far right of the top map row. Use the Eyeball Key obtained from the Child’s Room Wooden Chest to open the door.
Achievement — Eye Eye, Captain: Unlock the Captain’s Cabin with the Eyeball Key.
Explore the Captain’s Cabin
Inspect the HER Painting, Ship in a Bottle, Stone Bell, and Handheld Radio. The HER Painting prompts another round of interviews.
At this stage, revisit the suspects and ask about newly discovered people and clues. The conversation list expands as the investigation progresses, and several later interactions depend on having discussed the latest evidence.
Ask Sinthia about the HER Painting, then return to the Captain’s Cabin. Inspect the painting again, select the sun above the woman’s head, and rotate it into the correct position. This opens the route to the Captain’s Quarters.
Captain’s Quarters
Climb the ladder and inspect the curtain, Model Town, and Black Box.
Model Town Puzzle Solution
Begin from the II marker on the left side. Rotate the boats and place the sails so the route follows this sequence and ends at the red X:
| Step | Boat Direction | Spaces |
|---|---|---|
| 1 | Up | 3 |
| 2 | Down-right diagonal | 2 |
| 3 | Down | 2 |
| 4 | Right | 7 |
| 5 | Up-left diagonal | 5 |
| 6 | Left | 2 |
| 7 | Down-right diagonal | 4 |
| 8 | Up-right diagonal | 2 |
| 9 | Left | 5 |
Every Roman numeral represents the number of spaces from its boat to the next boat in the route. Copy the completed arrangement below if a boat or sail orientation is unclear.
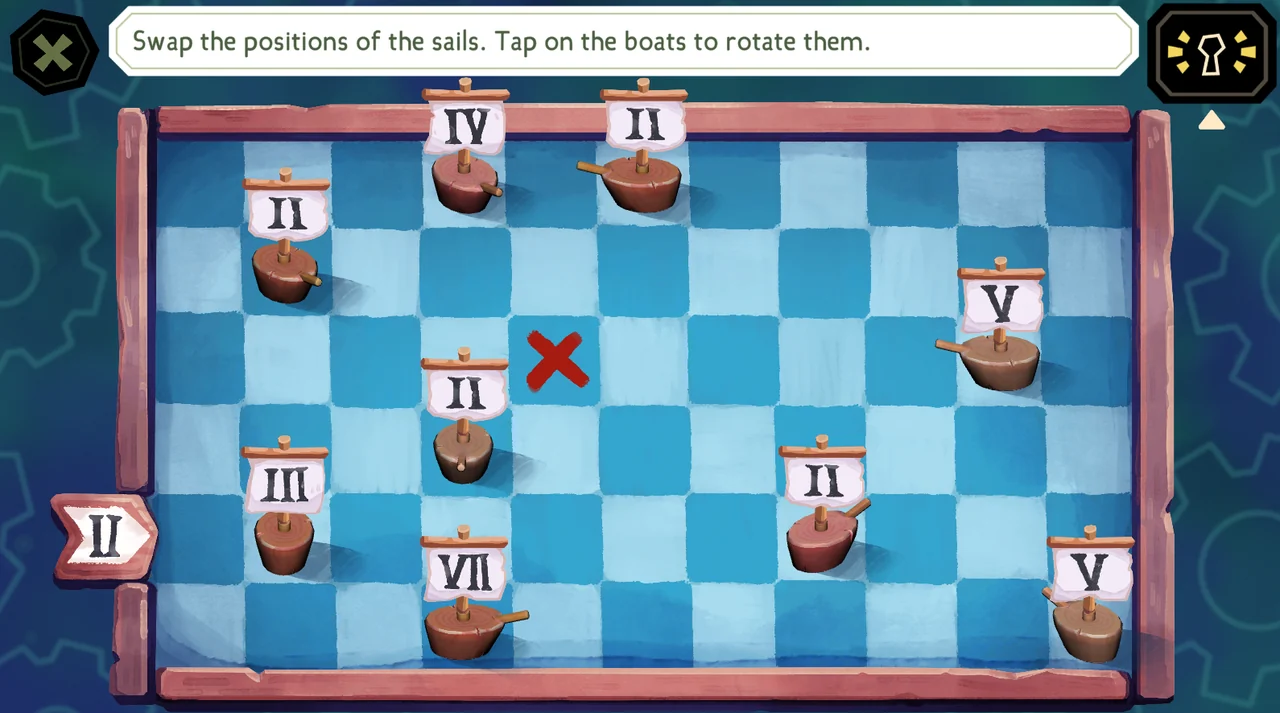
Open the completed Model Town and collect the second Film Reel. Inspect the Film Projector in the inventory and use the new reel to watch the second film.
Finally, inspect the Black Box on the bed and try its movable sections. The box cannot yet be opened, and completing this inspection advances the story into Chapter Two.
Chapter One Completion Checklist
- Sun Tablets collected from the Mess Hall cabinet
- Glass Eyeball collected from the Child’s Room chest
- Captain’s Logbook collected from the Control Room panel
- Underwater Photo collected from the Pig Safe
- Caretaker’s Journal collected from the Dream Chamber bookshelf
- Dirk’s Cellphone fully unlocked and inspected
- Handwritten Letter collected from Wirman’s Typewriter
- Ocean Map collected from the Engine Room
- Moon Photo collected from the Cargo Hold Pin Board
- Film Projector collected from the Illusion Theatre panel
- Pocketbook collected and opened
- Strange Device and Diving License collected from the Bilge
- Captain’s Cabin and Captain’s Quarters unlocked
- Second Film Reel collected from the Model Town
- Black Box inspected to begin Chapter Two