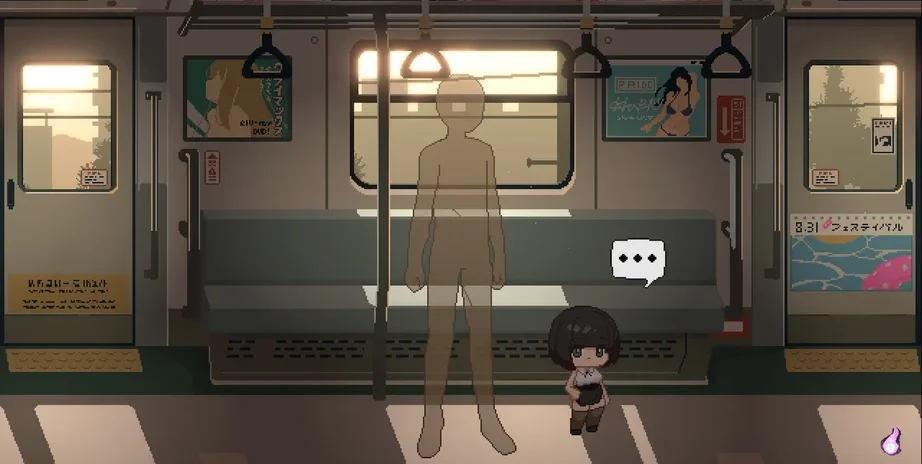
In this Train45 route puzzle guide, I explain how I solve each memo, item clue, inspection report, and route requirement by registering the correct car numbers. This guide focuses on the storage path and all listed puzzle solutions without adding extra steps.
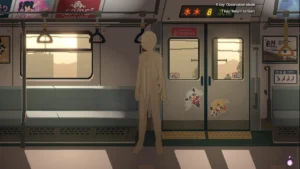
All Puzzle Solutions and Route Car Codes
In this Train45 all puzzle solutions guide, I explain how I solve every route puzzle, terminal clue, memo, item puzzle, inspection report, flyer, warning notice, and the final Engine Room route. I wrote this guide for players who want the correct Train45 route car codes, but I also explain the logic behind each solution so the puzzles make sense instead of feeling like a random number list.
This guide reveals the answers for Train45 puzzle routes and terminal solutions. If you want to solve every puzzle on your own, I recommend only checking the section you are stuck on.
In most Train45 terminal puzzles, the order of the registered car numbers does not matter. I still list the route cars in the order that makes the clue easiest to follow.
| Puzzle / Clue | Terminal / Route | Route Cars |
|---|---|---|
| The Path to the Storage | Storage Room | 3, 4, 5 |
| Memo -Dark Room- | Dark Room | 10, 3, 41, 2 |
| Padlock | Security Car | 13, 2, 1, 8 |
| Torn Fan | Broken AC Car | 18, 19, 20, 21 |
| Train Inspection Report -2- | Break Room | 13, 14, 30, 5 |
| Groper Warning | Groper Car | Any 3 of: 6, 32, 34, 38, 49 |
| Slow Zone Notice | Slow Car | 44, 29, 18 |
| Flyer – Hot Spring Car | Hot Spring Car | 1, 15, 27 |
| Train Inspection Report -3- | Broken Car | 7, 22, 24, 32 |
| Dog Collar | Pet Car | 6, 17, 23, 28 |
| Door Repair Notice | Faulty Door | 3, 5, 7 |
| Lover’s Letter | Strong AC Car | 9, 16, 29 |
| Validated Ticket | Ticket Check Car | 23, 47, 50 |
| Flyer – Pachinko | Collab Car | 46, 45, 31 |
| Black Bikini | Changing Room | 30, 28, 10 |
| Broken Clock | Passing Car | 10, 5, 40 |
| Empty Milk Bottle | Nursing Center | 4, 5, 8, 12 |
| Rod and Rope | Penalty Car | 33, 36, 41 |
| Konial’s Memo | Engine Room / Final | 45, 54, 8, 31 |
How Train45 Puzzle Routes Work
Most Train45 puzzles ask me to connect a clue to one or more train cars. Sometimes the clue directly gives the numbers, but other puzzles require me to match words to car names, check an item sprite, inspect a wall marking, or remember a code from another terminal.
When I solve these puzzles, I usually follow three steps. First, I read the clue carefully. Second, I look for words that match car names or themes. Third, if the clue is attached to an item, I inspect the item image because several answers are hidden directly on the object sprite.
Storage Route Puzzle
The Path to the Storage
The Storage Room puzzle is one of the easiest route puzzles in Train45. The clue says that I need to pass through cars 3, 4, and 5 to reach the storage. Since the required cars are already written in the clue, I register those numbers directly.
- Route Cars: 3, 4, 5
Memo and Inspection Report Puzzle Solutions
Memo -Dark Room-
For the Dark Room memo, I match each strange phrase in the note to a specific car theme. “Heading reverse” points to the Reverse car. The “green light” points to the Button car. The line about the whole body being bound points to the Bondage car, and the birds chirping outside point to the Crow car.
- Car 10: Reverse
- Car 3: Button
- Car 41: Bondage
- Car 2: Crow
- Route Cars: 10, 3, 41, 2
Train Inspection Report -2-
Train Inspection Report -2- is based on ghost complaints. Each complaint describes a different car. The creepy stare from under the seats points to Gaze, the crying sounds in a tunnel point to Tunnel, the resentful ghost at the end of the train points to Doll, and the ghost in the window points to Window.
- Car 13: Gaze
- Car 14: Tunnel
- Car 30: Doll
- Car 5: Window
- Route Cars: 13, 14, 30, 5
Train Inspection Report -3-
This report gives the answer almost directly. It says that the priority inspection and accident report should focus on cars 7, 22, 24, and 32. I use those listed accident sites as the route cars.
- Route Cars: 7, 22, 24, 32
- Optional character scene note: this route is connected to Mai.
Flyer and Notice Puzzle Solutions
Torn Fan
The Torn Fan clue mentions an event running from the 18th to the 21st. I treat that date range as the route answer and register every number from 18 through 21.
- Route Cars: 18, 19, 20, 21
Flyer – Hot Spring Car
The Hot Spring flyer gives me three route clues. It says the whole car flooded, white water poured from the ceiling, and the windows were fogged up. I match those details to White Liquid, Flooding, and Fogged Glass.
- Car 1: White Liquid
- Car 15: Flooding
- Car 27: Fogged Glass
- Route Cars: 1, 15, 27
- Wall Code: 54
- Optional character scene note: this route is connected to Reina.
I also make sure to remember the wall code in this terminal. The Hot Spring Car wall code is 54, and it becomes important later for the final Engine Room puzzle.
Flyer – Pachinko
For the Pachinko collaboration flyer, I focus on the Shining Labyrinth reference, the favorite characters, the bunny girl outfit, and the slingshot bikini. These details point to Rei and Kokyo, Bunny Girl, and Slingshot Bikini.
- Car 46: Rei and Kokyo
- Car 45: Bunny Girl
- Car 31: Slingshot Bikini
- Route Cars: 46, 45, 31
- Wall Code: 45
- Optional character scene note: this route is connected to Mai.
The Collab Car / Pachinko terminal also has a wall code: 45. I keep this number in mind because it is used again in the final route. For the optional Mai scene, the Pachinko result is tied to getting the three bunny results in a row.
Door Repair Notice
The Door Repair Notice mentions a March-July odd months accident-free operation event. I take the odd-numbered months in that range: March, May, and July. Their month numbers are 3, 5, and 7.
- Odd Months: March, May, July
- Route Cars: 3, 5, 7
- Optional character scene note: this route is connected to Mai.
Item Puzzle Solutions
Padlock
The Padlock puzzle starts with the Security Car clue, but the clue sends me somewhere else first. It talks about rising water and scribbles on the wall, so I go to the Flooding car and check the wall markings there.
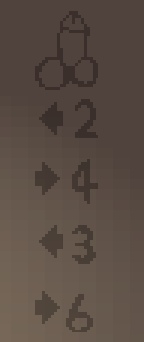
The wall markings show a movement pattern: left 2, right 4, left 3, and right 6. After that, I check the Padlock item itself. The lock starts at 4, so I apply the wall movement pattern from that starting number.

- Start at 4
- Move left 2: 13
- Move right 4: 2
- Move left 3: 1
- Move right 6: 8
- Route Cars: 13, 2, 1, 8
Dog Collar
For the Dog Collar puzzle, the text clue is simple, but the answer is hidden in the item sprite. I inspect the collar and look at the holes. The numbers above those holes give me the correct route cars.
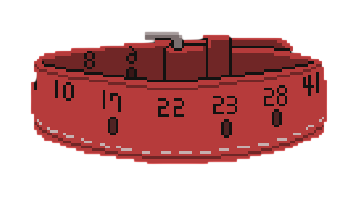
- Route Cars: 6, 17, 23, 28
- Optional character scene note: this route is connected to Reina.
Lover’s Letter
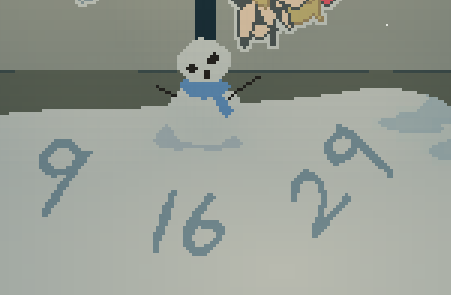
The Lover’s Letter repeatedly refers to snow, which points me toward Car 36: Snow Woman. However, simply visiting the Snow Woman car is not enough. I first need to bring the Empty Beer Can with me.
Once I bring the Empty Beer Can to the Snow Woman car, the route numbers can be found written in the snow near the end of the area.
- Required Item: Empty Beer Can
- Snow Clue Target: Car 36, Snow Woman
- Numbers Found in the Snow: 9, 16, 29
- Route Cars: 9, 16, 29
Validated Ticket
The Validated Ticket puzzle depends on both the punched holes and the orientation of the tickets. The most important visual clue is that the word “Ticket” is printed upside-down. This shows that the tickets were flipped over before they were punched.
I mentally rotate the ticket layout and then compare the punched positions with the printed numbers. I also account for the way the two tickets overlap. When the holes are read from the correct orientation, they correspond to 23, 47, and 50.
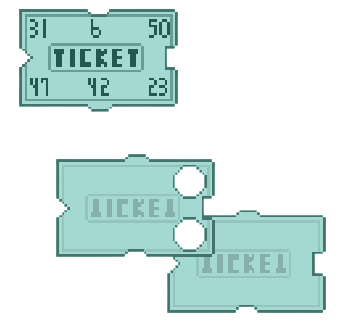
After flipping the tickets, the punched corners point to 23 and 50. One punched area overlaps with the other ticket, which adds 47 as the remaining route number.
- Orientation Clue: The word “Ticket” is upside-down
- Punched Numbers: 23, 47, 50
- Route Cars: 23, 47, 50
Black Bikini
The Black Bikini clue mentions suspicious stains, but the actual route answer comes from looking closely at the item sprite. The route numbers are visible on the item itself.
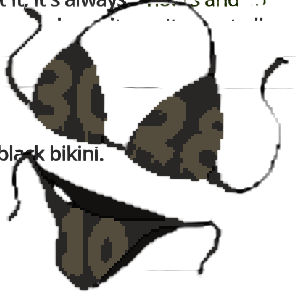
- Route Cars: 30, 28, 10
- Optional character scene note: this route is connected to Reina.
Broken Clock
The Broken Clock puzzle uses the clock face and the note saying the clock is always 3 hours and 15 minutes fast. I read the displayed time as 13:20:40, then subtract 3 hours and 15 minutes from it.
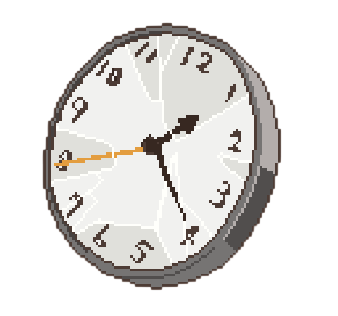
- Displayed Time: 13:20:40
- Clock Error: 3 hours and 15 minutes fast
- Correct Time: 10:05:40
- Route Cars: 10, 5, 40
Empty Milk Bottle
For the Empty Milk Bottle puzzle, I inspect the markings on the bottle sprite carefully. The required route numbers are printed directly on the item, but some of the markings may appear upside-down depending on how I view the bottle.
After mentally rotating the bottle and reading all of the markings from the correct orientation, the visible numbers are 4, 5, 8, and 12.
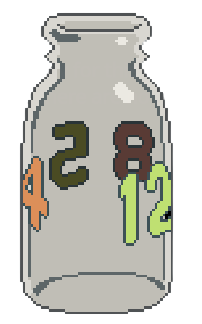
- Item Clue: Numbers printed on the bottle
- Reading Tip: Some markings may appear upside-down
- Route Cars: 4, 5, 8, 12
- Optional character scene note: this route is connected to Reina.
Rod and Rope
The Rod and Rope item is a wrapping cipher. Instead of reading the visible numbers as a simple repeating sequence, I need to imagine wrapping the rope around the rod.
I begin by aligning the rope’s “33” mark with the rod. The rod is shaped like a triangular prism, so the rope passes across three different faces as it winds around it. This means that every third number in the wrapped sequence ends up on the same face of the rod.
The numbers that align on the same face as 33 are 33, 36, and 41.
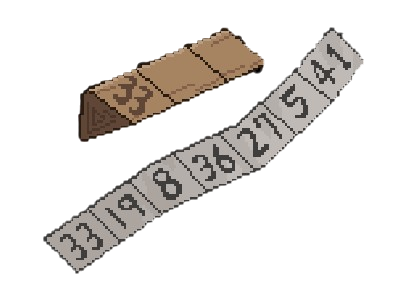
The pattern works as number, blank, blank, number, blank, blank, number. When I apply that pattern to the visible sequence, the matching numbers are 33, 36, and 41.
- Starting Mark: 33
- Cipher Method: Wrap the rope around the triangular rod
- Numbers on the Same Face: 33, 36, 41
- Route Cars: 33, 36, 41
Warning and Notice Route Solutions
Slow Zone Notice
The Slow Zone Notice gives three accessibility and safety clues: priority seating, tactile paving blocks, and an ultra-slow safety zone. I match each one to the related car name.
- Car 44: Priority Seat
- Car 29: Tactile Paving
- Car 18: Low Speed
- Route Cars: 44, 29, 18
Groper Warning
The Groper Warning describes incidents involving excessive exposure, visible underwear, deliberately revealing private areas, and inappropriate poses. These details point to the cars associated with female exposure.
There are five cars that match the warning: 6, 32, 34, 38, and 49. Unlike most route puzzles, I do not need to register the entire matching set. Registering any three of these five cars is enough to complete the route.
- Possible Cars: 6, 32, 34, 38, 49
- Route Requirement: Register any three of these cars
- Example Valid Route: 6, 32, 34
Final Engine Room Puzzle Solution
Konial’s Memo
Konial’s Memo is the final Engine Room route puzzle. Before using this route, I recommend saving the game and finishing anything else I still want to do, because this puzzle is tied to the final sequence.
The memo gives two terminal clues first: Roulette and Hot Spring. Roulette points back to the Collab Car / Pachinko terminal, where I find the wall code 45. Hot Spring points back to the Hot Spring Car terminal, where I find the wall code 54.
The last clue mentions a date written on a poster near the butler’s place. That poster gives the date 8/31, which provides the final two numbers for the Engine Room route.
- Roulette / Collab Car Wall Code: 45
- Hot Spring Car Wall Code: 54
- Poster Date: 8/31
- Route Cars: 45, 54, 8, 31
Train45 Puzzle Route Tips
That covers every major Train45 puzzle route solution in this guide. The most useful habit is to check both the written clue and the item sprite. Some puzzles give the answer through text, but several of the harder Train45 puzzles hide their route numbers directly in the object image or nearby environment.
If a route does not unlock, I first make sure I have the related clue item, then I check whether the terminal is already available. Some terminals appear to depend on finding the correct item or clue before the route can be used normally.
What I Check If a Puzzle Route Does Not Unlock
If a route does not work, I do not immediately assume the numbers are wrong. In Train45, the problem is often that I have not met the unlock condition yet.
When a route fails, I check these points:
- I make sure I have the related clue item or memo.
- I check whether the terminal has been unlocked by story progress.
- I confirm that Car Navigation is available.
- I remove Copper Bracelet if I am trying to use Car Navigation, because it disables navigation.
- I check whether the route accepts any order or requires a specific clue condition first.
- I verify that I did not confuse similar anomaly names.
- I re-check item sprites for hidden numbers.
- I revisit the related anomaly if the clue comes from the environment.
This is especially important for routes connected to Padlock, Lover’s Letter, Validated Ticket, Rod and Rope, and Konial’s Memo.
Puzzle Types in Train45
I group Train45 puzzles into a few types. This makes it easier to solve new route clues without guessing.
| Puzzle Type | How I Solve It | Examples |
| Direct number clue | I use the written numbers directly | The Path to the Storage, Train Inspection Report -3 |
| Phrase matching | I match words to anomaly names | Memo -Dark Room-, Train Inspection Report -2 |
| Item sprite clue | I inspect the item image | Dog Collar, Black Bikini, Empty Milk Bottle |
| Environmental clue | I revisit an anomaly or terminal | Padlock, Lover’s Letter, Konial’s Memo |
| Date or time clue | I convert dates or correct the time | Torn Fan, Door Repair Notice, Broken Clock |
| Flexible category route | I choose any valid matching cars | Groper Warning |