
In this Dread Weight choices and routes guide, I list the main dialogue paths, item rewards, affection gains, route splits, puzzle solutions, and ending-related decisions from the prologue through the climax. I also include the Fuse Box, Oven, desk box, and relationship routes so I can keep track of which choices matter, which items are lost or gained, and which scenes lead to extra rewards or endings.

All Choices and Routes
If a dialogue option is not listed here, I treat it as a flavor choice. Those options may slightly change dialogue, but they do not appear to have major item, route, affection, or ending consequences.
Table of Contents
Prologue to Fuse Box Route
This section covers the early choices from the first hallway scenes up to the Fuse Box puzzle. The main goal here is to collect useful items, choose who to talk to, and prepare for the first route split.
[Hallway] Meeting Max Who Quacks
After meeting Max, I receive the first useful item.
- Item acquired: [Rope]
[Foyer] Who Do You Want to Talk To?
After meeting Max, I return to the hallway with or without the rope. Everyone splits up, and I can choose who to talk to.
Renata
- Obtain [Wire Cutter]
- Gain <3 with Renata by choosing “Why not hire someone to help?” when asking about Kurt
Kurt
- Gain <3 with Kurt by exhausting some of his dialogue
Dimitri
- Gain <3 with Dimitri by choosing “What’s wrong?” when asking about the paperwork
- Obtain [Doctor’s Note]
- The [Doctor’s Note] can immediately be given away to Renata
Gisela
- I can give Gisela the [Rope]
- Gain <3 with Gisela by choosing “The Real Version”
- Obtain [Switch]
[Foyer] Return to Foyer
After a loud noise in the foyer, everyone returns to see what happened.
- Item acquired: [Bolt Cutter]
[Hallway] Meeting Clover
I check the ringing phone and meet a new friend.
- Items acquired:
- [Strange Radio]
- [Tarnished Pendant]
[Cellar] Get the Bucket
No matter how I answer Gisela, she sends me to the cellar. I can take the bucket or destroy it.
- Item acquired: [Bucket O’ Nails]
[Hallway] Barricading the Window
I help Gisela barricade the hallway window by watching her do the work.
Give the Bucket to Gisela
- Gain <3 with Gisela
- Obtain [Wrench]
Do Not Have the Bucket
- I can choose either dialogue option
- I miss the reward for the simple quest of handing Gisela the bucket
[Foyer] Who Do You Want to Go With?
Kurt suggests splitting up to search for weapons. This creates two mini-routes.
The game splits here. Either Renata or Dimitri dies early, and the remaining friend dies later. Both paths eventually converge, but each route has different items and a different scene with the living friend.
Renata Upstairs
- Dimitri dies
- An extra Renata scene becomes available later
- Obtain [Fuse]
Dimitri Downstairs
- Renata dies
- An extra Dimitri scene becomes available later
- Search the closet repeatedly to find items
Closet Search Items
- Top-left spot:
- Mouse
- [Screwdriver]
- Empty
- [Fuel]
- A note
- Bottom-left spot:
- Empty
- [Lighter]
- [Switch]
- Hardtack
- Right-hand spot:
- Mouse
- Teeth
- [Scared Letter]
- Garbage
- [Gross Book]
- [Fuse]
- Bottom of the screen:
- Leaves the scene
Once I obtain the [Fuse], the scene ends immediately.
I can keep eating the hardtack for a funny death scene.
[Cellar] Fix the Fuse Box
If I want to keep any items past this point, I need to solve the Fuse Box puzzle correctly.
If solved correctly, I lose:
- [Fuse]
- [Wire Cutter] or [Bolt Cutter]
- [Switch]
If attacked:
- I lose my entire inventory
Finding the Bear Trap Route
This section covers the route after the Fuse Box, including bedroom conversations, the Oven puzzle, Dimitri’s Tie, cellar searches, and the Bear Trap.
[Bedroom] Who Do You Want to Talk To?
After solving or failing the Fuse Box puzzle, I end up in the bedroom scene with Kurt.
No matter what I do, I will talk to Gisela, Baba Yaga, and my living friend. If I want to talk to everyone, I should talk to Kurt first.
Kurt
- When Kurt asks “Promise not to tell anyone?”, choose “Yes” to gain <3 with Kurt
- It does not matter if he keeps his clothes on
- Choose “Let me carry it” to obtain [Gun]
- Choose “Let’s leave it here” to leave the gun so it can be found later during the bedroom search
Gisela with Surprise Guest
- This skips the Kurt scene
- I will talk to Gisela no matter who I choose
- I can give her [Gun] to gain <3 with Gisela
- Obtain [Candle]
- Obtain [Land Mine]
- Or destroy the [Land Mine] to gain <3 with Baba Yaga
Renata if Alive
- Gain <3 with Renata immediately
- This happens while she takes credit for fixing the Fuse Box, even if I solved it correctly
- Exhaust her dialogue by repeatedly choosing the top option to gain another <3 with Renata
Dimitri if Alive
- Gain <3 with Dimitri if my character mentions being attacked
- This happens in all scenarios except when I succeed at the Fuse Box puzzle and then destroy the [Green Test Tube]
- Exhaust his dialogue by repeatedly choosing the top option to gain another <3 with Dimitri
[Kitchen] Melt the Right Item in the Oven
Eventually, I go to the kitchen with Renata or Dimitri and investigate the oven. Another haunting begins.
To solve the Oven puzzle:
- Lose [Candle]
- Lose [Fuel]
- Then use [Lighter]
- Obtain [Sun Key]
If the ghost attacks:
- I lose all items
Extra Notes
- Replacing [Candle] with [Gun] gives a scene, but I lose the item
- Placing only the [Land Mine] gives another funny death, and I lose the item
[Bedroom] Gisela After Failed Oven Puzzle
If I fail the Oven puzzle, I get a bedroom scene with Gisela.
- Choose “Thanks for saving me” to gain <3 with Gisela
[Hallway] Taking Bribes
If I succeed at the Oven puzzle, I skip directly to this scene. Max offers Dimitri’s tie, even though I may not have been told Dimitri is dead unless I woke up with Gisela.
- Say “Yes” to Max to obtain [Dimitri’s Tie]
- I can give [Dimitri’s Tie] to Kurt to gain <3 with Kurt
- Or I can keep [Dimitri’s Tie] for a later scene
[Hallway] What Do You Want to Investigate?
Here, I can choose whether to get the Bear Trap in the cellar or stay upstairs and search the bedroom.
Get the Bear Trap in the Cellar
- Room on the left:
- Ceremonial Room search
- There is a note to read
- Room on the right:
- Ancient Laboratory search
- Keep sniffing vials for an ending
- Find the well:
- This only appeared while in the Ceremonial Room
- Jump in for an ending
- Run or Leave:
- Proceeds to the next foyer scene
- I get dragged to the cellar
Stay Upstairs and Search the Bedroom
- Search the bedroom:
- Look out the window to spot an oak tree
- Look under the bed
- Keep selecting “Keep searching?” to find [Medkit] and a note
- Check the closet:
- Die
- Grab the gun from the pillow:
- Obtain [Gun] if I left it there earlier
- Leave:
- Proceeds to the next foyer scene
- I get dragged to the cellar
This section can be buggy. Selecting Leave may sometimes create an infinite loop where I return to the foyer scene and get dragged back to the cellar. Some options may also be missing from search rooms. If this happens, selecting Leave without investigating anything can force the game to continue.
[Cellar] Where Do You Want to Go?
I end up in the cellar regardless of the earlier decision. The search is mostly the same, but now I can open a chest to obtain an item.
Ancient Laboratory
- Keep sniffing vials for an ending
- I can travel to the Ceremonial Room afterward
Ceremonial Room
- Open the chest with [Sun Key]
- Obtain [Renata’s Dress]
- There is a note to read in one of the books
- I can travel to the Ancient Laboratory afterward
Find the Well — NG+ Only
- Jump in for an ending
Leave
- Goes to the next scene
[Hallway] Search the Bedroom or Return to the Cellar
This choice seems to be the last chance to check the bedroom if I have not already done it.
- Choose bedroom or cellar
- Either way, I eventually end up at Gisela
- If I already checked the bedroom earlier, I can go into the closet to die
[Cellar] Follow Her Downstairs or Go Back Up to the Foyer
This is another non-choice.
- Go downstairs for a jumpscare
- Go upstairs to continue
[Foyer] Flirting with Danger
I head upstairs and meet Baba Yaga again.
- Obtain [Bear Trap]
- Or destroy [Bear Trap] to gain <3 with Baba Yaga
- Upstairs, I can arm [Bear Trap] or [Land Mine] if I have either
- The [Land Mine] triggers an ending
- Regardless of the choice, I obtain [Rusty Key] from Max
Climax Route
This section covers the late-game choices, including Ryna, Potato, Kurt, Gisela, Baba Yaga, ghost conversations, test tubes, and the hallway desk.
[The Inner Machinations of a Killer’s Mind] Ryna or Potato
This choice determines whether I continue the game or end it here.
Ryna
- Choose Ryna
- Then choose Return to the Cabin
- This ends the game
Potato or Kill Kurt
- Choose Potato or Kill Kurt
- This continues the run
[Bedroom] Has the Witch Spoken With You?
After major lore reveals, I return to Kurt.
- Tell Kurt “Yes” to gain <3 with Kurt
[Foyer] What the Hell Do I Do Now?
Gisela looks worse, and I can decide what to do next.
- Gain <3 with Gisela if I have the [Medkit]
Go Upstairs to Speak With Kurt and Gisela
- Advances to the next scene
Speak With the Witch
- Lets me talk to the witch
[Foyer] What About You?
This conversation gives me another Baba Yaga affection choice.
I Remember Everything
- Gain <3 with Baba Yaga
I’m Not Remembering Anything
- Gain sympathy, but no clear affection reward
Why Do You Look Different?
- Antagonizes the antagonist
[Bedroom] What Do You Want to Do?
At this point, I can talk to old friends again. Speaking with Kurt or the witch advances the scene, so I can only pick one of them. Dying to the ghosts also advances the scene.
Talk to Gisela Optional
- Gisela has left the mansion
- I can then talk to any of the remaining four characters
Speak With Dimitri Optional
- Choose “Help me kill the witch”
- Give him [Dimitri’s Tie]
- Gain <3 with Dimitri
- Obtain [Wooden Rabbit]
- Any other option, or not having the item, results in death and advances to a game ending
- If alive, I can then talk to any of the remaining four characters
Chat With Renata Optional
- Choose “Help me kill the witch”
- Give her [Renata’s Dress]
- Gain <3 with Renata
- Obtain [Wooden Duck]
- Any other option, or not having the item, results in death and advances to a game ending
- If alive, I can then talk to any of the remaining four characters
If I have both [Wooden Rabbit] and [Wooden Duck], I can open the hallway chest. Each of the three options inside leads to a separate ending. Taking nothing leads to the default game ending sequence.
Go With Kurt
- Kurt tells me to go to the hallway desk and bring him a box
- This leads to the same scene reached by Converse With the Witch
Converse With the Witch
- Confirm with “Yes”
- If I have [Gun], I can shoot her and trigger the result
- If I have [Rope], I can gain <3 with Baba Yaga
- She takes me to the hallway desk
Hallway Desk Options
At the hallway desk, several options appear.
- Search the desk and drawers repeatedly to find three notes
- Then obtain [Blue Test Tube]
- Look through the books repeatedly to find [Red Test Tube]
- Use the keypad on the safe
- The guide has not found a working result for this yet
- Nothing happens
- Speak with the witch enough times and she stabs me
- Leave once and she stabs me
Important Notes
- If I still have [Green Test Tube], I am locked into an ending
- If I do not have [Green Test Tube] and cannot solve the box puzzle, she stabs me
- Destroying any test tube in front of her is a bad but funny choice
Endings
Regardless of my choices, several scenes play in sequence and reveal backstory, lore, and character motivations.
Crush It
- Press the only option on the screen after the prompt appears
Puzzle Solution Routes
This section lists the important puzzle routes for the Fuse Box, Oven, solving both in one run, and opening the desk box.
The Fuse Box Solution
To solve the Fuse Box, I need the right items.
Required Route and Items
- Go with Gisela during [Foyer] Who do you want to talk to?
- Obtain [Switch]
- Kurt gives me [Bolt Cutter] automatically
- Go with Renata to the bedroom to obtain [Fuse] automatically
Alternative Dimitri Route
- Go with Dimitri to the cellar
- In the next Bedroom Closet search scene:
- Obtain [Switch] from the bottom-left drawer
- Obtain [Fuse] from the right-hand drawer
- The [Fuse] appears after [Scared Letter] and [Gross Book], so I keep checking that drawer until I get it
Fuse Box Puzzle Steps
- Use [Bolt Cutter] and [Fuse] in either order
- Then use [Switch]
- Flip it by choosing “Yes”
I can also use [Wire Cutter] instead of [Bolt Cutter], but I cannot get the [Switch] in the same run as the [Wire Cutter], so it appears to be a red herring.
The Oven Solution
To solve the Oven puzzle, I need items from Dimitri’s route.
Required Route and Items
- Go with Dimitri to the cellar
- In the Bedroom Closet search:
- Search the top-left drawer for [Fuel] after [Screwdriver]
- Search the bottom-left drawer for [Lighter]
- Keep the [Candle] when Gisela offers it
Oven Puzzle Steps
- Use [Fuel] and [Candle] in any order
- Then use [Lighter]
Solving the Fuse Box and Oven in One Run
To solve both puzzles in a single run, I follow this route.
- Pick anyone for the first option
- Kurt gives me [Bolt Cutter] in the foyer
- When I must choose between Renata and Dimitri, go with Dimitri to the cellar
Bedroom Closet Search
- Search the top-left drawer until I obtain [Fuel]
- Search the bottom-left drawer to obtain [Lighter] and [Switch]
- Search the right-hand drawer until I obtain [Fuse]
- Keep the [Candle] when Gisela offers it
Fuse Box Steps
- Use [Bolt Cutter] and [Fuse] in either order
- Use [Switch]
- Flip it by choosing “Yes”
Oven Steps
- Use [Fuel] and [Candle] in any order
- Then use [Lighter]
Opening the Desk Box
To open the desk box, I need to keep items through the haunt sections.
- Use the route for solving the Fuse Box and Oven in one run
- Go to the cellar with Dimitri so he stays alive
- Later, Dimitri gives me [Green Test Tube]
- At the desk, search until I have both:
- [Red Test Tube]
- [Blue Test Tube]
- Once I have both test tubes, an option appears to open the box
Relationships
This section is a work in progress. I can start New Game Plus from the end of a run without returning to the title screen to keep hearts. This means I can get five hearts with any character by looping through the game multiple times. The routes below focus on finding hearts in a single run.
Gisela Relationship Route
To gain hearts with Gisela, I follow these steps:
- Choose to go with Gisela at the first chance
- Choose “The Real Version” when asking about the intruder
- Obtain and give her [Bucket O’ Nails]
- Choose Kurt after the Kurt bedroom scene and keep the gun
- Give [Gun] to Gisela
- Choose “Thanks for saving me” during the Gisela bedroom scene
- This may require failing the Oven puzzle to trigger the scene
- Have the [Medkit] during the Eyepatch Reveal scene
- Search under the bed many times to find it
Kurt Relationship Route
To gain hearts with Kurt, I follow these steps:
- Choose to go with Kurt at the first chance
- Exhaust his dialogue
- Agree to keep his secret after choosing to talk to him while he is in bed with me
- Give him [Dimitri’s Tie]
- Tell him I spoke to the witch when he asks
- The remaining step is still unknown
Dimitri Relationship Route
To gain hearts with Dimitri, I follow these steps:
- Choose to go with Dimitri at the first chance
- Choose “What’s wrong?” when asking about the paperwork
- Choose to search the cellar with him so he stays alive
- Talk to him afterward to gain another heart
- When speaking to his ghost, choose “Help me kill the witch”
- Have [Dimitri’s Tie] in my inventory
- The remaining step is still unknown
For Dimitri’s second heart, the only scenario that avoids gaining it is succeeding the Fuse Box puzzle and then destroying the [Green Test Tube].
Renata Relationship Route
To gain hearts with Renata, I follow these steps:
- Choose to go with Renata at the first chance
- Choose “Why not hire someone to help?” when asking about Kurt
- Choose to search the bedroom with her so she stays alive
- Talk to her after the Fuse Box puzzle
- In the same scene, keep choosing the top option to gain another heart
- When speaking to her ghost, choose “Help me kill the witch”
- Have [Renata’s Dress] in my inventory
- The remaining step is still unknown
There is an unresolved issue with Renata’s route. If I go with Renata at both opportunities, I cannot solve the Oven puzzle because it requires items found with Dimitri only. That means I cannot obtain the [Sun Key] needed for [Renata’s Dress] in the same run as her other three hearts, and the fifth heart has not been found yet.
Baba Yaga Relationship Route
To gain hearts with Baba Yaga, I follow these steps:
- Permanently destroy the [Land Mine]
- Permanently destroy the [Bear Trap]
- Choose “I remember” during the conversation with her
- Hold onto [Rope] until I can give it to her
- Successfully open the box at the hallway desk for her
Notes
A raw image dump of all the notes in the game for lore reference.
Closet note in top-left
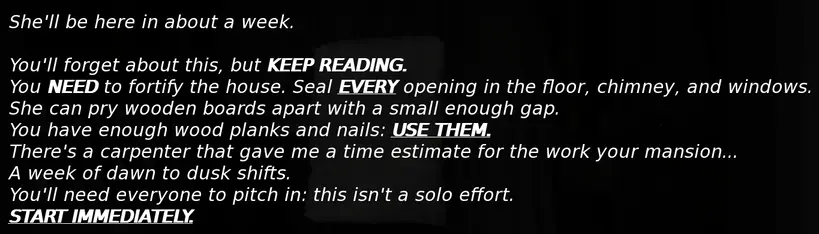
Scared Letter
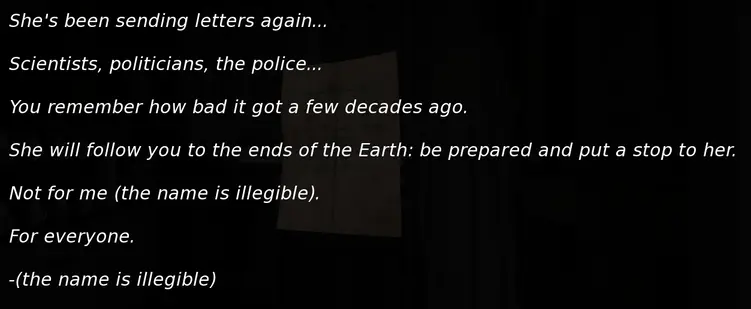
Gross Book

Note under the bed
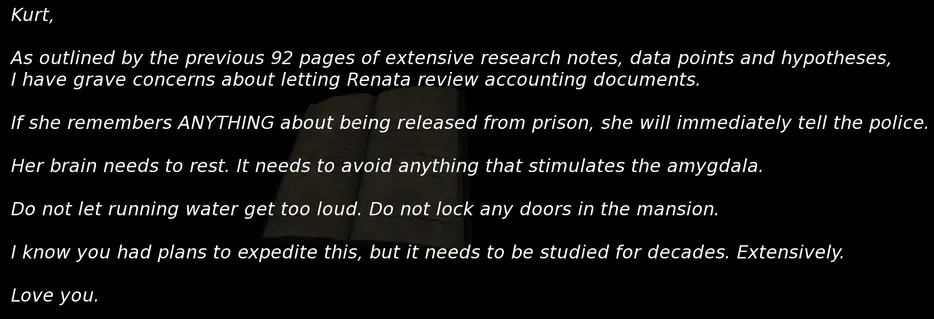
Note in ceremonial room
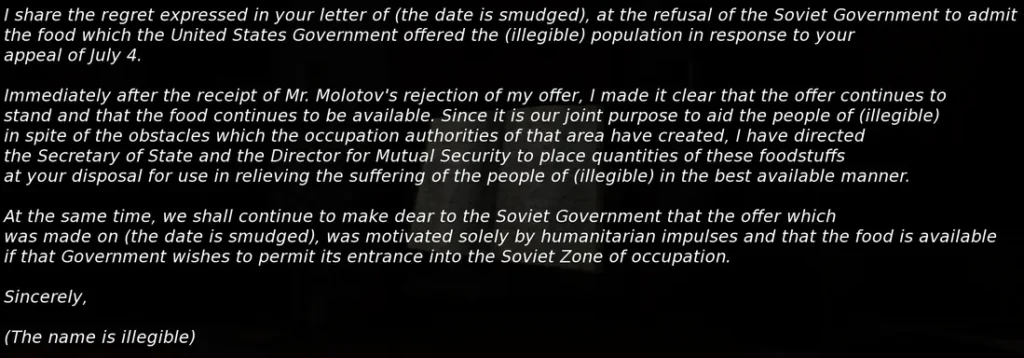
Hallway desk note #1

Hallway desk note #2
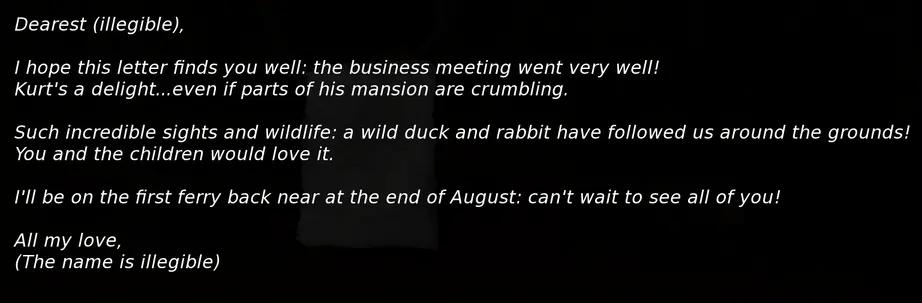
Hallway desk note #3