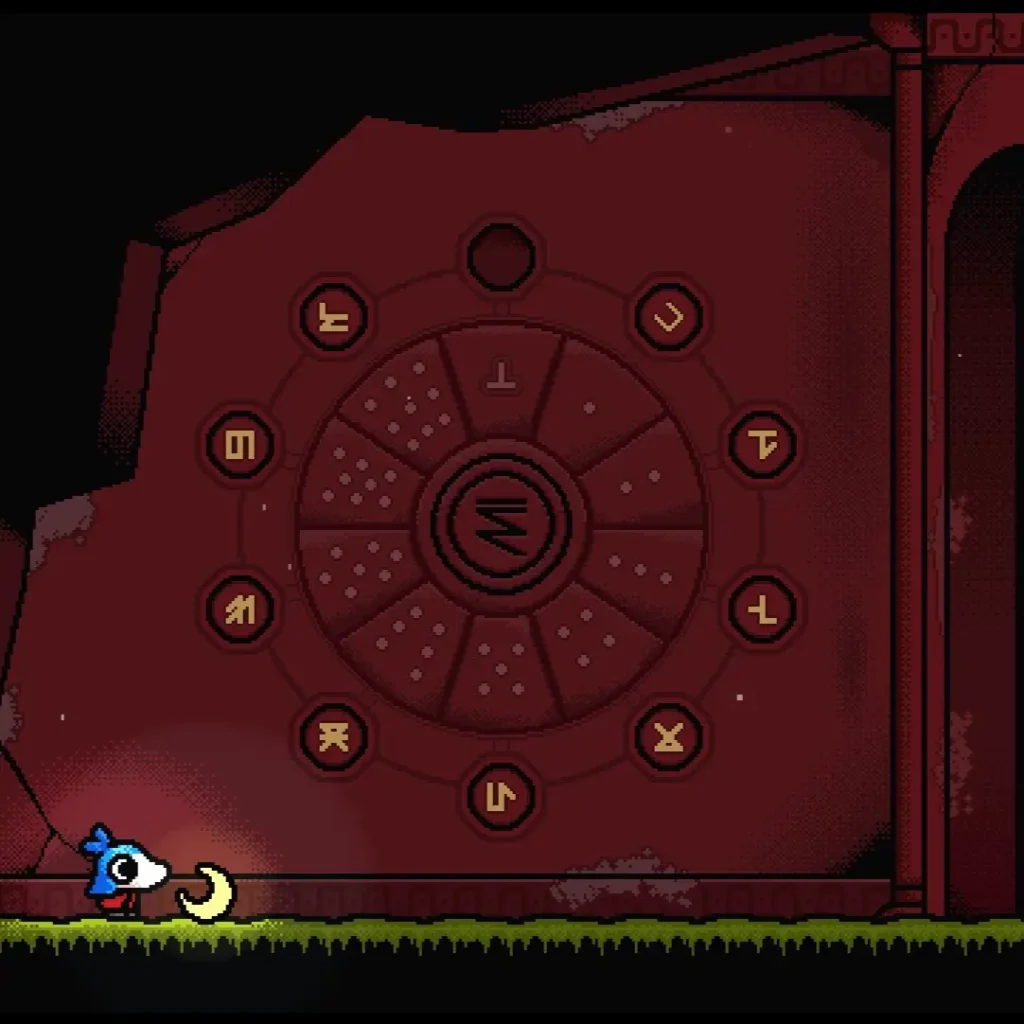
In MONOMOON, the Red Temple contains nine puzzles that require me to understand the game’s number symbols, recognize patterns, and use clues hidden throughout the rooms. In this guide, I’ll explain how I reach the Red Temple, unlock its entrance, and solve every puzzle with hints and the correct codes.
Red Temple Guide: 9 Puzzle Codes & Solutions
I’ve organized the solutions in the same order I encounter the puzzles. For each one, I’ll start with hints that help me understand the mechanics before revealing the complete answer. If I only need a specific combination, I’ve also included the exact code for each puzzle.
Finding the Red Temple
I can find the Red Temple entrance near the bottom center of the map, at coordinates (15,08). While exploring, I might notice the outline of the temple before figuring out how to enter it.
To work out the entrance puzzle, I start from coordinates (13,07).
Hints for Reaching the Red Temple
- Hint 1: I notice two possible entrances. One is blocked by a button and appears to be a shortcut, while the other involves a lift that I can send down.
- Hint 2: I need to think about where the lift travels and whether I can reach that location without releasing my left mouse button (LMB).
- Hint 3: I consider what happens if I release LMB instead of trying to keep it held down throughout the process.
Red Temple Entrance Solution
Once the lift is fully activated, I quickly teleport to the save point at (13,05). From there, I move up one screen and get onto the lift before it has time to leave. This allows me to use the lift to reach the Red Temple.
Opening the Red Temple Door
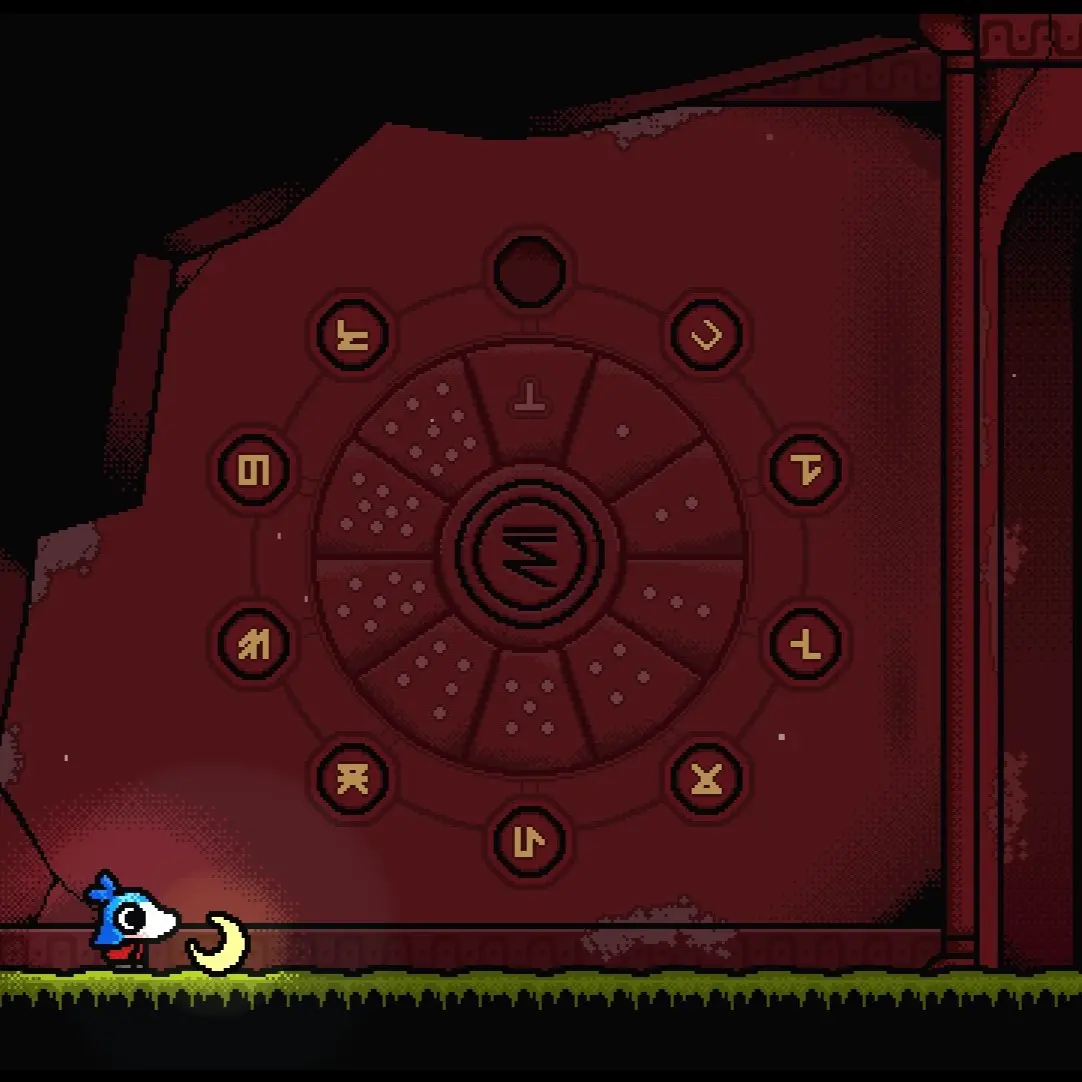
At the temple’s front door, I encounter a wheel covered in unfamiliar symbols. If I don’t understand what these symbols represent yet, it’s better to return after learning more about the game’s number system.
Door Puzzle Hint
The symbols represent numbers. To understand the combination, I need to know how counting works in MONOMOON’s language. The number of dots helps me identify each symbol.
Red Temple Door Solution
To unlock the door, I rotate through the symbols until they appear in clockwise order from 0 to 9, using the dot counts to identify the correct numbers. The image below shows the exact arrangement I need.
Red Temple Puzzle 1 Solution
For the first puzzle, I need to understand how the symbols translate into individual numbers. The chalk drawing on the wall provides the clue for calculating the combination.
Puzzle 1 Hints
- Hint 1: I treat the combination as three separate digits rather than one three-digit number.
- Hint 2: The chalk drawing tells me that each horizontal line has a value of 1.
Puzzle 1 Code
I count the horizontal lines in each figure and use those totals as the three digits of the combination.
Solution Code: 503
Red Temple Puzzle 2 Solution
The second puzzle uses circles and their positions to determine a numerical answer. Instead of counting the circles themselves, I need to compare how they are arranged.
Puzzle 2 Hints
- Hint 1: The chalk drawing indicates a value of 0. I look at the figure and try to identify what is being counted to produce that result.
- Hint 2: I compare the relative positions of the circles in both figures, paying particular attention to their horizontal placement.
Puzzle 2 Code
To solve this puzzle, I calculate the differences along the x-axis, meaning the left-to-right distances between the circles. Adding those differences gives me the answer.
Calculation: 1 + 2 + 2 + 1 + 2 + 2 + 2 = 12
Solution Code: 12
Red Temple Puzzle 3 Solution
In the third puzzle, I focus on the lines inside the figures and the clues provided by the buttons. The chalk drawing also helps me identify exactly what I should count.
Puzzle 3 Hints
- Hint 1: I examine the three buttons carefully and look for anything unusual about them.
- Hint 2: The chalk drawing has a value of 2. I need to identify which feature appears twice in that figure.
- Hint 3: For the second figure, I assume the design is symmetrical when working out the answer.
Puzzle 3 Code
The solution comes from counting the intersecting lines in each figure. When I account for the symmetry of the second figure, its total is 16, calculated as 8 × 2.
Solution Code: 616 (6 and 16)
Red Temple Puzzle 4 Solution
The fourth puzzle presents four different figures and four buttons. I need to recognize the number concealed inside each design rather than simply counting its individual lines.
Puzzle 4 Hints
- Hint 1: I compare all four figures to identify their similarities and differences. Some shapes might look familiar.
- Hint 2: Because there are four figures and four buttons, I consider whether each figure represents one digit of the final code.
Puzzle 4 Code
Each figure contains a number hidden within a square. I identify the embedded number in every figure and enter the four digits in order.
Solution Code: 5297
Red Temple Puzzle 5 Solution
For the fifth puzzle, I have to compare pairs of symbols across three columns. The trick is to apply a specific logic operation to their line segments rather than treating each symbol as a complete number.
Puzzle 5 Hints
- Hint 1: There are three columns and three buttons, suggesting that each column produces one digit of the combination.
- Hint 2: I draw the two symbols from each pair side by side, then separate their matching and nonmatching segments to understand the differences.
- Hint 3: I need to apply a logic gate to the symbols to reveal the resulting number.
Puzzle 5 Code
I use the XOR logic operation on each pair of symbols. This means I keep only the segments that appear in one symbol but not in the other. Any segment shared by both symbols is excluded.
Applying this rule to all three columns reveals the combination.
Solution Code: 357
Red Temple Puzzle 6 Solution
The sixth puzzle might initially seem difficult because part of the mural is missing. However, I can solve it without recovering that missing piece by using a method I’ve already encountered.
Puzzle 6 Hints
- Hint 1: I don’t need to find the missing section of the mural to complete this puzzle.
- Hint 2: This puzzle follows exactly the same principle as an earlier one. The only additional difficulty is that some information is missing.
Puzzle 6 Code
I solve this puzzle the same way as Puzzle 4. Each figure contains a number embedded in a square, so I look for the hidden number in both figures despite the incomplete mural.
Solution Code: 64
Red Temple Puzzle 7 Solution
The seventh puzzle requires me to examine the wall more carefully and understand how multiple number symbols can overlap. The highlighted lines and nearby buttons both contribute to the answer.
Puzzle 7 Hints
- Hint 1: I start by shining a light on the wall to reveal more information.
- Hint 2: I examine the figure and consider which number symbols I could draw inside it.
- Hint 3: The three buttons on the side indicate which digit of the code each highlighted line corresponds to. For example, the first line at the top relates to the second digit.
- Hint 4: I try combining the number symbols I’ve identified to see whether their lines can recreate the original figure.
Puzzle 7 Code
I need to identify three number symbols that form the original figure when combined. Each number must use one of the highlighted lines, and those lines also determine the order of the digits in the final combination.
Solution Code: 523
Red Temple Puzzle 8 Solution
In Puzzle 8, the figures contain triangular cells marked with different numbers of dots. To work out the code, I need to connect those dots to the lines used to draw the game’s number symbols.
Puzzle 8 Hints
- Hint 1: I shine a light on the wall before examining the figures.
- Hint 2: I pay attention to why some triangles contain one dot while others have two.
- Hint 3: The missing piece of the third figure isn’t necessary to solve the puzzle.
- Hint 4: I try drawing different number symbols inside the figures and check whether the dots match the lines of those numbers.
Puzzle 8 Code
The dots tell me how many lines of a number symbol are adjacent to each triangular cell. By matching the dot counts with the lines in the grid, I can identify the three numbers.
Solution Code: 097
Red Temple Puzzle 9 Solution
The ninth Red Temple puzzle works differently from the previous ones. Instead of solving another standalone number pattern, I need to use information from puzzles I’ve already completed.
Puzzle 9 Hints
- Hint 1: I keep in mind that this puzzle doesn’t follow the same approach as most of the earlier challenges.
- Hint 2: I shine a light on the wall to reveal additional clues.
- Hint 3: I inspect the buttons closely and look for anything unusual about them.
- Hint 4: I examine the three small rectangles of different widths that interact with my Moon. Their appearance resembles something else inside the room.
- Hint 5: I open my map and look for a similar arrangement or pattern.
- Hint 6: The three large empty squares represent puzzles I’ve already solved earlier in the temple.
Puzzle 9 Code
The three squares correspond to Puzzles 4, 5, and 6 on the second floor. I use the correct digits from their previous solutions and combine them in the required order to form the final code.
Solution Code: 9374