I use this guide to work through the Mirror of Sisyphe achievements in Limbus Company, from dungeon clears and E.G.O Gift collections to fusion challenges, specific team loadouts, combat objectives, and Extreme Mode. I have grouped the requirements with the approaches I use so I can plan several achievements during the same run.
MD8 Achievements Guide
Unless an achievement specifically says otherwise, I must claim the rewards from the run for it to count. Combat achievements are an important exception: most of them register as soon as I meet the requirement in battle.
Most of my routes assume Hard Mode, which makes many collection achievements more manageable. When an objective works in Normal Mode, I point that out. If I am still building my roster, I can earn achievement experience from weekly runs without clearing every objective; the main reward I would miss is the banner for reaching 100% achievement completion.
I also make use of Starlight. Spending it on Graces can help with difficult floors, gift collection, and shop objectives. When I have enough IDs available, I consider a multi-status team to benefit from more than one type of E.G.O Gift.
Table of Contents:
Dungeon Clear and Collection Achievements
Clear Requirements
- Clear Floor 5 or higher up to 50 times.
- Clear Floor 5 or higher in Hard Mode up to 10 times.
- Clear Floor 10 or higher up to 10 times.
- Clear Floor 15 once.
For a newer account, I can use a rental team for Hard Mode clears. Rental teams only go as far as Floor 5, but they are useful if my own IDs are not leveled enough.
Compendium Collection Requirements
- Unlock at least 40 Normal Theme Packs.
- Unlock at least 70 Hard Theme Packs.
- Unlock at least 10 Extreme Theme Packs.
- Unlock 20 E.G.O Gifts for each main status keyword.
- Unlock 350 E.G.O Gifts in total.
These milestones build up naturally as I play. To fill a missing compendium entry faster, I can search for any Tier I–III E.G.O Gift at the start of a run, even if I have not unlocked it yet. It is added to the compendium as soon as the run begins, so I can forfeit and repeat with another missing gift.
Single-Run Collection Requirements
Each of the following challenges requires a clear of Floor 5 or higher:
- Finish with 30 or more E.G.O Gifts.
- Finish with 20 or more Tier IV Gifts.
- Finish with 10 or more Tier IV Fusion Gifts.
- Finish with 8 or more Theme Pack-exclusive Gifts.
- Finish with 15 or more Gifts of one main status keyword, or 10 or more Gifts of one damage type.
I find the 30-gift target straightforward if I keep purchasing gifts whenever the shop offers them. The more specialized targets require a little planning, which I cover below.
How I Collect 15+ Status E.G.O Gifts
For the Burn, Bleed, Tremor, Rupture, Sinking, Poise, and Charge challenges, I focus on increasing the number of gifts I hold rather than immediately fusing everything I find.
- Use starting Gift Search in Normal Mode. It can offer gifts normally restricted to Hard Mode. I can combine this with Theme Pack searching to make a 15-gift run easier.
- Avoid fusing the target status unnecessarily. A fusion result counts as only one gift, so the total drops. The ingredients also stop appearing once I own the fusion that uses them.
- Take advantage of the available gift pool. Duplicate gifts will not appear in the shop or fusion results. If I own three of four possible Tier I gifts for a status, fusing for the last one can be better than repeated shop refreshes.
- Buy expendable gifts when useful. I can use unwanted purchases as fusion materials. If keyword fusion stops showing my chosen keyword, I have exhausted the currently fusable gifts of that tier.
- Remember how recipe fusions affect the pool. A recipe fusion behaves as though its ingredients are still owned when determining fusion results. This can help me steer the outcome.
- Save costly rerolls for later. I normally reassess the shop around Floor 3 because earlier floors have not yet supplied enough spare gifts and materials.
- Continue beyond Floor 5 in Hard Mode if necessary. Parallel Superposition gives another chance at Floor 5 Theme Packs across Floors 6–10. After Floor 5, I can forfeit and claim rewards without winning those extra floors.
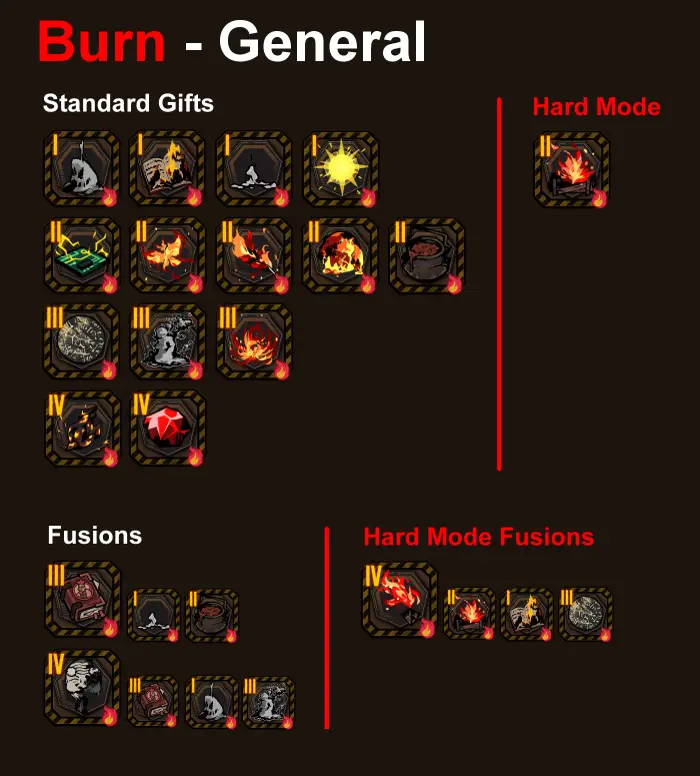
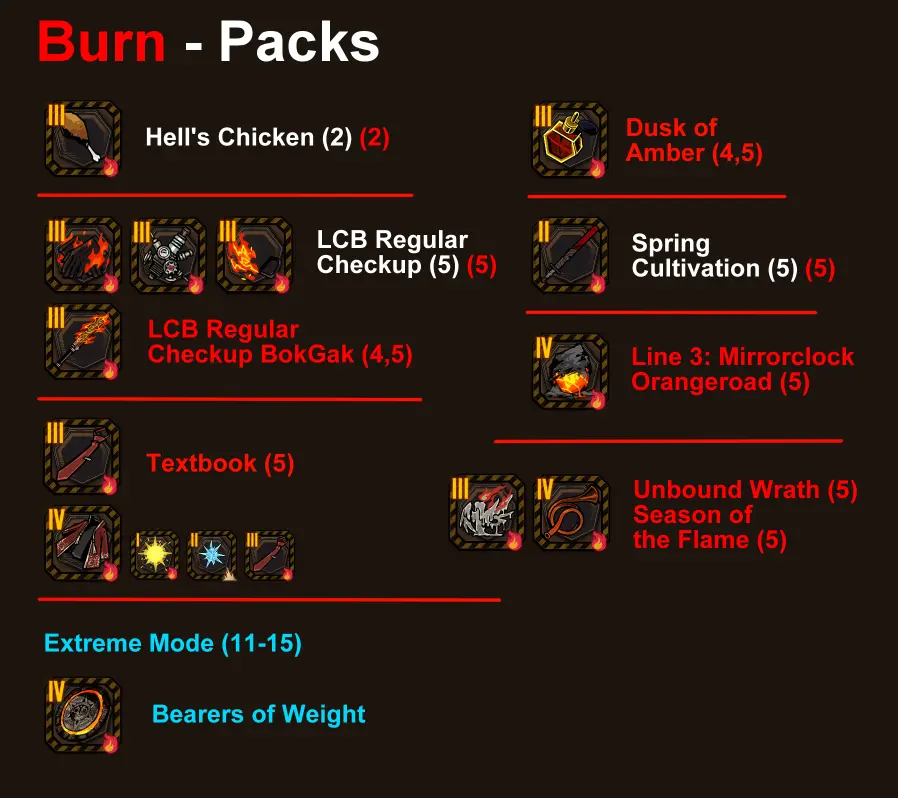
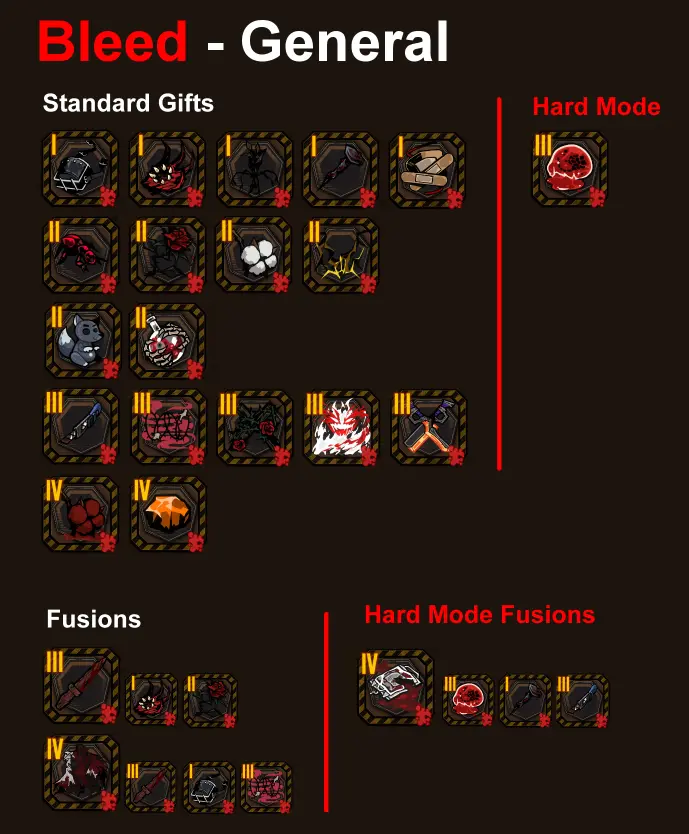
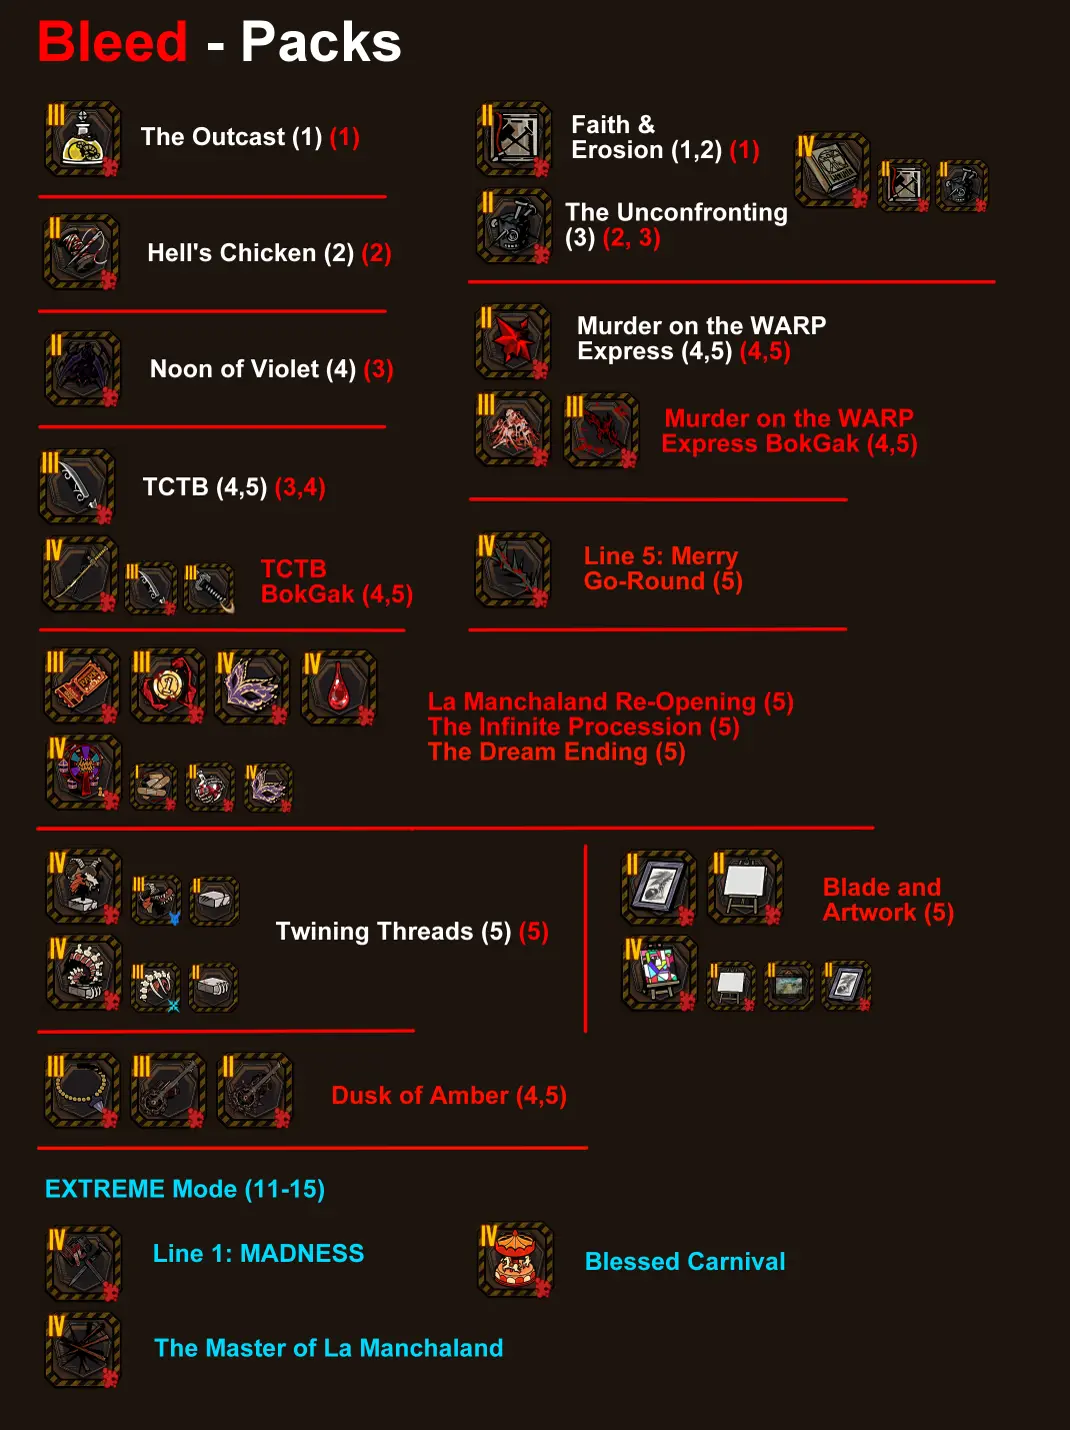
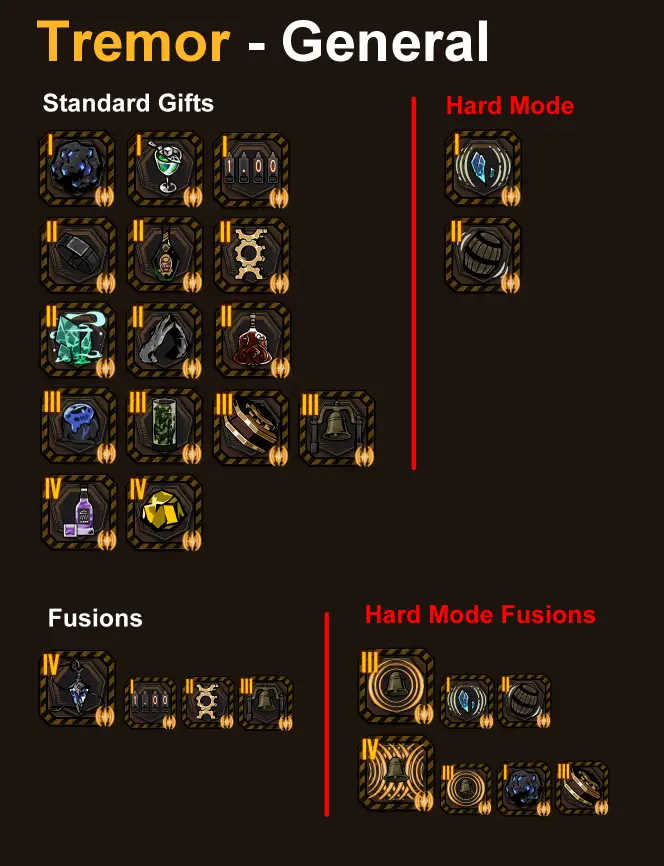
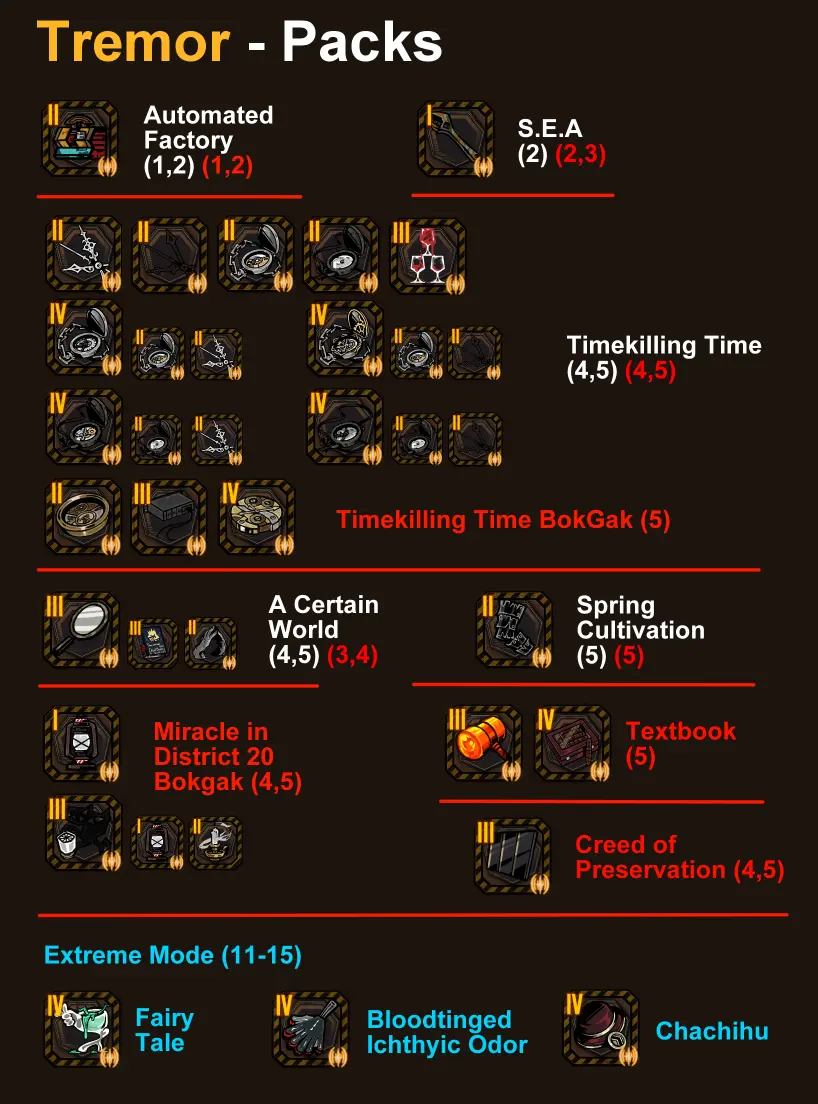
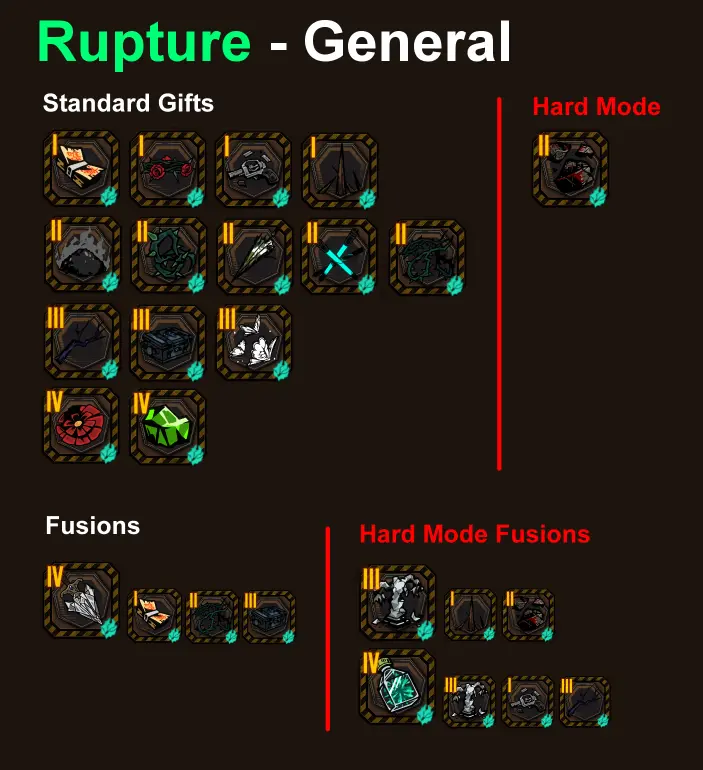
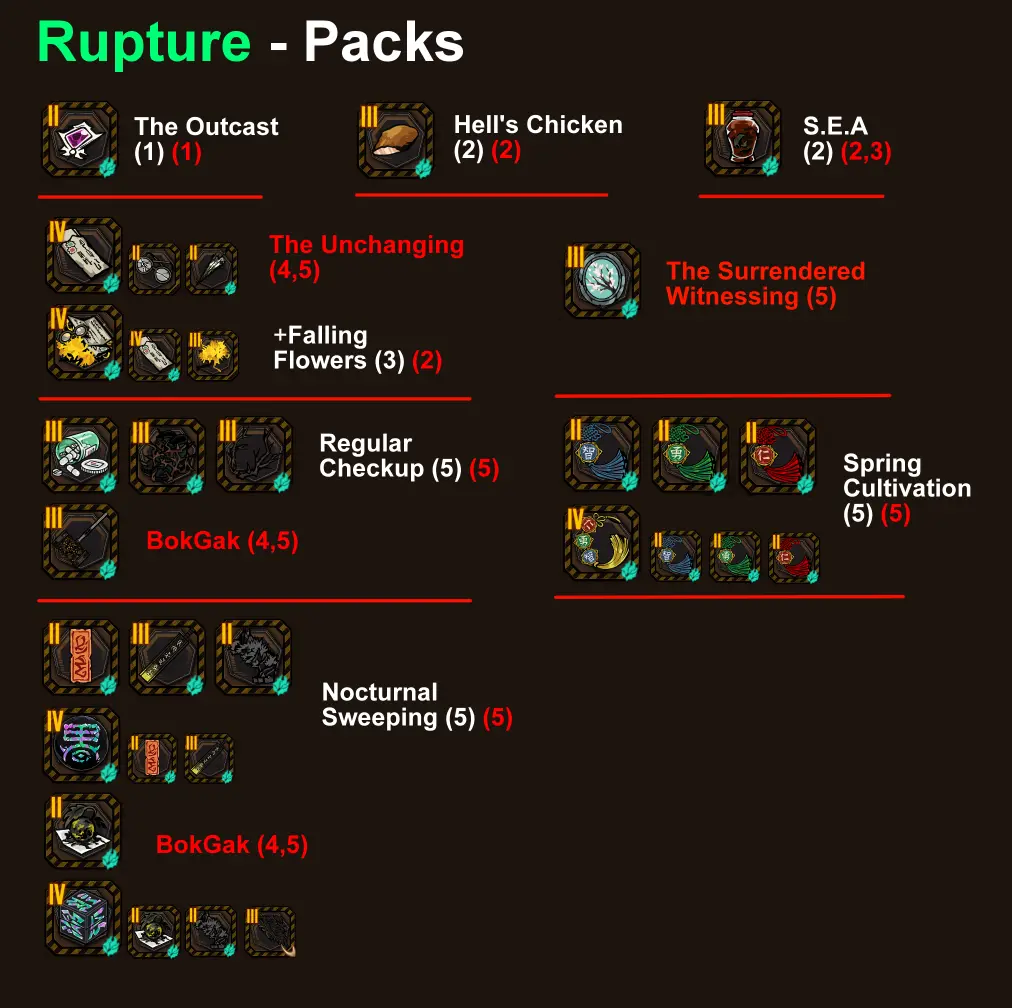
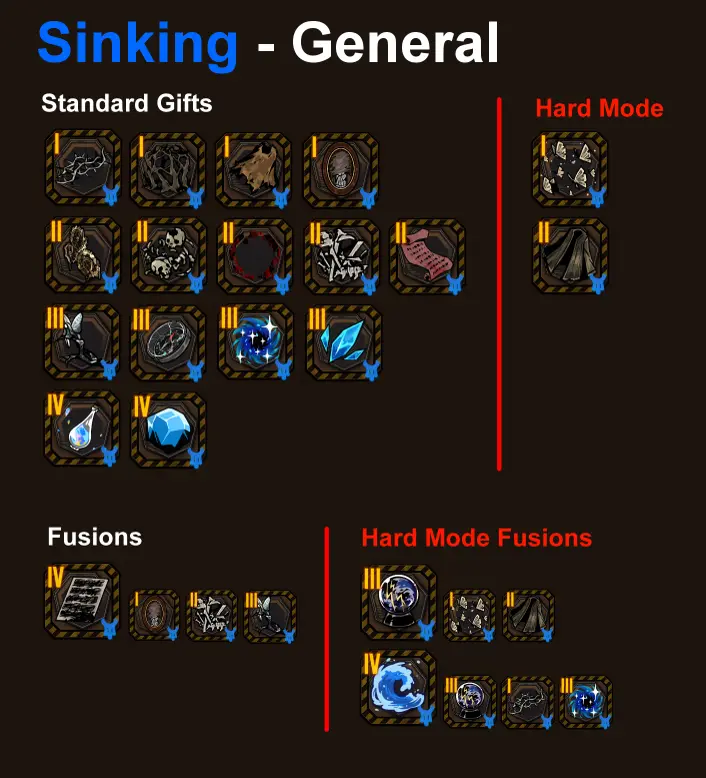
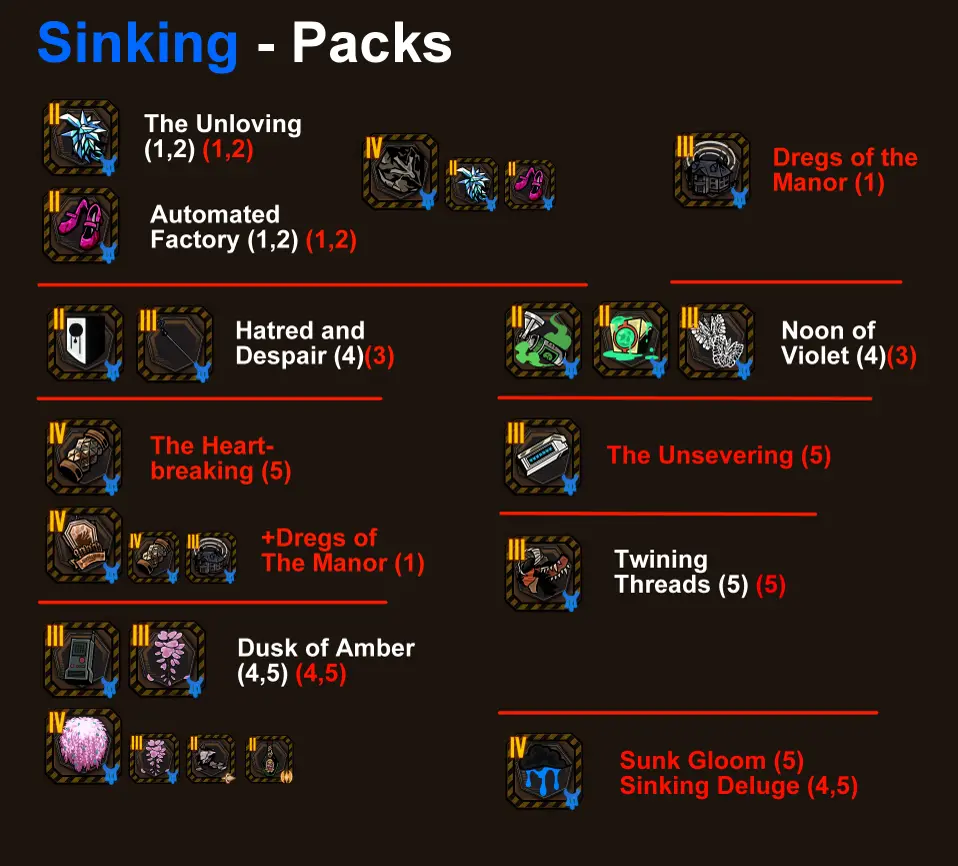
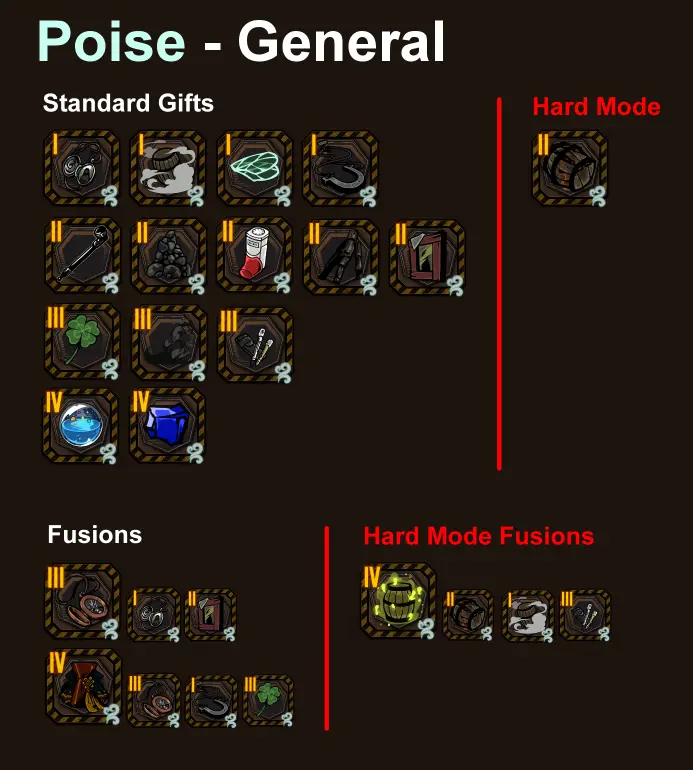
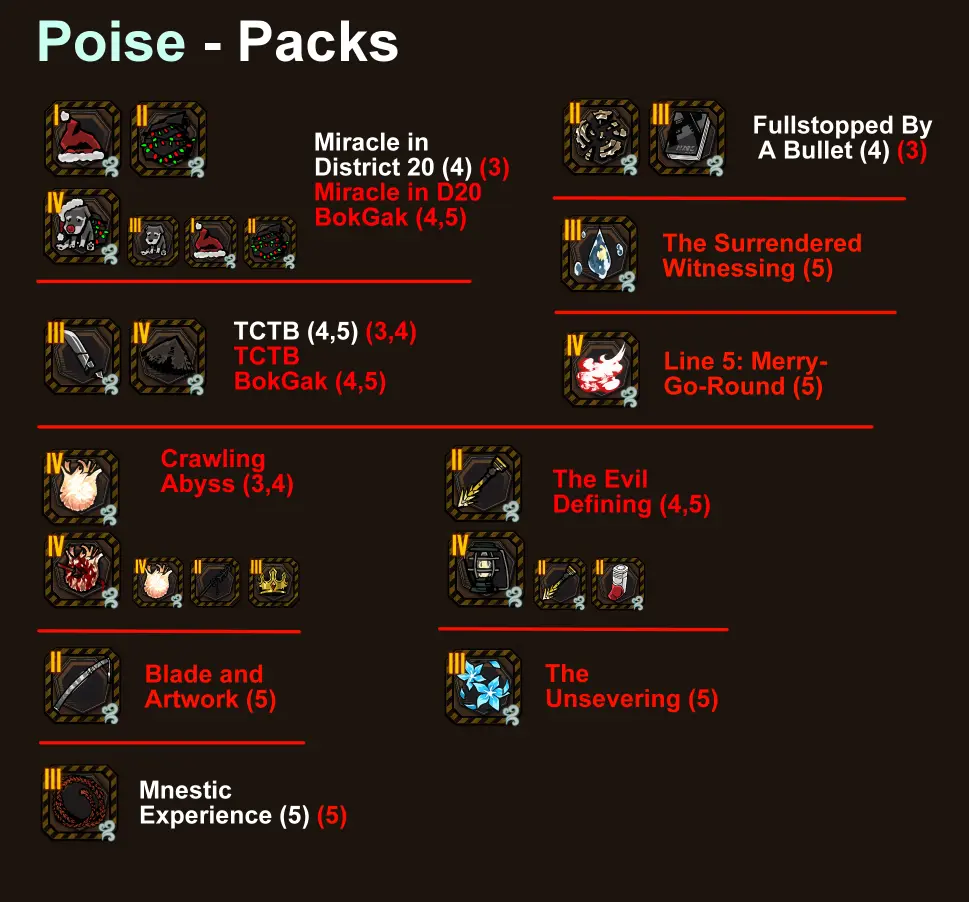
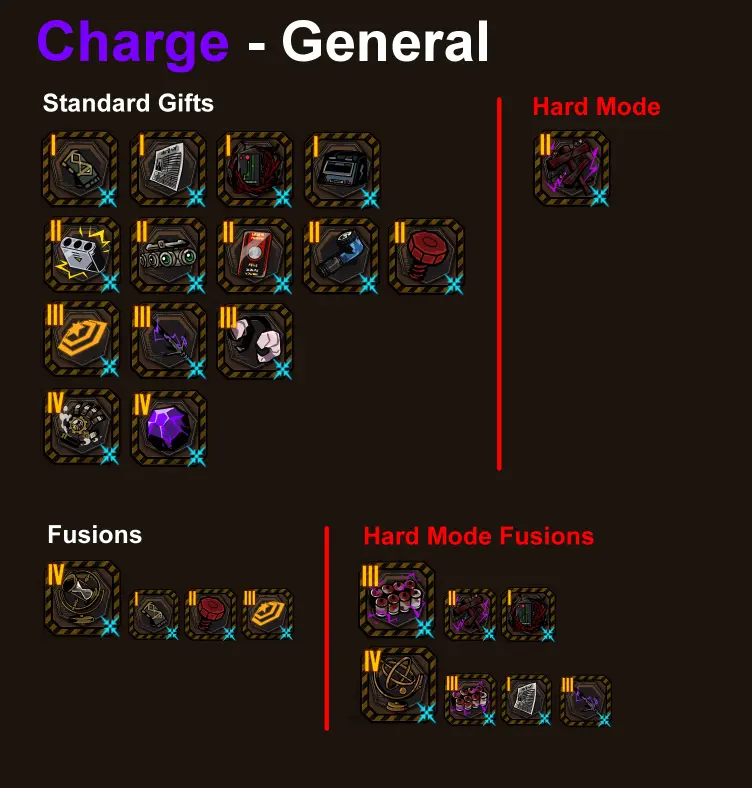
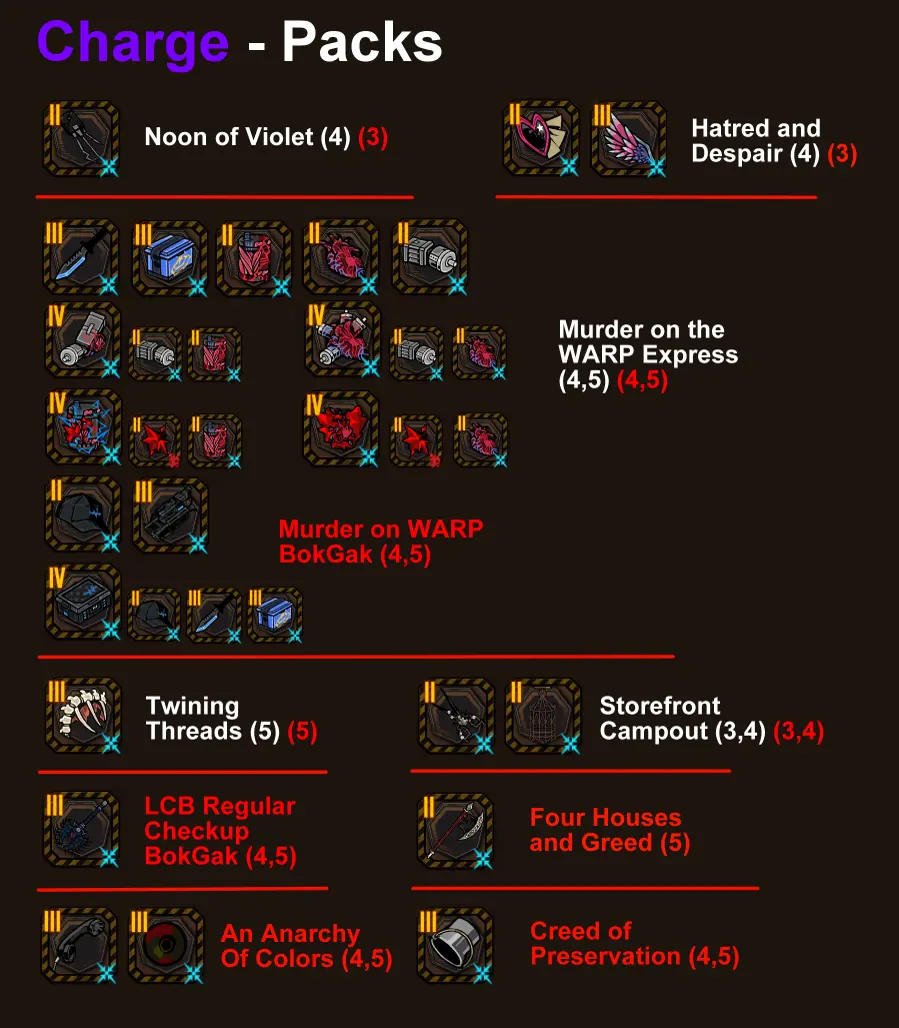
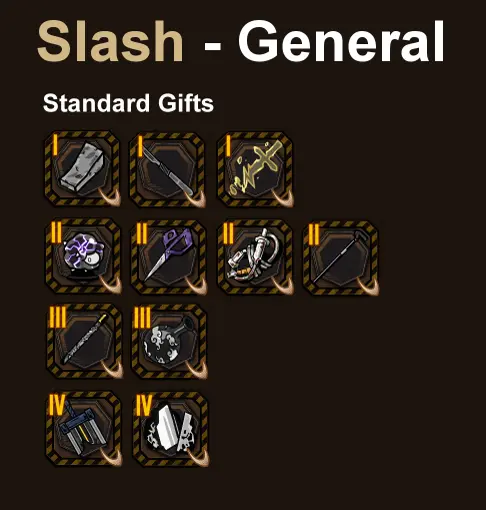
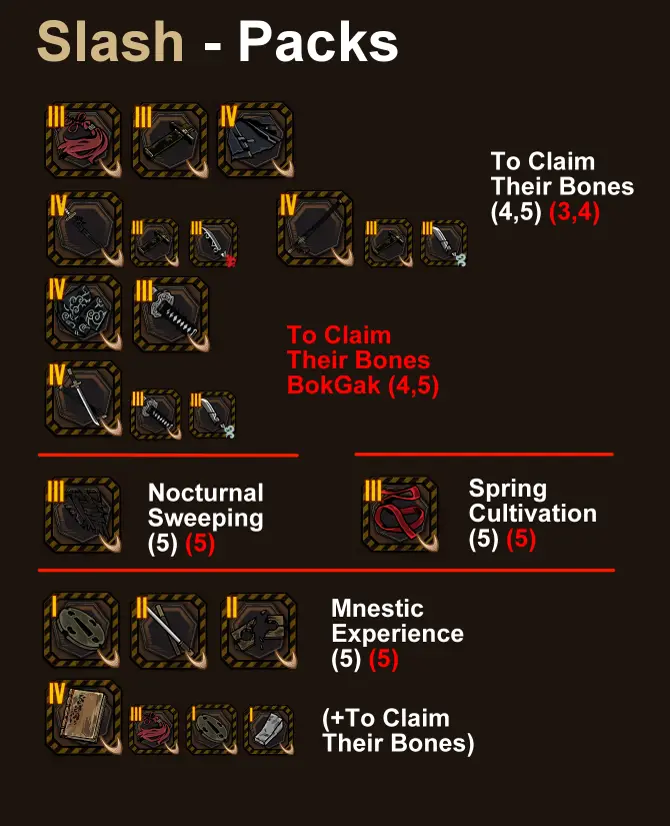
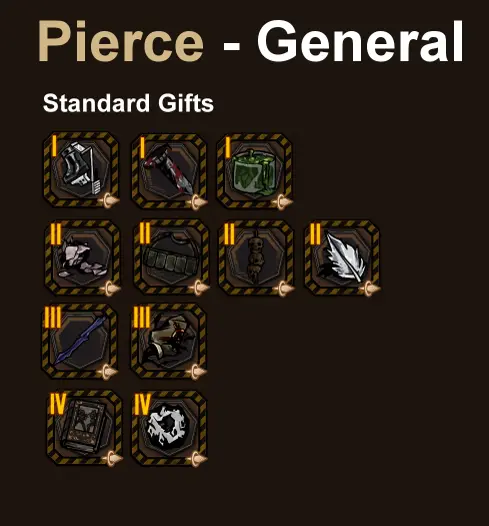
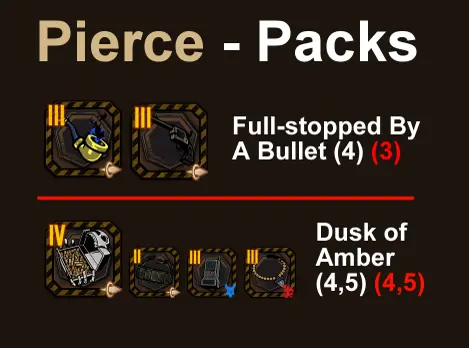
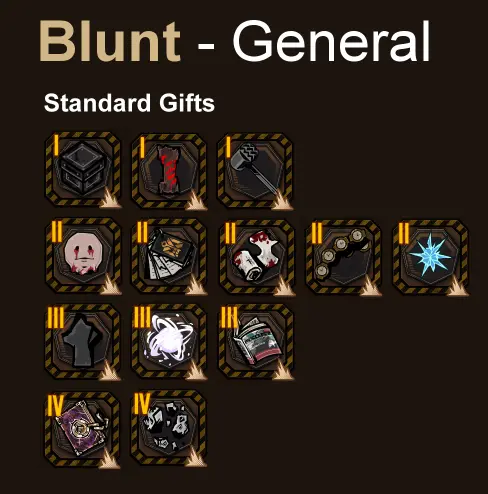
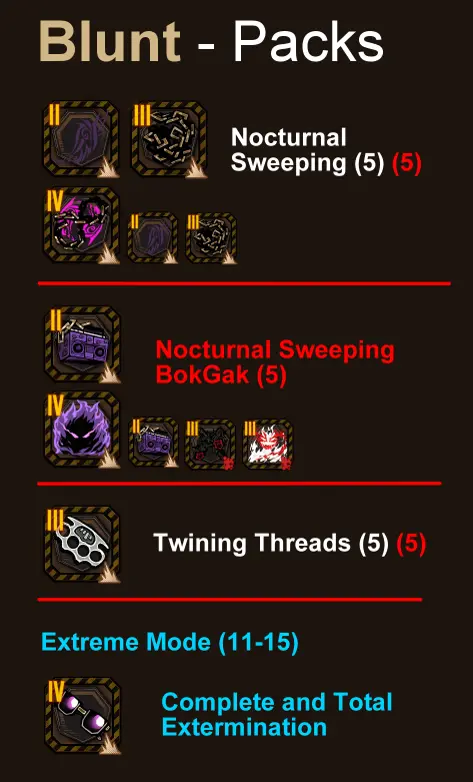
The first image for each status shows generally available E.G.O Gifts. The second covers Theme Pack-specific gifts, which I can also obtain by fusion while inside the matching pack. White floor numbers in these references indicate Normal Mode availability; red floor numbers indicate Hard Mode availability. A missing white number means the pack or gift is restricted to Hard Mode.
15+ Burn E.G.O Gifts
Burn is one of the tighter collections, with only 17 gifts available in Normal Mode. I rely on Theme Pack gifts to push the total higher, especially during a longer Hard Mode run.
15+ Bleed E.G.O Gifts
I find Bleed one of the easiest 15-gift challenges because there are plenty of Bleed E.G.O Gifts available.
15+ Tremor E.G.O Gifts
Tremor is also fairly forgiving. Timekilling Time supplies many useful gifts, and its availability on multiple floors gives me more opportunities to complete the collection.
15+ Rupture E.G.O Gifts
Rupture has strong options in the later floors. If I already hold most of the standard gifts, I use keyword fusions to chase the additional gifts when they do not appear in shops or clear rewards.
15+ Sinking E.G.O Gifts
I like starting with The Unloving for early Sinking gifts. Noon of Violet is a useful later pick because I may be able to fuse its gifts or receive them as pack rewards. Hatred and Despair is a backup, although it provides fewer Sinking options.
Dregs of the Manor can appear in Normal Mode, but its Sinking gift is Hard Mode-exclusive.
15+ Poise E.G.O Gifts
Poise gives me plenty of possible gifts, but many of them are limited to Hard Mode. Crawling Abyss itself can appear in Normal Mode; its relevant Poise gift cannot.
15+ Charge E.G.O Gifts
Charge becomes much easier when I can select Murder on the WARP Express later in the dungeon, since that pack offers a large number of Charge-related gifts.
10+ Slash, Pierce, and Blunt E.G.O Gifts
Slash Gifts
I consider Slash the easiest of the three damage-type collections. To Claim Their Bones (TCTB) provides particularly helpful choices.
Pierce Gifts
Pierce is manageable as well, especially with the gifts available from Full-stopped by a Bullet.
Blunt Gifts
For Blunt, Nocturnal Sweeping is the main pack I watch for.
Tier IV E.G.O Gift Achievements
I tackle the highest Tier IV collection targets in Hard Mode, since they can no longer all be completed in Normal Mode. The goals are to clear with at least 20 Tier IV Gifts, 10 fusion-only Tier IV Gifts, and 8 Theme Pack-exclusive fusion gifts.
Graces I Prioritize
- Chance Comet++: Three guaranteed Tier IV Gifts at different stages of the run, plus extra gifts from fusion.
- Moon Star-shop++: A base 25% chance of a Super Shop, where fusion bonuses reduce the materials needed for Tier IV results.
- Binary Star-shop++: More gifts for sale, more Cost from fights, and a better chance to find Tier IV Gifts in shops.
- Perfected Possibility++: Three Tier III Gifts at the start of the run.
How I Build a 20+ Tier IV Run
When using Gift Search, I can start with Nagel und Hammer Scriptures and Squalidity to make Wholeness. I then use The Unloving and Automated Factory on Floors 1 and 2 to obtain Haunted Shoes and Frozen Cries for Hoarfrost Footprint. Normally, I would only be able to pursue one of these easy fusions at the start. From Floor 3 onward, I take any pack offering a guaranteed Tier IV reward.
For a general 20-gift target, I do not need to force specific recipes. I gather two Tier III Gifts and one Tier II Gift, then fuse them into whatever Tier IV result I get. I can delay the fusion until later floors because holding the ingredients removes those gifts from shop and fusion rolls, making future rerolls more effective.
Unless I specifically need recipe ingredients, I mostly buy Tier III and Tier IV Gifts in shops. Lower-tier gifts come from encounters and rewards; Tier I Gifts can often be sold for Cost because they do not directly contribute to ordinary Tier IV fusion. Super Shops are an exception. I also prioritize difficult or Abnormality encounters for the combination of Cost and a free gift.
I favor packs with guaranteed Tier IV rewards over speculative choices. Otherwise, To Claim Their Bones has several fusion paths; Timekilling Time and WARP Express offer flexible ingredients and recipes; and Railway packs can provide Tier IV shop stock or rewards. Line 5 stands out because several events can award Tier IV Gifts.
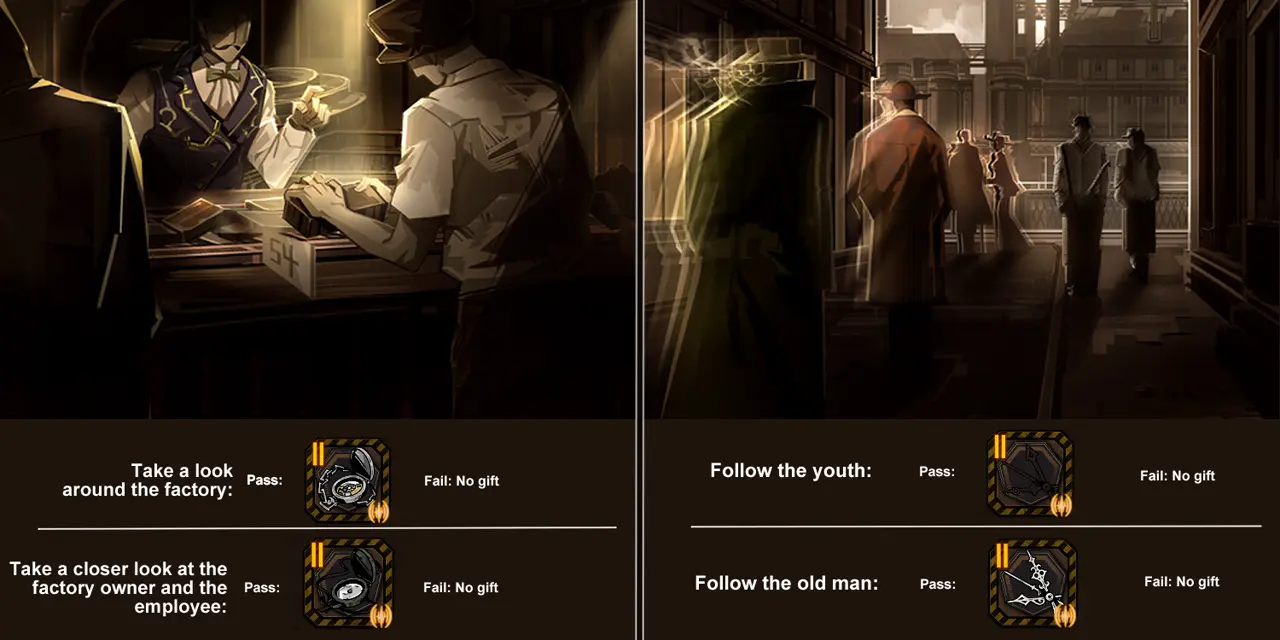
The reference below covers two events where selecting the right option can reward a Tier IV Gift.
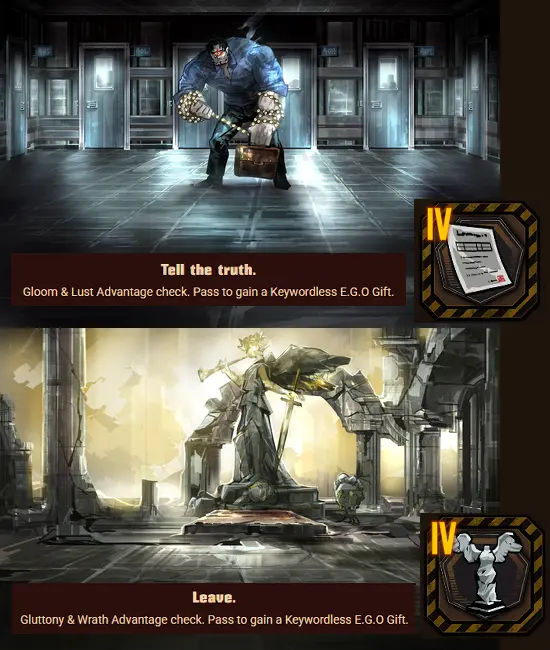
If I am also collecting fusion-only and Theme Pack-specific Tier IV Gifts, I plan those packs during the same run rather than treating the challenges separately.
Tier IV Fusion and Theme Pack Fusion Achievements
I use the following references for Tier IV fusion recipes and Theme Pack-specific gifts. They support two overlapping targets: holding 10 or more fusion-only Tier IV Gifts and obtaining 8 or more Theme Pack-exclusive fusion gifts.
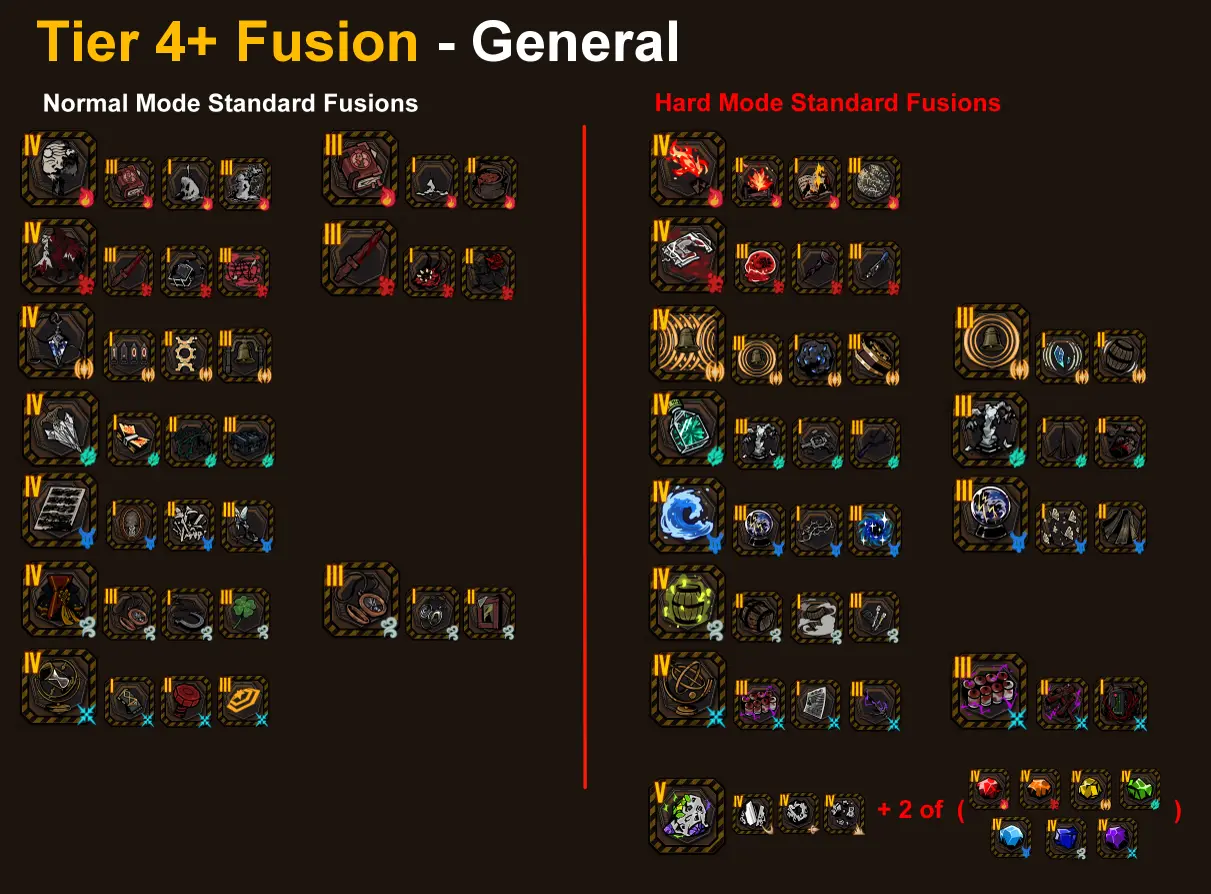
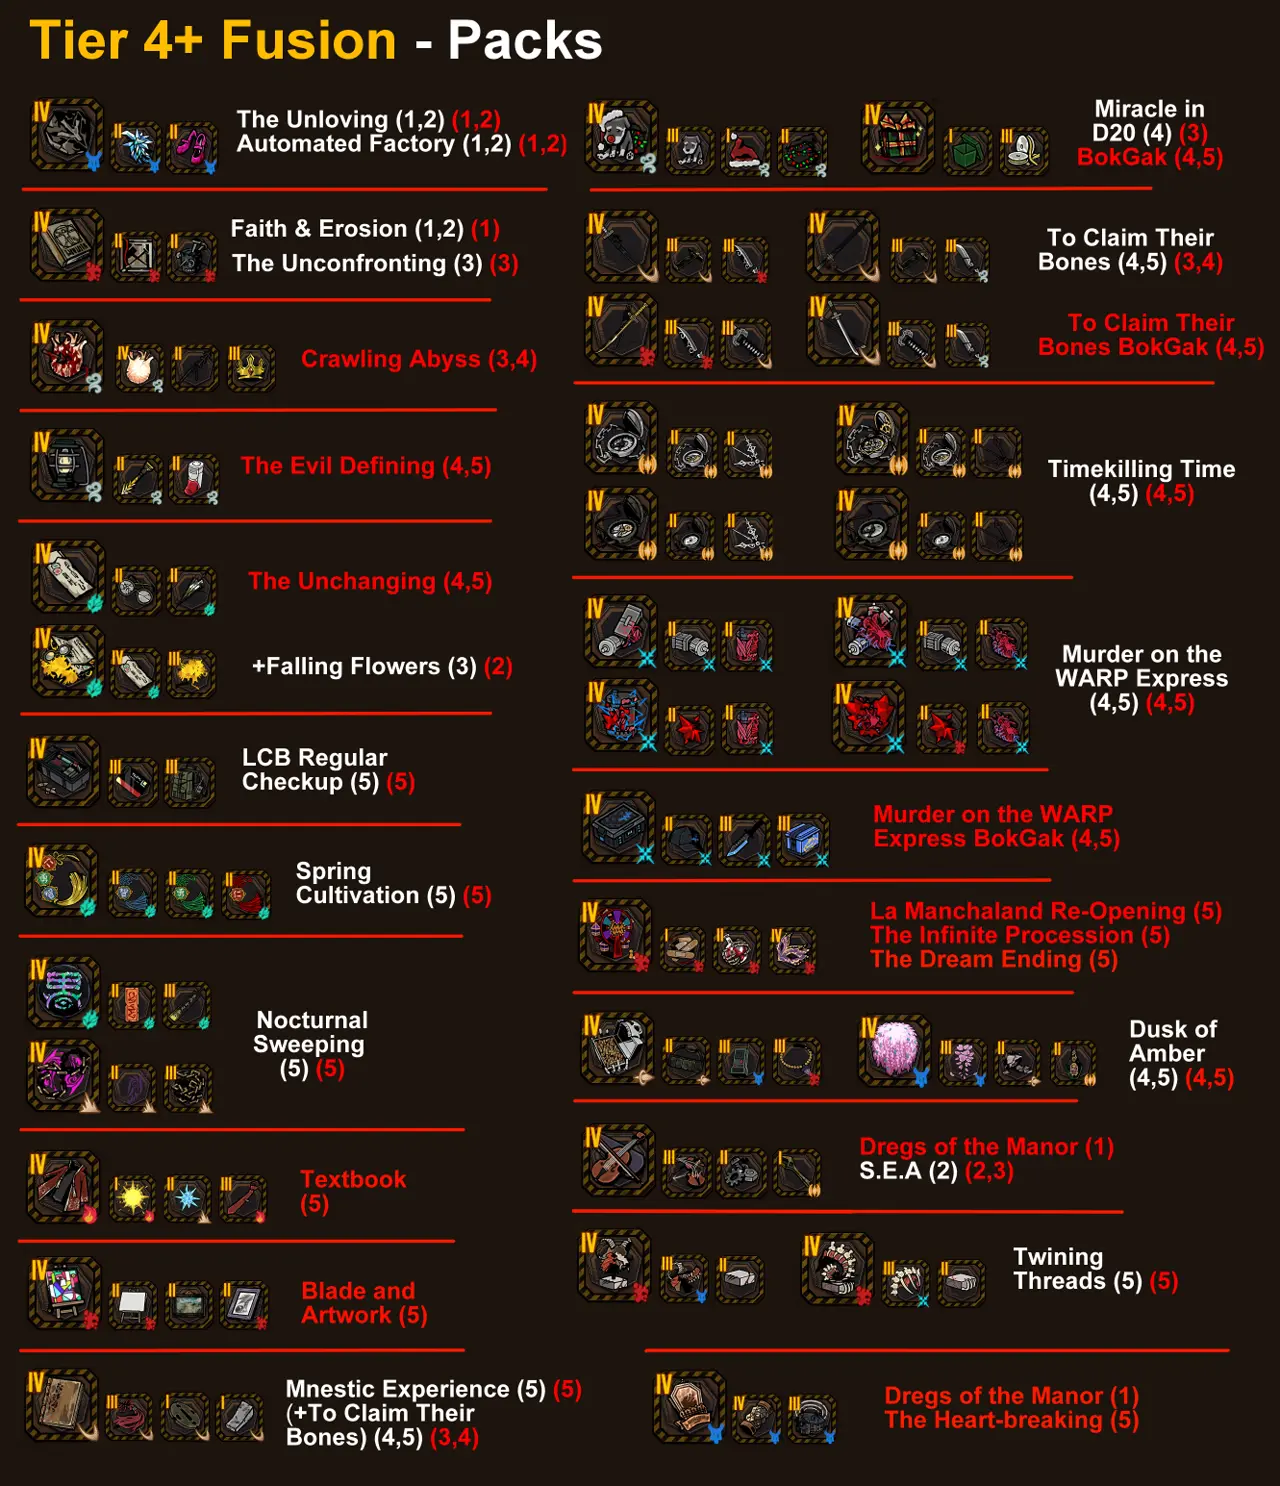
Fusion Rules I Follow
- Secure early packs first. A Floor 10 run gives me six opportunities to encounter packs from Floor 5 onward, so I prioritize valuable early packs before those chances disappear.
- Use BokGak packs for missing ingredients. A later BokGak version can supply something I missed in the original pack, particularly for TCTB and TKT.
- Keep gifts until I need to fuse. Held gifts stay out of the shop pool. Because the achievement checks my collection when the run ends, there is no reason to fuse every recipe immediately.
- Exploit keyword fusion pools. If I own all but one Tier II Charge Gift, for example, a Tier II Charge fusion must produce the remaining eligible gift. I use that principle in packs such as Timekilling Time and WARP Express.
Theme Pack-exclusive fusions do not all have to be Tier IV: Shadow Monster and Handheld Mirror are lower-tier exceptions. I still concentrate on Tier IV recipes so I can work toward all three achievement targets together.
My Fusion Run Route
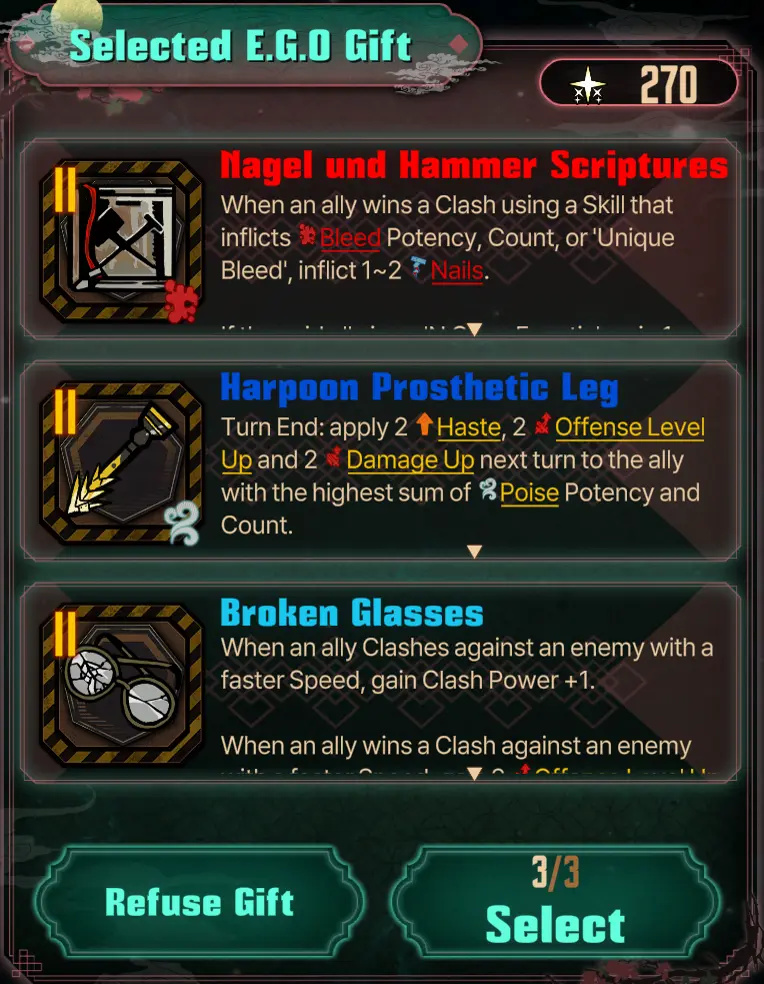
For Gift Search, I start with Nagel und Hammer Scriptures, Broken Glasses, and Harpoon Prosthetic Leg. Each comes from a pack with a single specific fusion gift and can combine with general gifts, so I do not need to visit those packs later just for those ingredients.
- Floors 1–2: I choose The Unloving and Automated Factory for Haunted Shoes and Frozen Cries, allowing me to fuse Hoarfrost Footprint.
- Floor 3: I take The Unconfronting, collect Squalidity, and complete Wholeness.
- Floor 4 onward: I reroll Theme Pack choices toward the story packs in the route image, especially packs offering multiple possible fusion results.
During the climb, I buy useful status-fusion ingredients, prioritizing recipes with only three total components. I choose event nodes and harder fights when I can because extra gifts narrow the possible shop outcomes. Hard Mode also opens more Tier IV status fusions, so I check the available recipes closely.
I avoid spending more than one or two early shop rerolls unless necessary. If I have no Theme Pack rerolls left, I can spend Starlight to search for a useful remaining pack.
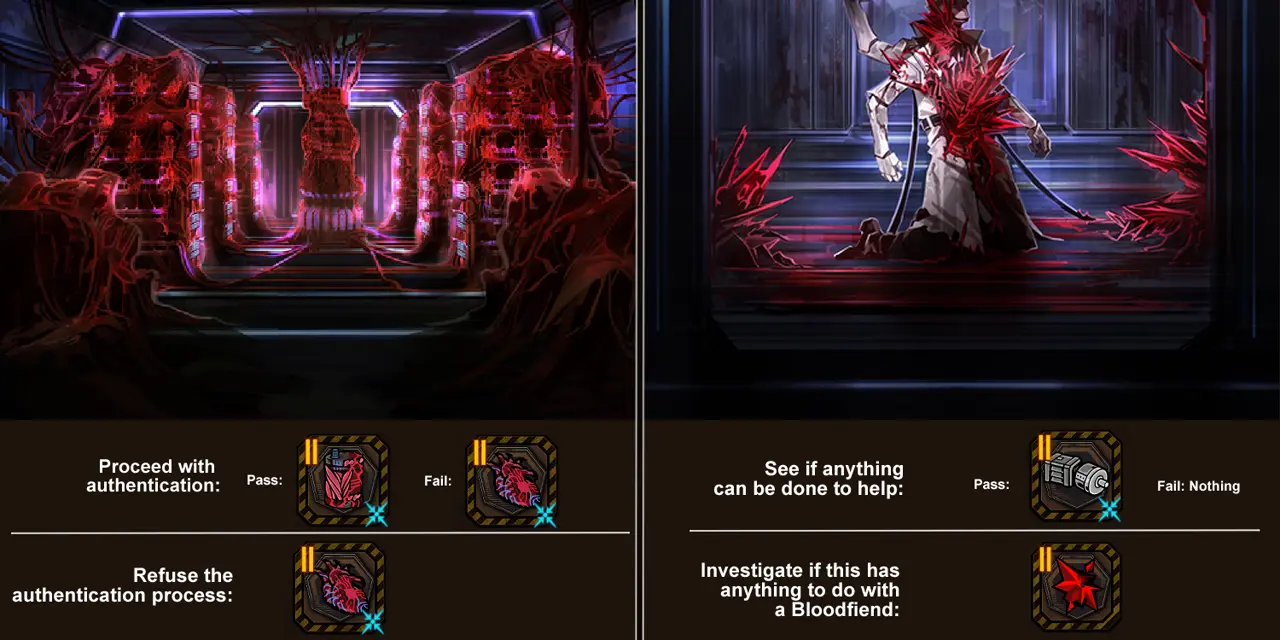
These last two references show event-choice outcomes relevant to fusion ingredients in Timekilling Time and WARP Express.
Team Loadout Achievements
Some achievements require me to clear Floor 5 or higher with at least five IDs sharing a status archetype. I can combine these with the 15+ status-gift objectives, and with good starting gifts and shop Graces I may finish two status targets in one Floor 5 run.
The faction and Theme Pack achievements are more restrictive, so I build my runs around those requirements first. I can finish several of the status-based team challenges along the way.
Floor 5+ Faction Requirements
- 2 Thumb IDs out of 4.
- 5 Sisyphe IDs out of the 7 currently listed.
- 6 Office/Workshop IDs. I have not yet confirmed the full list of eligible IDs, so I treat the roster below as provisional.
The potential Office/Workshop groups listed for this requirement are Rosespanner Workshop (3), Dawn Office (3), Fullstop Office (2), Firefist Office (1), Fanghunt Office (1), Hook Office (1), Jeong’s Office (1), Molar Office/Workshop (4), Multicrack Office (2), and Wedge Office (3, listed as upcoming). Dawn, Fullstop, Hook, Jeong’s, and Wedge are Walpurgis-locked.
Theme Pack and Active-ID Requirements
For the pack-specific achievements, I place the required IDs among the first seven Sinners used in the boss encounter. Backup IDs do not count. Those required IDs may die during the fight, but I must complete all packs listed for an achievement in one run.
- Le Noir: All 3, including Don — Readvent of Gluttony.
- Le Rouge: All 3, including Sinclair — Creed of Preservation.
- Chefs: Chef Ryoshu and Chef Gregor — Hell’s Chicken.
- Molar Office: All 4 — S.E.A.
- Pequod: All 3, including Ishmael — Crawling Abyss, Evil Defining, and S.E.A C.R (Extreme).
- Kurokumo: All 6, including Gregor — Yield My Flesh BokGak.
- Blade Lineage: 6 of 7, including Meursault — Full-stopped by a Bullet, Yield My Flesh BokGak, and Mnestic Experience.
- H Corp: 7 of 11, including Hong Lu and Ishmael — Nocturnal Sweeping, Four Houses and Greed, Surrendered Witnessing, and Spring Cultivation. I have not confirmed whether the BokGak version of Nocturnal Sweeping qualifies.
These routes require frequent ID swaps and some very specific units. I use three planned runs on a developed account, but I can split the objectives across more attempts if I lack the necessary levels or IDs. Stronger units and Dante’s Morositas ability may help carry underleveled required IDs through some encounters.
Run 1: Sisyphe Office
Planned packs: Chefs → Molar → Kurokumo → Noir → Rouge. Ending targets: Office, Sisyphe, Bleed, Tremor, and Charge.
This starting team uses Multicrack Faust as a flexible Office slot and an accessible Charge ID; Dawn Office can also fill that role. The route uses Hook Hong Lu, a Walpurgis ID, to optimize the overlap.
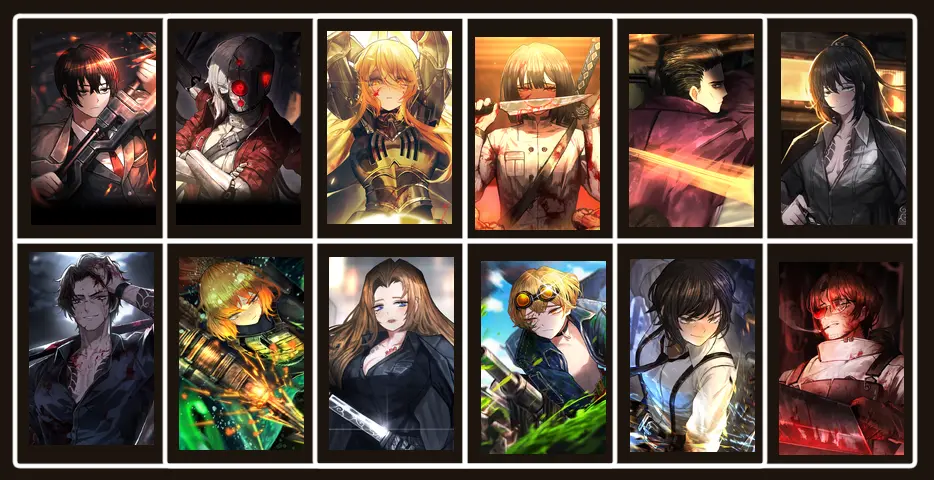
- Floor 1: Any pack.
- Floor 2 — Hell’s Chicken: Bring both Chef Gregor and Chef Ryoshu into the boss fight.
- Floor 3 — S.E.A: Swap Ryoshu and Gregor to Kurokumo; use all four Molar Office IDs on the boss.
- Floor 4 — To Claim Their Bones BokGak: Change Ishmael to Kurokumo and Sinclair to Le Rouge. Use all Kurokumo IDs on the boss.
- Floor 5 — Creed of Preservation: Change Ryoshu and Hong Lu to Le Noir; change Gregor to Dawn Office or Rosespanner. Include Don, Ryoshu, and Hong Lu on the boss.
- Floor 6 — Readvent of Gluttony: Change Ishmael and Heathcliff to Le Rouge, then change Hong Lu to Hook Office. Include Ishmael, Sinclair, and Heathcliff in the boss fight. Five Sisyphe IDs are still enough at the end of the run.
Run 2: Pequod Career Loop
Planned route: Pequod → H Corp → Pequod. Ending targets: Thumb, Burn, Rupture, Sinking, and Poise.
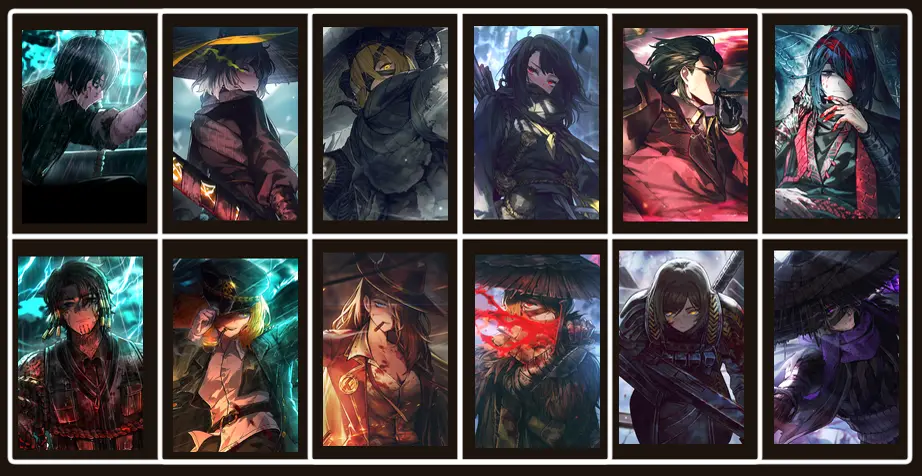
This route requires Extreme Mode. I bring Theme Pack reroll Starlight Graces because Theme Pack Search is unavailable in Extreme Mode. The required route ends on Floor 12, although I can continue to Floor 15 for another achievement. If I do, I consider avoiding Lunar Memory to preserve the separate Extreme achievement that prohibits obtaining it.
- Floor 3 — Crawling Abyss: Bring the Pequod crew into the boss fight.
- Floor 4 — Evil Defining: Bring the Pequod crew into the boss fight again.
- Floors 5–8: Complete Nocturnal Sweeping, Four Houses and Greed, Surrendered Witnessing, and Spring Cultivation in any order. Swap Ishmael to Heirarch Candidate, and use Hong Lu, Ishmael, and the other five required Heishou in each boss fight.
- Floors 9–10: Select the Line 3, Line 4, or Line 5 Railway packs to prevent those options appearing during Extreme floors. Swap Ishmael back to Pequod Captain, Faust to Index, and Ryoshu to House of Spiders.
- Floor 11 — S.E.A C.R: Look for this Extreme pack. If it does not appear, try the next floor. Use the Pequod crew on the boss.
- Floor 12 — Any pack: Switch Yi Sang to Index Nursefather and Heathcliff to Sunshower. There is no special ID requirement for this final boss, so I can end after clearing it.
Unless I am trying to combine this with a full Extreme clear, I do not need to accept any Adversities during this run.
Run 3: Blade Lineage Cleanup
My final planned run is a straightforward Blade Lineage clear. I need a separate run because the Kurokumo and Blade Lineage objectives both use the TCTB BokGak pack and do not fit neatly together with all the other pack requirements.
- Floor 3: Full-stopped by a Bullet.
- Floor 4: To Claim Their Bones (TCTB) BokGak.
- Floor 5: Mnestic Experience.
I bring the required six Blade Lineage IDs, including Meursault, and ensure they take part in the relevant boss fights.
Shop Achievements
Every shop challenge in this section requires me to clear at least Floor 5. Several can be completed during longer gift-collection runs, but I use a dedicated shop run when I want to combine the more demanding ones.
- Refresh the shop up to 50 times.
- Buy up to 50 E.G.O Gifts from shops.
- Win while holding up to 20 enhanced E.G.O Gifts.
- Win with up to 5,000 Cost remaining.
- Spend 3,000 Cost on E.G.O Gifts in one shop visit.
- Sell 5,000 Cost worth of E.G.O Gifts across the run.
- Clear Floor 10 or higher without refreshing the shop gift selection.
- Trigger Rebate Token three times in one run.
My Shop Megarun
I attempt the 50 purchases, 20 enhancements, Rebate Token, 5,000 Cost sold, 3,000 Cost spent in one shop, 5,000 Cost remaining, and no-reroll Floor 10 objectives together. A Floor 10 run asks me to buy an average of five gifts per shop, with Super Shops giving more opportunities.
I do not reroll the shop at all during this route. I aim to buy at least five gifts per visit and favor cheaper, lower-tier gifts early so expensive gifts remain available for the final shop. Binary Star Shop and/or Star of the Beginning Graces help increase shop selection. I use a strong team and can invest Starlight into other Graces, since avoiding rerolls and good fusions makes the combat portion harder. Gift Search for Sharp Needle and Thread is another option mentioned in the original route.
All those inexpensive purchases also provide material for the 20-enhancement achievement. Each gift needs only one enhancement to count. I take Rebate Token as a starting gift to guarantee it: its 20% refund chance triggers on enhancement, and I need three successful triggers. Fifteen enhancements is the statistical average, not a guarantee.
I continue through Floor 10 and aim for a 100% Super Shop chance after its shop. Once I defeat the Floor 10 boss, I enter Extreme Mode and select the Adversity that doubles shop prices. I only need the Floor 11 shop and can abandon before that floor’s boss.
At the Floor 11 Super Shop, I purchase enough expensive gifts to spend 3,000 Cost in a single visit. Then I sell spare gifts until I have gained 5,000 Cost through sales across the run. I find it easiest to track the selling requirement all at once, although earlier sales also contribute.
Important: I still need to hold 20 enhanced gifts when finishing, so I keep enough enhanced low-tier gifts and sell higher-value spares instead. If I avoid creating fusion-exclusive gifts along the way, I can also complete the separate Floor 10 combat-category achievement. Generic fusion results are allowed.
Refreshing the Shop 50+ Times
This one can even be done in Normal Mode with Starlight. Star of the Beginning++ and Moon Star-shop++ grant four free refreshes per shop. By spending the two regular free refreshes, buying six more, then using the two free keyword refreshes, I can reach ten refreshes per shop for 495 Cost per shop. Selling spare gifts and using Cost Graces can cover the expense.
I still prefer Hard Mode. Across ten floors, I need only five refreshes per shop on average, four of which can be free with these Graces. The resulting refresh expense is far more forgiving: about 45 Cost per shop with these Graces.
Combat Achievements: Status Potency
Most combat achievements register immediately when I meet their conditions. Unlike the clear and collection categories, I generally do not need to finish the run or claim rewards. If I am setting up a single challenge, I can spend Starlight on temporary Graces or starting gifts, then abandon the run to get that Starlight refunded.
Bosses I Use for High Status Potency
For 99 Potency, I stack helpful E.G.O Gifts and sometimes defend instead of attacking so the target lives long enough. Bosses with strong protection or invulnerability are particularly useful: So You Want to Get Beat, Hurtily and My Form Empties are my preferred choices. Skin Prophet, Shock Centipede, and Gasharpoon Ahab are other possibilities. I can sometimes search for the preferred fights as early as Floors 3–4. Railway Line 1 on Floor 4 guarantees My Form Empties.
99 Burn Potency
- Fiery Down: Adds Burn Potency and doubles it when above 20.
- Dust to Dust: Provides Burn Count at the start of combat.
- Avoid Glimpse of Flames: Its damage can kill the target before Burn reaches 99.
99 Bleed Potency
- Wound Cleric: Additional Bleed Potency.
- Smoke and Wires: Doubles inflicted Bleed.
- Red-stained Gossypium: Starts combat with 15 Count.
- Sanguine Desire Rodion E.G.O: Useful for maintaining Count, if available.
99 Tremor Potency
- Oscillating Bracelet: Applies Tremor on hit.
- Nixie Divergence: Adds starting Potency and Count.
- Downpour: Builds Potency through continued application.
I bring IDs that consistently apply Tremor, since the available gifts alone are not particularly strong at increasing its Potency.
99 Rupture Potency
- Talisman Bundle: When enhanced, it can apply Rupture on every hit.
- Standard-duty Battery: Applies Rupture on hit.
- Thunderbranch: Helps increase Count.
- Thrill: Helps with Count but deals so much damage that I reserve it for an invulnerable target.
99 Sinking Potency
- Thorny Path: Extra Sinking Potency and Count.
- Midwinter Nightmare: Applies Sinking on all hits.
If damage is killing the target too early, I use a boss with Sanity so Sinking does not also deal heavy damage on every hit. Hurtily is a good choice.
99 Poise Potency
- Stone Tomb: Multiplies Potency gain from skills by 1.5.
- Nebulizer: Starts with Potency and Count.
- Four-leaf Clover: Helps maintain both Potency and Count.
- Endorphin Kit: Adds Poise generation from skills.
- Avoid Angel’s Cut: It consumes Potency to grant Count.
10 Charge Potency
The achievement checks Charge Potency, not Charge Count. E.G.O Gifts do not solve this by themselves; I need a Charge ID with a passive that allows Potency gain. Unique Charge now qualifies too, but it still has to provide Potency.
My preferred approach is to bring a suitable ID alone against Hurtily. The small number of enemies makes the early turns manageable, and a few Charge-generating gifts help me build the necessary 10 Potency during the fight.
Additional Combat Achievements
Clear Floor 10+ Without Fusion-Exclusive Gifts
For this challenge, I simply avoid fusion-exclusive E.G.O Gifts until I clear Floor 10 or higher. Generic fusion results are allowed. If I followed the Shop Megarun and avoided exclusive recipes, I may have already finished this one.
Perform Five Tremor Amplitude Conversions in One Turn
There are eight listed Tremor Amplitude Conversions. I can trigger them with the following IDs or E.G.O, subject to their specific conditions:
- Chain: T Corp Don S3 (if she acts faster); T Corp Outis S2 (if the target has no Conversion yet).
- Conservation: Le Noir Don S3.
- Decay: Oufi Heathcliff S3; Jeong’s Office Ishmael S3.
- Everlasting: Everlasting Faust E.G.O, any tier.
- Fracture: Binds Outis E.G.O, any tier.
- Hemorrhage: Contempt Awe Ryoshu S3; Night Awls Gregor S3.
- Reverb: Yurodivy Hong Lu S3; Cavernous Wailing Hong Lu E.G.O at Tier III.
- Scorch: Thumb Meursault, Sinclair, Heathcliff, or Rodion S3; Dawn Faust or Gregor S3.
One combination I use is T Corp Outis with Binds E.G.O, Oufi Heathcliff, Thumb Meursault, and Hong Lu with Cavernous Wailing. I can bring T Corp Don as a fifth character to make Chain more reliable, or choose another non-overlapping conversion option from the list.
I spend a few early turns preparing the needed Skill 3s and giving Outis another skill slot so she can use S2 and her E.G.O if required. On the decisive turn, I activate Outis and Hong Lu’s E.G.O and direct all five conversion skills into the same boss part.
Use Assist Defense Exclusive Skills Five Times in One Battle
The key distinction is that I need skills specifically described as “Exclusive Skill for Assist Defense”, not merely an Assist Defense setup. Some units have interactions that can overwrite or fail to register the intended skill.
I approach these candidates cautiously: Mao Faust may activate Ascendant Heishou rather than Swiftfeet Protection; Ring Faust must leave Iron Maiden form; Lord Hong Lu and Le Rouge Sinclair have unusual activation rules; and Thumb Heathcliff only assists Thumb Rodion while she is in Overheat.
The easier candidates mentioned in the source are Ring Hong Lu, Le Noir Hong Lu, LCD Ishmael, and Dawn Office Gregor. Their options are more consistent, though tied to later seasons or Walpurgis availability. I have not tested every combination, so I treat them as options rather than guaranteed fixes.
I can also inspect rental teams for a suitable Assist Defense unit. Le Noir Hong Lu is one character I check for in rental teams.
Have Six Sinners Reach 12+ Speed at Once
For a more consistent attempt, I build around five Cinq IDs and use Mao Faust or Mao Ryoshu for the sixth position. Either Cinq Don works, although the South version has a slight advantage through her Gloom skill. Starlight Guidance+ adds three to maximum Speed rolls.
I use the following reference to collect and upgrade the required E.G.O Gifts before entering the target fight.
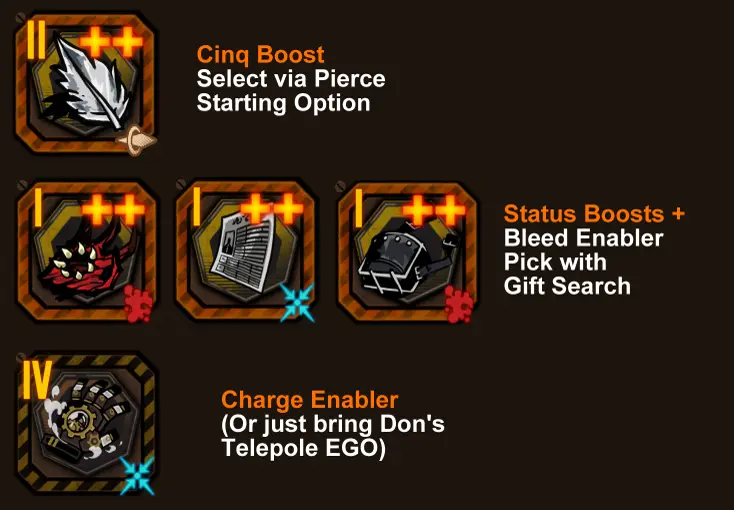
If I do not find the Tier IV Charge gift, I can instead overclock Don’s Telepole E.G.O. At Tier IV, it reliably grants 10 Charge to all allies; at Tier III, it can work on a heads hit. This method can make the setup possible much earlier, even as early as Floor 2.
With the gifts and upgrades ready, I enter a battle against at least six enemies and clash with all of them. If I do not have Charge Gloves, I use Telepole immediately. With the buffs active, the Cinq IDs can roll 11–18 Speed before their self-buffs, while the Mao unit with Strider can roll 12–18. If the rolls are poor or enemies defend instead of clashing, I may need to retry the battle.
Shield, Charge Count, and Karma Achievements
Gain 1,000 Shield on One Sinner in a Turn
I use Dieci Rodion for this challenge. Higher Uptie helps because discarding Skill 3 grants a larger shield: the Skill 3 discard shield varies between 45% and 60% depending on Uptie, although I can complete this at Uptie III. Normal Mode can bring an underleveled Rodion to Level 65. Dieci Yi Sang and Meursault support IDs can also contribute roughly 50% additional shield per turn at full efficiency.
Over several early floors, I replace Rodion’s skills with Skill 3s. I search for her in Super Shops. Another method is to use Spiderweb Entangled in Red with House of Spiders Ryoshu to remove other allies from the skill-replacement pool.
To increase the shield value, I build Rodion’s maximum HP using Starlight level-up Graces and take Piece of Relationship if it appears. On Floor 4, I search for Railway Line 2 and try to obtain Bridle through rewards or shop rerolls. Enhancing Bridle twice increases HP by 25%, which improves the amount of shield gained from each Skill 3 discard.
On Floor 5, I enter a chain battle with Rodion alone so she gains more skill slots. I alternate between clashes and defending to survive long enough. I reached around 1,300 shield by Turn 9, even at Uptie III and without Bridle.
Consume 100 Total Charge Count in One Turn
For this achievement, I save Charge Count rather than spending it throughout the fight. Lightning Rod and Charge-type Gloves enhanced twice help generate more Count. Don’s Telepole E.G.O Corrosion is another option for adding 10 Count to all allies.
I extend a chain battle without using early Skill 3s or other Charge-consuming actions. That allows me to gain skill slots and build Count across several Sinners before spending at least 100 total in a single turn. My tests suggest that Unique Charge does not count here, so I use regular Charge IDs.
I avoid E.G.O Gifts that automatically consume Charge Count, because they can disrupt the setup. Useful spending options include Heathcliff’s Move-in Reg (uses all Charge Count), Outis’s Dimension Shredder (up to 40), and Don’s Electric Screaming (up to 20).
Suppress My Form Empties Using Karma
This fight is unusual because I need Karma to defeat My Form Empties and its summons rather than simply overpowering them. The boss must accumulate and apply more than 432 Karma through its skills to kill all four enemies, so I deliberately avoid excessive damage.
Railway Line 1 is the first guaranteed place to encounter it. Alternatively, I can reset Dregs of the Manor on Floor 1 until its event appears. That early attempt needs fewer gifts and takes less time. If I go through Line 1 instead, I take HP-increasing trials and sell strong status gifts before the encounter if necessary.
During the fight, I let My Form Empties attack its allies. I clash against Compulsory Offering and Sluggard Waker, while aiming spare attacks at the boss’s Buddha Murti part, represented by the ribcage icon. Breaking that part applies another 30 Karma to one summon.
Every few turns, the boss uses Prajñāpāramitā three times against the target with the most Karma, adding 150 total Karma. When the target is one of its own summons, I do not interrupt those attacks.
Deal 25,000 Damage With One Skill
The damage for this achievement must be tied directly to a skill. Huge damage procs from E.G.O Gifts such as Glimpse of Flames and Thrill do not count by themselves, and Sinking Deluge is no longer sufficient for this target.
I can attempt it with a high-attack-weight E.G.O, but enemies often die before the later coins of a multi-coin skill connect. For a more reliable setup, I go into Extreme Mode and select the Adversity that gives enemies 3,000 Shield. I then seek a fight where the E.G.O can hit seven enemies without killing them before the full skill resolves.
Triple-status IDs and E.G.O are useful when I can collect their matching Tier IV E.G.O Shard gifts. Roulette Wheel and other damage-boosting gifts can help as well. My aim is to stack as much direct skill damage as possible before attempting the hit.
Another route uses a full House of Spiders team and solo Ryoshu. I search for Spider Thread, let her gain the team-related buffs when the other House of Spiders units die, and use her seasonal triple-status E.G.O. This can be a strong alternative to the broader E.G.O approach.
Using Time Moratorium Instead
Time Moratorium stores the damage dealt to a target and releases it later with a multiplier. If the debuff expires naturally, the release is not credited to a skill. However, if I apply a second instance through a skill, the first instance bursts and its stored damage counts toward that triggering skill.
I use T Corp identities such as Rodion, Don Quixote, and Outis to set up the debuff. Then I spend a full turn or more dealing damage into the stored effect before triggering its release with another skill.
The released damage is Sloth, so I look for a boss that is Fatal to Sloth or use Lunar Memory. Applying the debuff while the enemy is staggered is particularly effective, because the subsequent attacks benefit from Fatal damage.
Extreme Mode Achievements
Extreme Mode has straightforward requirements, but clearing the deeper floors is difficult. I prefer multi-status teams so I can benefit from a broader range of E.G.O Gifts and keep increasing damage as the enemies become stronger.
Floor 15 With 50 Adversity
The demanding objective is to clear Floor 15 with an Adversity score of at least 50. I need to take nearly all of the available burdens on each floor. There is about ten points of leeway, so I can skip some of the worst choices, but I track the total carefully rather than assuming I have room to spare.
Floor 15 Without Lunar Memory
Another achievement requires reaching the end of Floor 15 without ever obtaining Lunar Memory. Selling it afterward does not undo the acquisition. I prefer doing this in a separate, lower-Adversity run because combining the two conditions makes enemies harder to survive without the gift.
Unlock 10 Extreme Theme Packs
I also need to unlock at least 10 Extreme Theme Packs. I make progress toward this on lower-Adversity attempts instead of combining every unlock with the hardest Floor 15 clear.