This guide covers the main puzzles in The Mermaid Mask. It begins with spoiler-free clues and places the exact answers and completed solution images in a separate section farther down the page.
Use the clue tables when you only need a push in the right direction. Continue to the full solutions section when you want exact placements, combinations, and puzzle rewards.
Spoiler warning: The first section avoids direct answers. The full solution section reveals every listed puzzle answer.
The Mermaid Mask Puzzle Guide Navigation
Jump to a Full Solution
- Mess Hall Snake Cabinet Puzzle
- Illusion Theatre Cauldron Deduction
- Child’s Room Wooden Chest Puzzle
- Control Room Electrical Switchboard Puzzle
- Captain’s Quarters Model Town Puzzle
- Symmetry and Sinthia’s Pig Safe Puzzle
- Dirk’s Cellphone Puzzle
- Wirman’s Typewriter Puzzle
- Dream Chamber Perfume Shelf Puzzle
- Engine Room Compass Puzzle
- Cargo Hold Pin Board Puzzle
- Airlock Grotto Diving Helmet Puzzle
- Bilge Switch Puzzle
- Illusion Theater Wooden Panel Puzzle
- Cargo Hold Mushroom Puzzle Box
- Control Room Electronic Panel Puzzle
- Dome Tank Treasure Chest Puzzle
- Cabinet of Curiosities Skull Shelf Puzzle
Spoiler-Free Puzzle Clues
Each puzzle has two progressively clearer clues. Read Clue 1 first, use Clue 2 only when needed, and follow the solution link when you are ready for the complete answer.
Mess Hall Snake Cabinet Puzzle Clues
The snake-shaped cabinet is on the left side of the Mess Hall. Its four windows display numbers, while the rotating dials place different shapes inside them.
| Clue | Guidance |
|---|---|
| Clue 1 | The numbers are not a combination code. Each number represents the total number of sides required inside that window. |
| Clue 2 | Count the sides of the triangles, squares, and pentagons. Some windows require the combined total of two shapes. |
View the full Mess Hall Snake Cabinet Puzzle solution.
Illusion Theatre Cauldron Deduction Clues
This deduction appears after examining the Illusion Theatre crime scene and investigating the cauldron.
| Clue | Guidance |
|---|---|
| Clue 1 | Consider whether Magnus Mortuga opened the locked cauldron himself. |
| Clue 2 | The deduction is not about someone hiding elsewhere in the theatre. Focus on what may already have been inside the cauldron. |
View the full Illusion Theatre Cauldron Deduction solution.
Child’s Room Wooden Chest Puzzle Clues
The Wooden Chest in the Child’s Room contains six illustrated cards and four glass lenses.
| Clue | Guidance |
|---|---|
| Clue 1 | Begin by combining the cards into three complete girl-and-doll pictures. |
| Clue 2 | The girls on the outside should look toward the middle girl. The two remaining lenses change the apparent sizes of the outer dolls. |
View the full Child’s Room Wooden Chest Puzzle solution.
Control Room Electrical Switchboard Puzzle Clues
The Control Room panel contains colored plugs and numbered sockets. The goal is to reproduce the symbol pattern shown on the nearby note.
| Clue | Guidance |
|---|---|
| Clue 1 | Treat the plugs as three matching pairs: red triangles, yellow circles, and blue squares. |
| Clue 2 | Each colored pair belongs in two numbered sockets. The matching sockets are separated across the panel. |
View the full Control Room Electrical Switchboard Puzzle solution.
Captain’s Quarters Model Town Puzzle Clues
The Model Town is inside the chest on the right side of the Captain’s Quarters. The boats and numbered sails must form a route across the board.
| Clue | Guidance |
|---|---|
| Clue 1 | The Roman numeral on each sail tells you how many spaces the route must travel before reaching another boat. |
| Clue 2 | Rotate the boats so the route continues from one sail to the next and finishes at the red X without breaking. |
View the full Captain’s Quarters Model Town Puzzle solution.
Symmetry and Sinthia’s Pig Safe Puzzle Clues
The Pig Safe is in Symmetry and Sinthia’s Bunk Room. Moving its hat, eyes, cheeks, nose, and tongue changes the number grid on its back.
| Clue | Guidance |
|---|---|
| Clue 1 | Rotate the pig and treat the red values as fixed row and column targets. |
| Clue 2 | Adjust one feature at a time and check how the white values change. Every row and column must match its red total. |
View the full Symmetry and Sinthia’s Pig Safe Puzzle solution.
Dirk’s Cellphone Puzzle Clues
Dirk’s Cellphone is inside the tuxedo in Dirk and Wirman’s Bunk Room. Its lock behaves like a crossword made from partial symbols.
| Clue | Guidance |
|---|---|
| Clue 1 | Every inserted piece contributes to both a horizontal and a vertical symbol. |
| Clue 2 | Start with A Across because it has the longest sequence, then use its intersections to complete B, C, and D Down. |
View the full Dirk’s Cellphone Puzzle solution.
Wirman’s Typewriter Puzzle Clues
The Typewriter puzzle uses three dials and several rotating abstract symbols.
| Clue | Guidance |
|---|---|
| Clue 1 | The rows show the same symbols rotating rather than unrelated drawings. |
| Clue 2 | Each step rotates by 45 degrees. Find the missing orientation between the symbols on the left and right. |
View the full Wirman’s Typewriter Puzzle solution.
Dream Chamber Perfume Shelf Puzzle Clues
The perfume puzzle is behind the glass panel on the lower-right shelves in the Dream Chamber.
| Clue | Guidance |
|---|---|
| Clue 1 | Inspect the bottles and watch how each liquid behaves, including its dripping speed, thickness, vapor, and bubbles. |
| Clue 2 | Match each written description to a bottle before moving the corresponding marked piece into position. |
View the full Dream Chamber Perfume Shelf Puzzle solution.
Engine Room Compass Puzzle Clues
The Engine Room panel contains four colored compasses whose needles react differently when the pieces are moved.
| Clue | Guidance |
|---|---|
| Clue 1 | Test each compass near and far from the others. Their different reactions identify their roles. |
| Clue 2 | You need one compass that points toward the others, one that points away, one that behaves like a clock, and one that refuses to cooperate normally. |
View the full Engine Room Compass Puzzle solution.
Cargo Hold Pin Board Puzzle Clues
The Cargo Hold pin board resembles a rough map of the submarine and includes movable character portraits.
| Clue | Guidance |
|---|---|
| Clue 1 | The board is not asking where everyone was during the murder. It uses their current locations when the puzzle becomes available. |
| Clue 2 | Place every living character in their current room. One portrait does not belong inside any room on the map. |
View the full Cargo Hold Pin Board Puzzle solution.
Airlock Grotto Diving Helmet Puzzle Clues
The Diving Helmet puzzle is on the upper shelf at the left side of the Airlock Grotto. It contains several connected rotating dials.
| Clue | Guidance |
|---|---|
| Clue 1 | Do not solve each dial independently. Compare the symbols at every point where two dials touch. |
| Clue 2 | Rotate the dials until the markings on both sides of every connection match one another. |
View the full Airlock Grotto Diving Helmet Puzzle solution.
Bilge Switch Puzzle Clues
The switch is at the entrance to the Bilge. Dirk’s phone is required as a flashlight before you can work on the mechanism.
| Clue | Guidance |
|---|---|
| Clue 1 | The center of the puzzle shows the target arrangements. The movable orbs must reproduce one of those patterns. |
| Clue 2 | You can rotate both the individual orbs and the full dials. Change one layer at a time and compare it with the center pattern. |
View the full Bilge Switch Puzzle solution.
Illusion Theater Wooden Panel Puzzle Clues
The Wooden Panel is on the left wall of the Illusion Theater. Ask Wirman about the Illusion Poster before attempting it.
| Clue | Guidance |
|---|---|
| Clue 1 | Each tile contains a playing-card suit, and the small indicator above it shows the required direction. |
| Clue 2 | Rotate or rearrange every suit so its orientation matches the marker at the top of that tile. |
View the full Illusion Theater Wooden Panel Puzzle solution.
Cargo Hold Mushroom Puzzle Box Clues
This puzzle is inside the tent in the Cargo Hold and becomes available after reporting to Sinthia.
| Clue | Guidance |
|---|---|
| Clue 1 | Rotate the sun and observe which mushrooms glow during the day, at night, at both times, or never. |
| Clue 2 | Classify the mushrooms by behavior before counting them: Dayglo, Evergleam, Illuminight, and Nevergleam. |
View the full Cargo Hold Mushroom Puzzle Box solution.
Control Room Electronic Panel Puzzle Clues
This wall panel is beside the jacket display in the Control Room and becomes available after reporting to Sinthia.
| Clue | Guidance |
|---|---|
| Clue 1 | Drag the tiles into different positions and move their weights to change the angle at which each tile rests. |
| Clue 2 | Listen for the faint buzzing sound. It indicates that a tile is in, or very close to, a correct position. |
View the full Control Room Electronic Panel Puzzle solution.
Dome Tank Treasure Chest Puzzle Clues
The Treasure Chest is on the rocks in the center of the Dome Tank and becomes available after reporting to Sinthia.
| Clue | Guidance |
|---|---|
| Clue 1 | Match each pirate to a flag by considering how well that pirate can see. |
| Clue 2 | After matching the flags, rotate each pirate so they face the tower with the same color as their flag. |
View the full Dome Tank Treasure Chest Puzzle solution.
Cabinet of Curiosities Skull Shelf Puzzle Clues
The Skull Shelf is in the Cabinet of Curiosities, reached through the back of the Dream Chamber bookshelf after reporting to Sinthia.
| Clue | Guidance |
|---|---|
| Clue 1 | The skulls and labels form a logic grid. Compare repeating eye, jaw, and nose features instead of treating each skull as unrelated. |
| Clue 2 | Use the four reference skulls to determine the row pattern, then place the remaining feature labels across the top so every combination is consistent. |
View the full Cabinet of Curiosities Skull Shelf Puzzle solution.
Full Puzzle Solutions and Images
Full spoilers begin here. The following sections reveal exact answers, completed arrangements, and puzzle rewards.
Mess Hall Snake Cabinet Puzzle Solution
The four numbered windows require shapes whose total number of sides equals 3, 9, 7, and 4.
| Window | Correct Shape or Shapes |
|---|---|
| 3 | Triangle |
| 9 | Square + Pentagon |
| 7 | Square + Triangle |
| 4 | Square |
Press the lock button after all four windows display the correct totals.
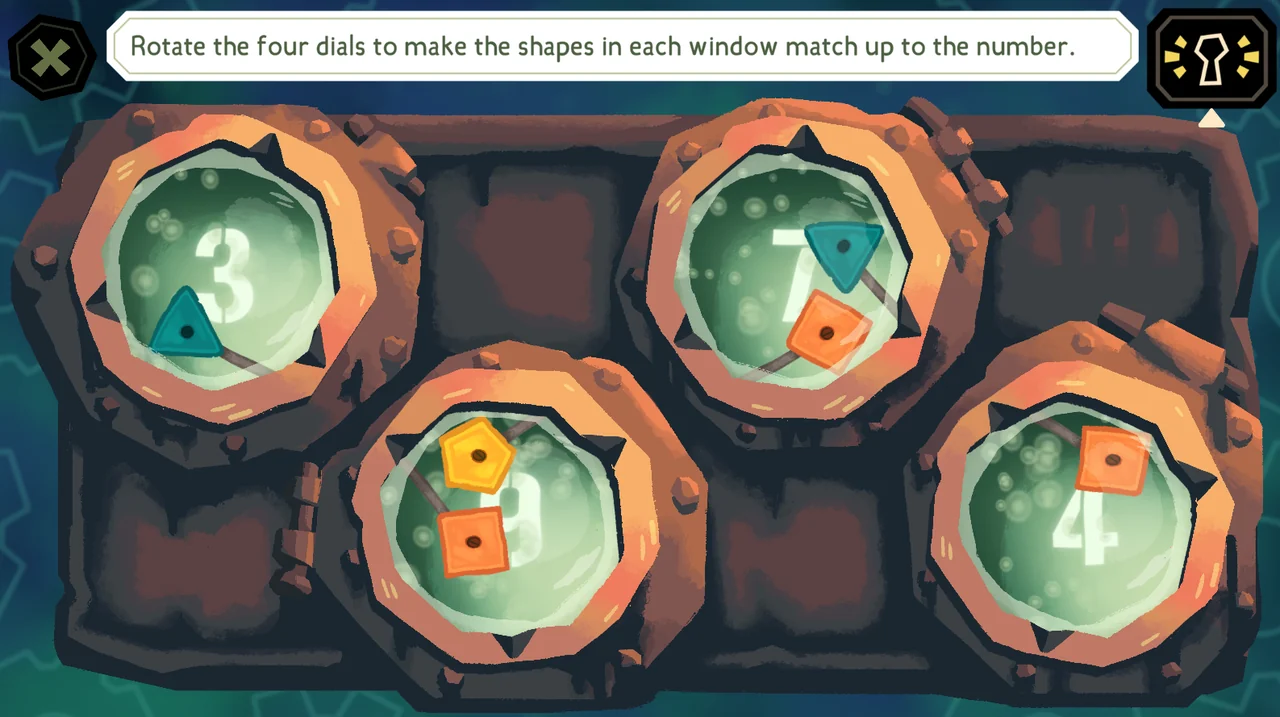
Result: The cabinet opens and you can collect the Sun Tablets.
Illusion Theatre Cauldron Deduction Solution
Connect the clues to form the following deduction:
Magnus Mortuga unlocked the cauldron and was killed by what was inside.
When the game asks what stands out inside the cauldron, rotate it and select the scratches.
Result: Completing the deduction and identifying the scratches ends the Prologue and begins Chapter One.
Child’s Room Wooden Chest Puzzle Solution
- Arrange the six cards into three vertical girl-and-doll pairs.
- Place one warping eye lens over the left girl so she looks toward the center.
- Place the other warping eye lens over the right girl so she also looks toward the center.
- Place the small lens over the left girl’s doll.
- Place the large lens over the right girl’s doll.
- Leave the middle girl and her doll without lenses, then press the lock button.
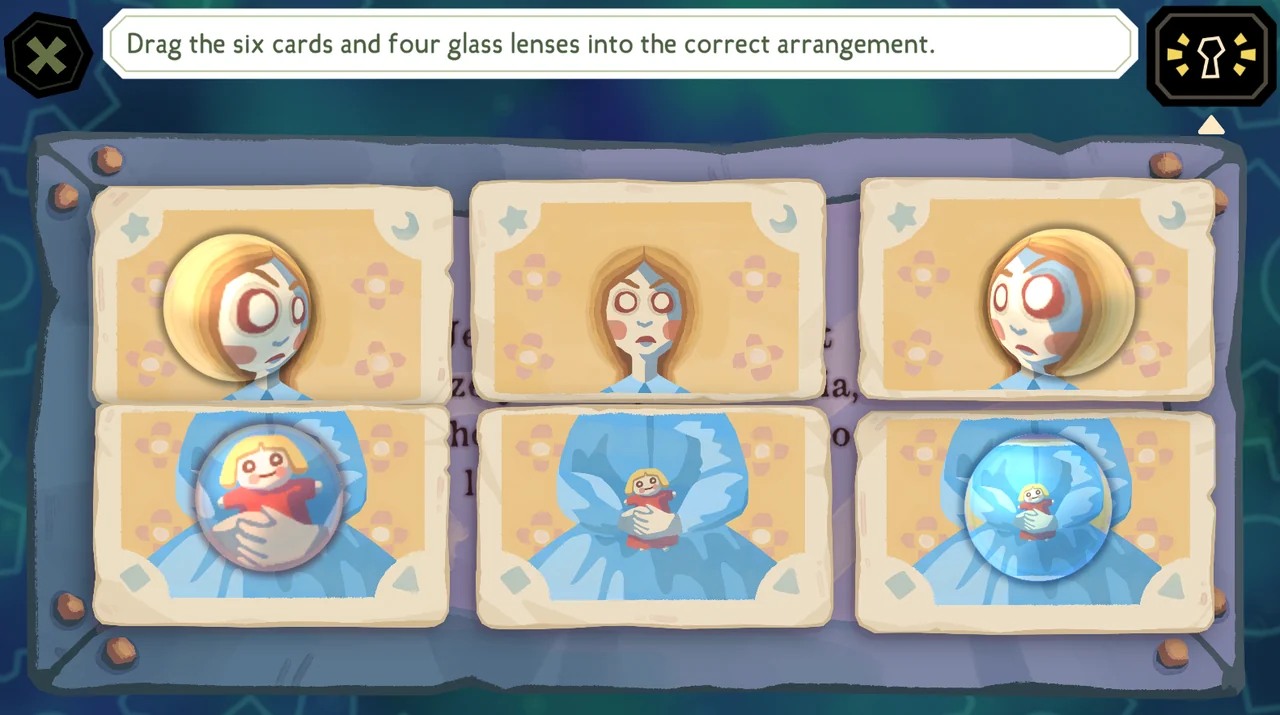
Result: The chest opens and you can collect the Glass Eyeball.
Control Room Electrical Switchboard Puzzle Solution
| Plug Pair | Correct Sockets |
|---|---|
| Red Triangle | 1 and 12 |
| Yellow Circle | 4 and 6 |
| Blue Square | 7 and 11 |
Insert both plugs from every color pair to complete the pattern shown on the note.
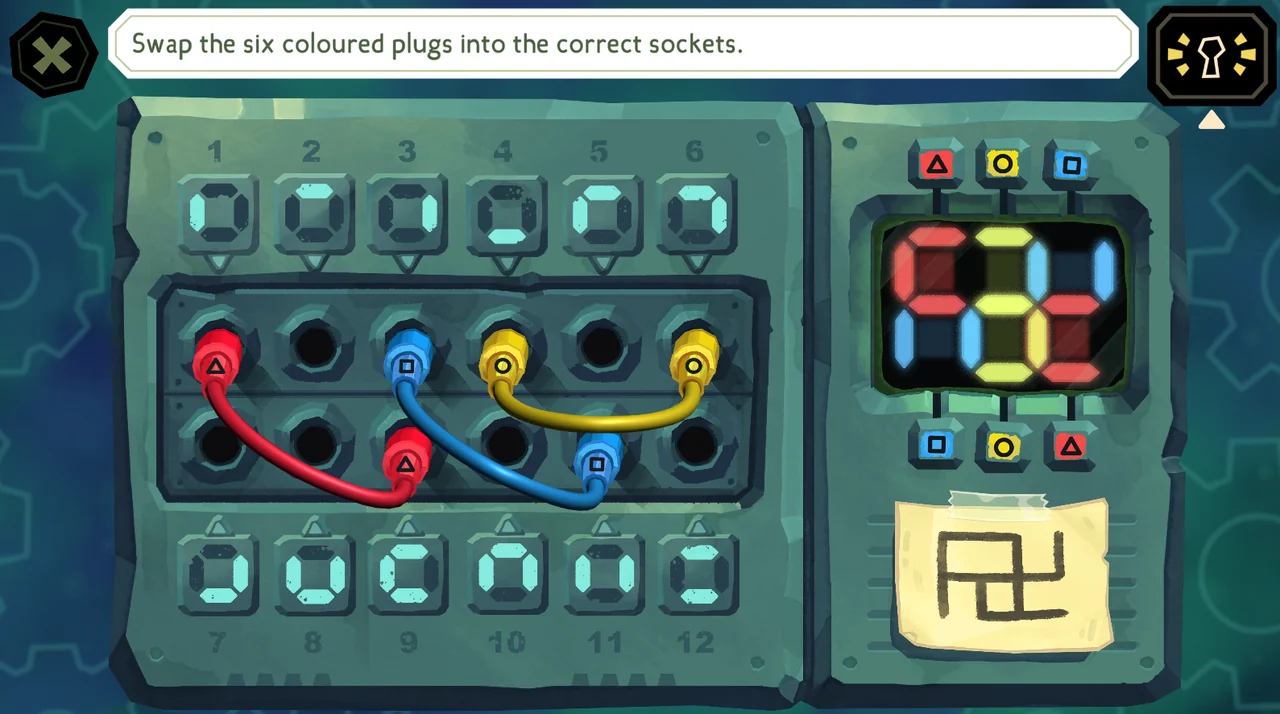
Result: The panel compartment opens and you can collect the Captain’s Logbook.
Captain’s Quarters Model Town Puzzle Solution
Rotate the boats and reposition the sails until they create one continuous route that ends at the red X. Every Roman numeral must match the number of spaces between its boat and the next boat in the route.
Because the correct answer depends on the exact orientation of several boats and sails, copy the completed layout shown in the solution image.
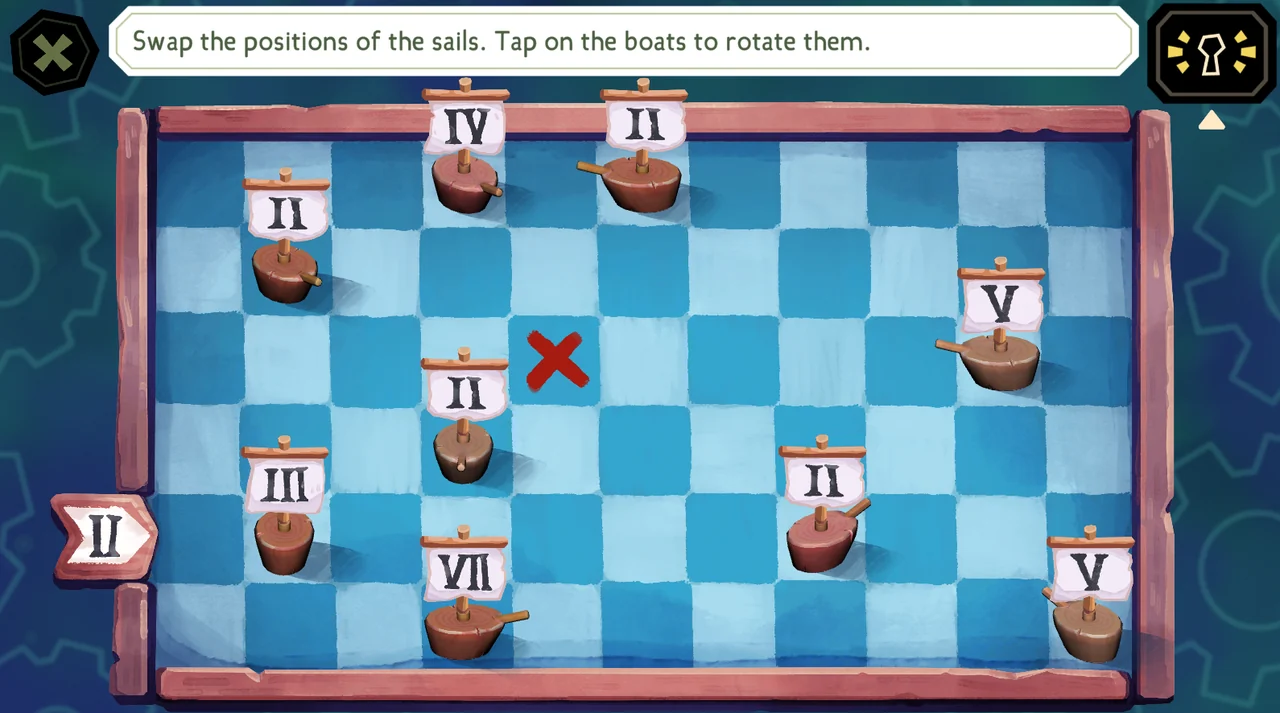
Result: Solving the route awards the Film Reel.
Symmetry and Sinthia’s Pig Safe Puzzle Solution
From the starting positions, use these inputs:
- Click the hat three times.
- Click the left eye twice.
- Leave the right eye unchanged.
- Click the left cheek once.
- Leave the right cheek unchanged.
- Click the nose twice.
- Click the tongue once.
The final visible arrangement has the hat pointing right, the left eye pointing right, the right eye facing forward, the nose pointing down, the left cheek illuminated, and the tongue extended.
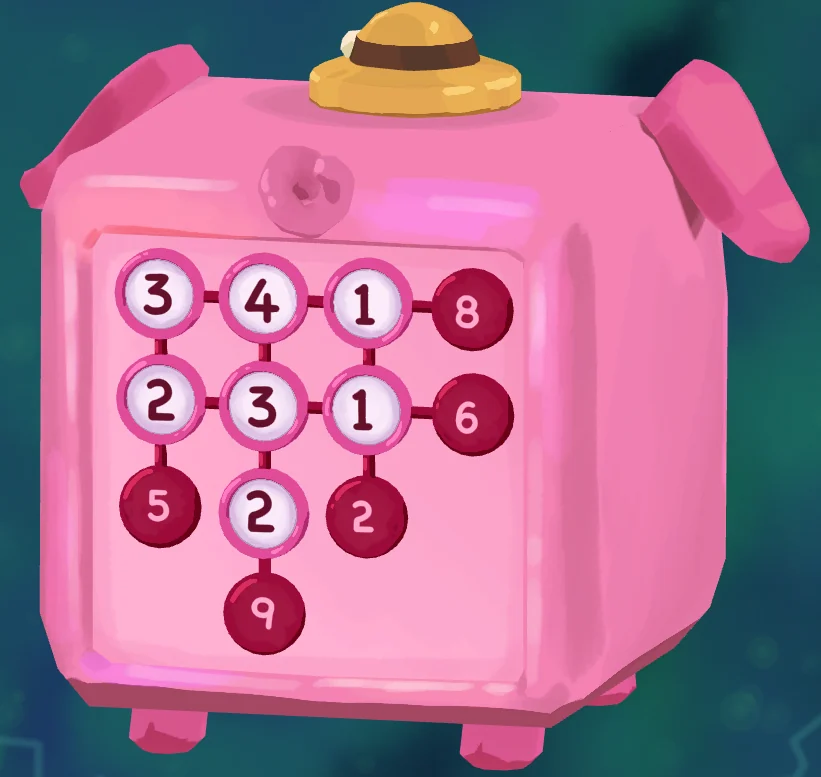
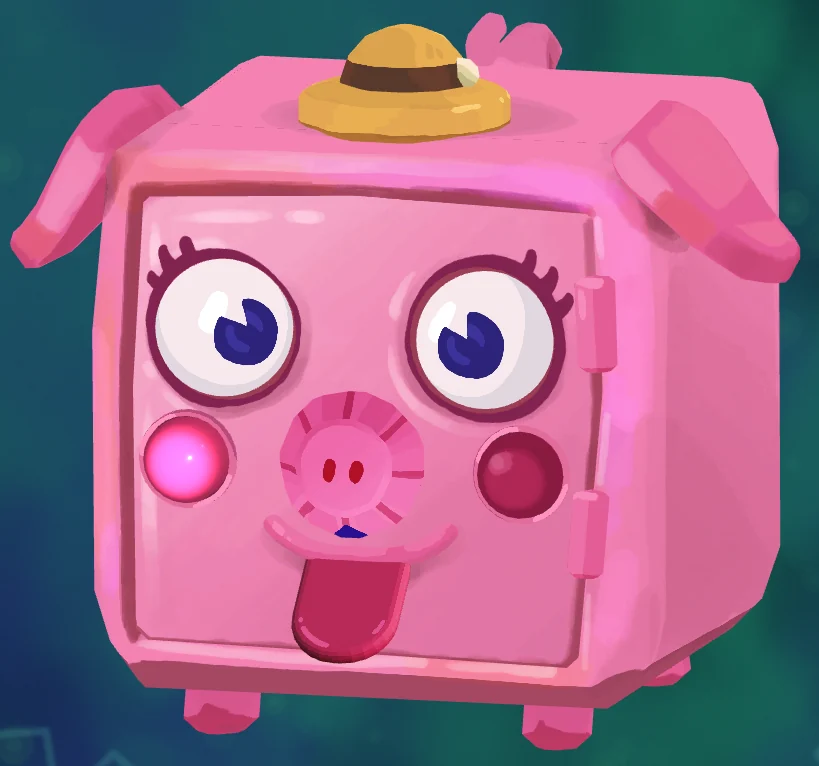
Result: The safe opens and you can collect the Underwater Photo.
Dirk’s Cellphone Puzzle Solution
A Across
<- Backward L turned on its side
V>- Straight line
B Down
- Backward L
/<
C Down
U^V
D Down
- Upside-down U
- L turned on its side
- Straight line
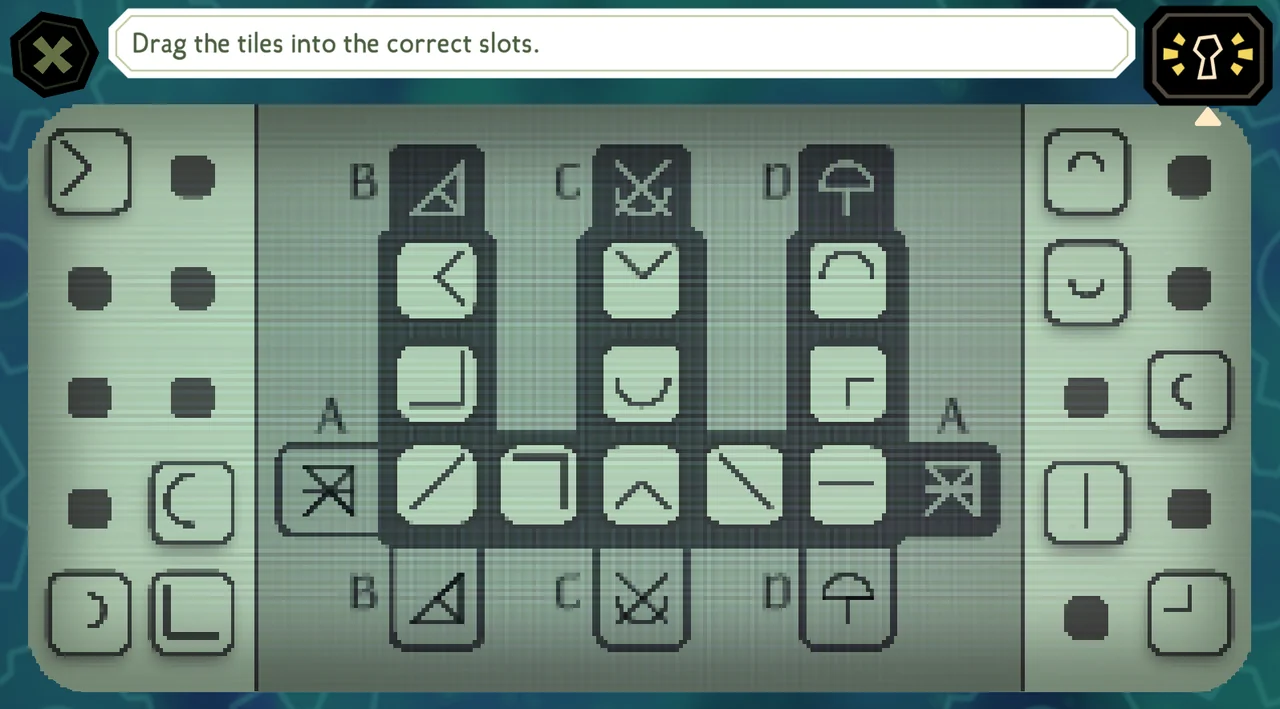
Result: The phone unlocks, allowing you to inspect its messages, contacts, call information, and other available entries.
Wirman’s Typewriter Puzzle Solution
Rotate the symbols and the outer notches on all three dials until the final pattern has:
- Open circle at 12 o’clock
- Diamond at 3 o’clock
- T symbol at 5 o’clock
- Closed circle at 6 o’clock
The exact final dial positions are shown in the solution image.
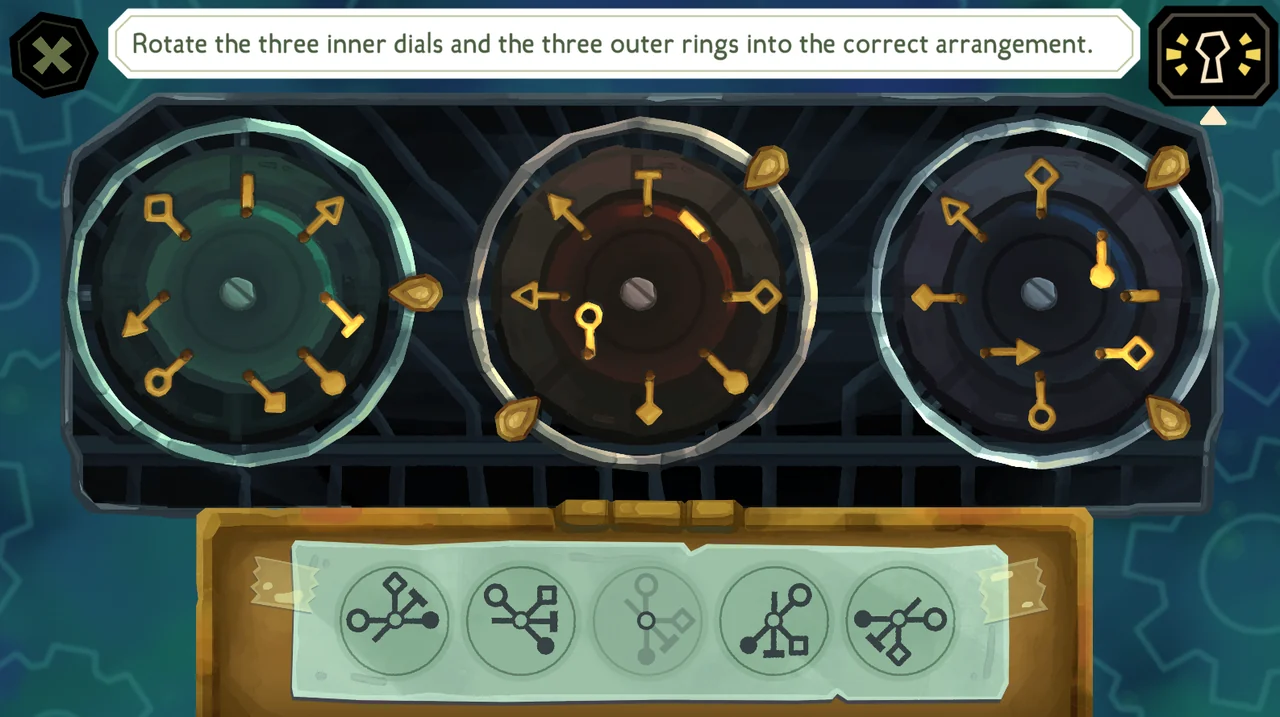
Result: The machine reveals a Handwritten Letter addressed to Wirman.
Dream Chamber Perfume Shelf Puzzle Solution
Arrange the marked bottle pieces from left to right in the following order:
- Arrow
- Bird Skull
- Moon
- Hand
- Eye
- Sun
The six positions correspond to these bottle clues in order: effervescence, an X on the label, a crimson mark, thick viscosity, visible vapor, and rapid dripping.
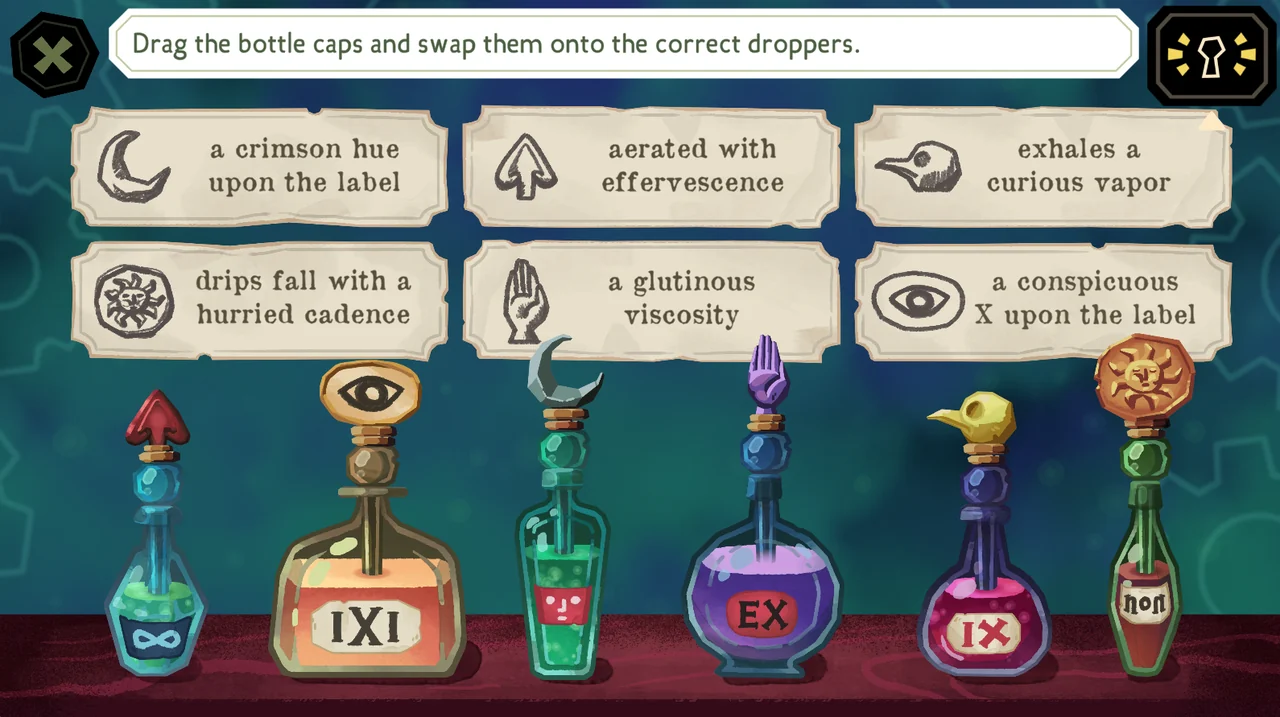
Result: The glass panel opens. Inspect the bookshelf directly above it to collect the Caretaker’s Journal.
Engine Room Compass Puzzle Solution
| Position | Compass | Behavior |
|---|---|---|
| Top left | Yellow | Points away from the others |
| Bottom left | Purple | Does not want to solve the puzzle |
| Top right | Pink | Acts like a clock |
| Bottom right | Red | Points toward the others |
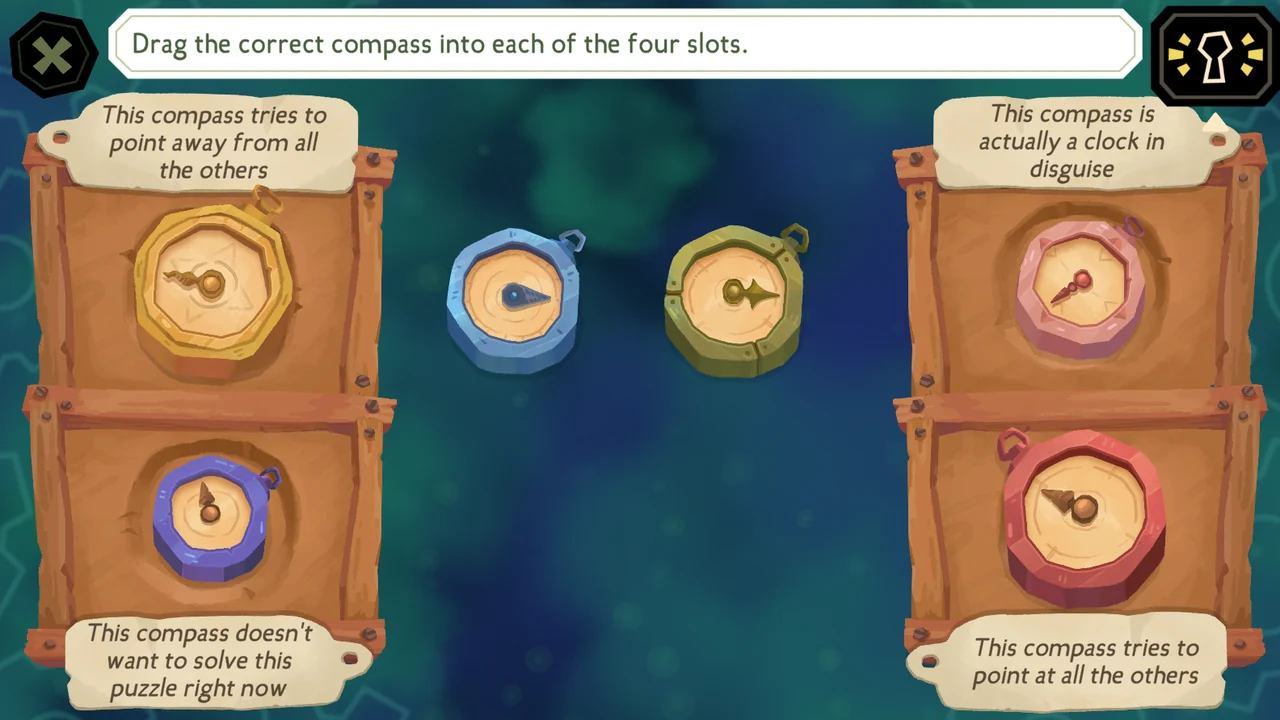
Result: The completed panel unlocks the Ocean Map.
Cargo Hold Pin Board Puzzle Solution
Place each living character on the section of the map representing their current room. Sally and Grimoire should be with Mariana in the Cargo Hold.
Magnus Mortuga must be placed outside the submarine map. Copy the remaining portrait positions from the completed image.
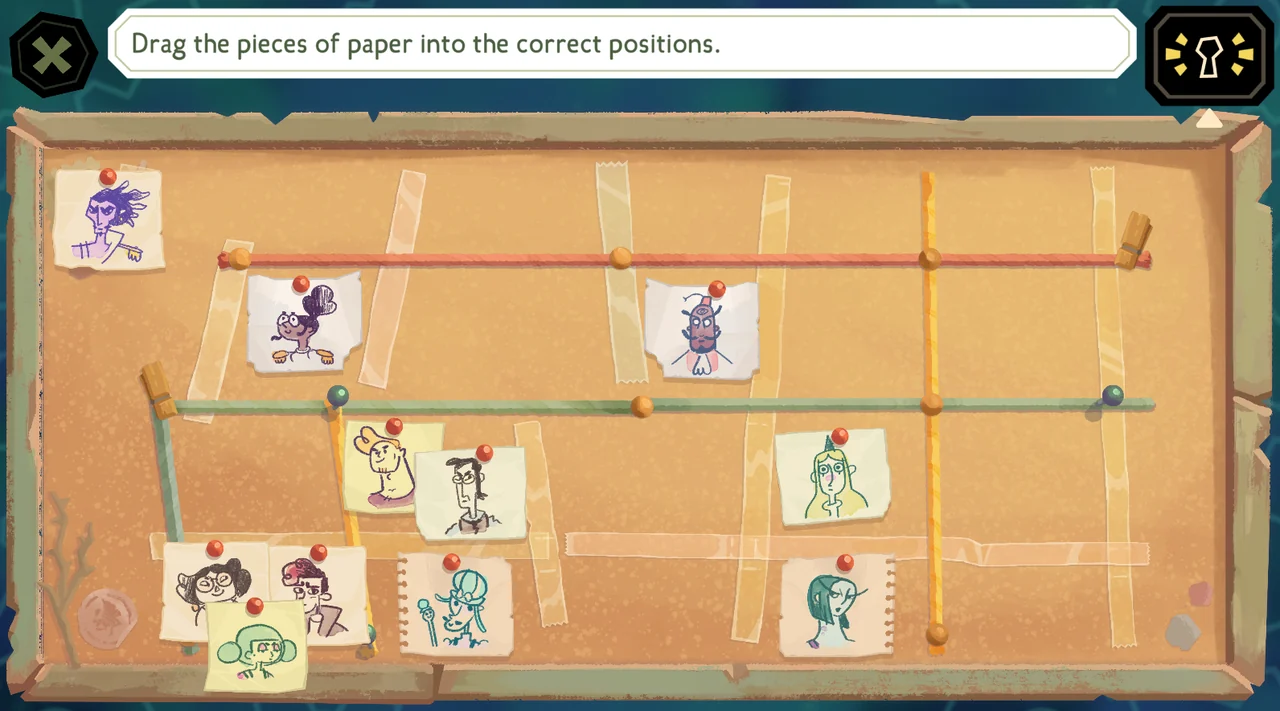
Result: The completed board unlocks the Moon Photo.
Airlock Grotto Diving Helmet Puzzle Solution
Rotate every dial until the markings agree at each point where neighboring dials connect. A correct dial may need to be moved again while you align a neighboring one, so work across the puzzle connection by connection.
The three images below show the complete set of correct dial positions.
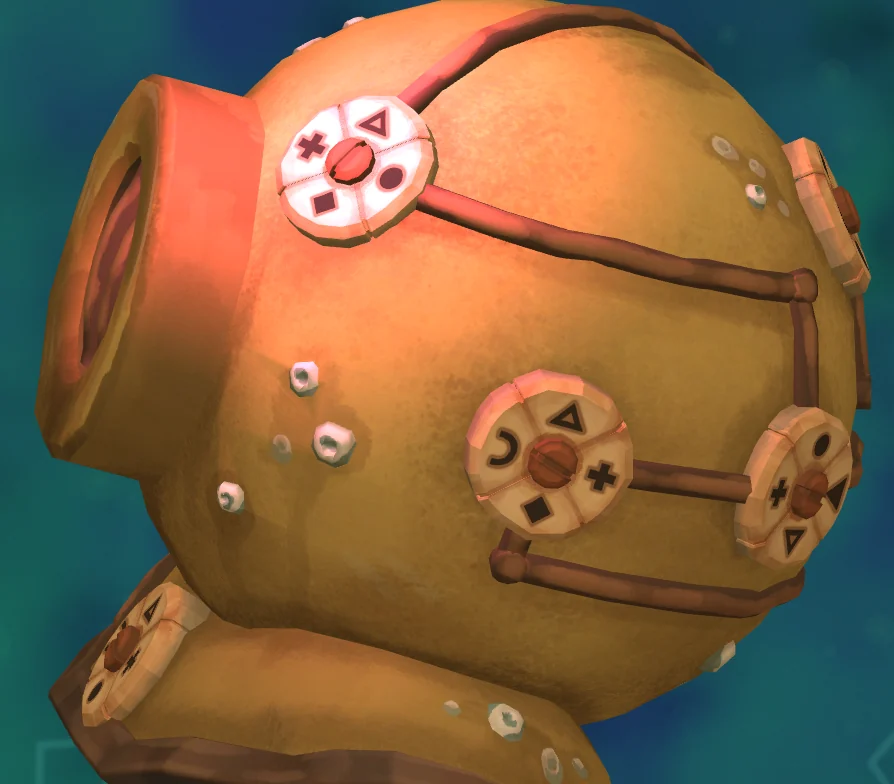
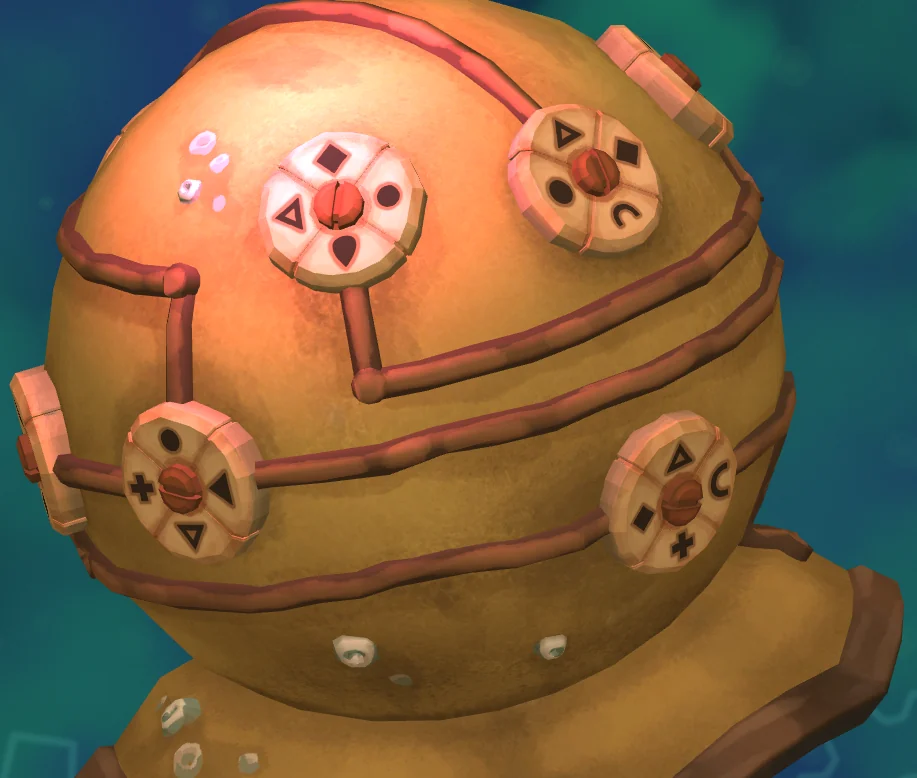
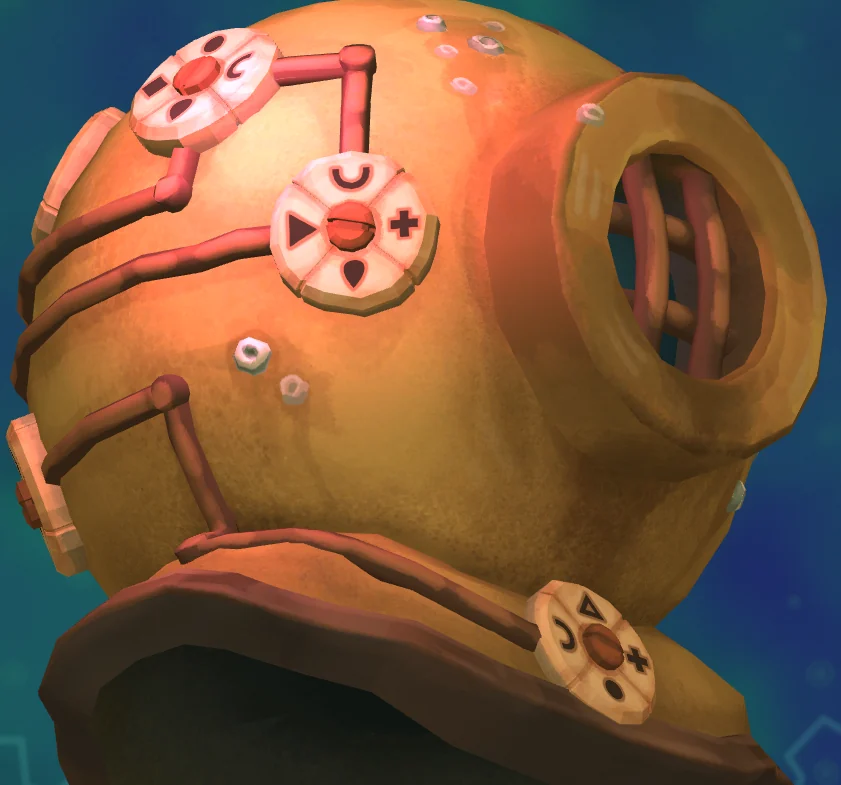
Result: Completing all connections unlocks the Pocketbook.
Bilge Switch Puzzle Solution
Move the orbs on each dial until they reproduce one of the patterns displayed in the center. Rotate the individual orbs to change their positions, then rotate the full dials to align those positions with the target.
This puzzle involves some trial and error, so use the completed image as the exact reference when the pattern is close but the mechanism does not activate.
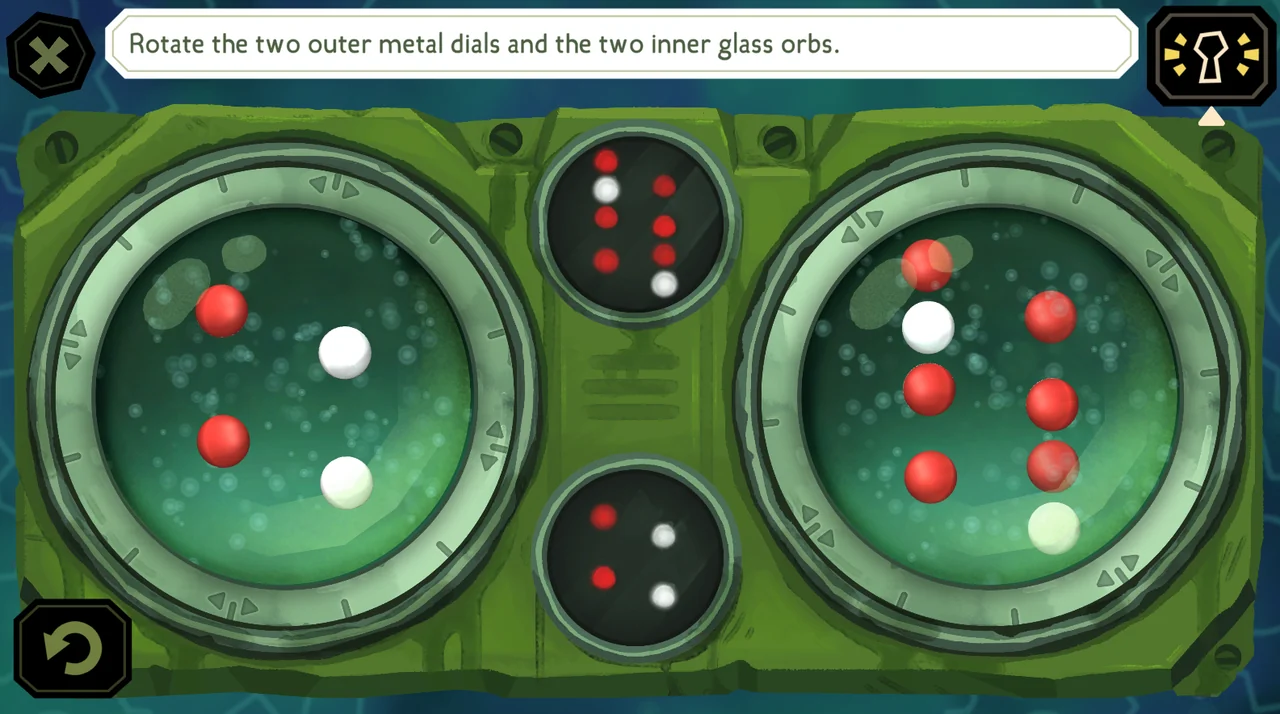
Result: The finished mechanism unlocks access to the Bilge.
Illusion Theater Wooden Panel Puzzle Solution
Arrange the playing-card suits so every suit points in the direction indicated above its tile. The puzzle checks the orientation of each individual symbol rather than only the overall order.
Copy the finished suit layout shown in the image.
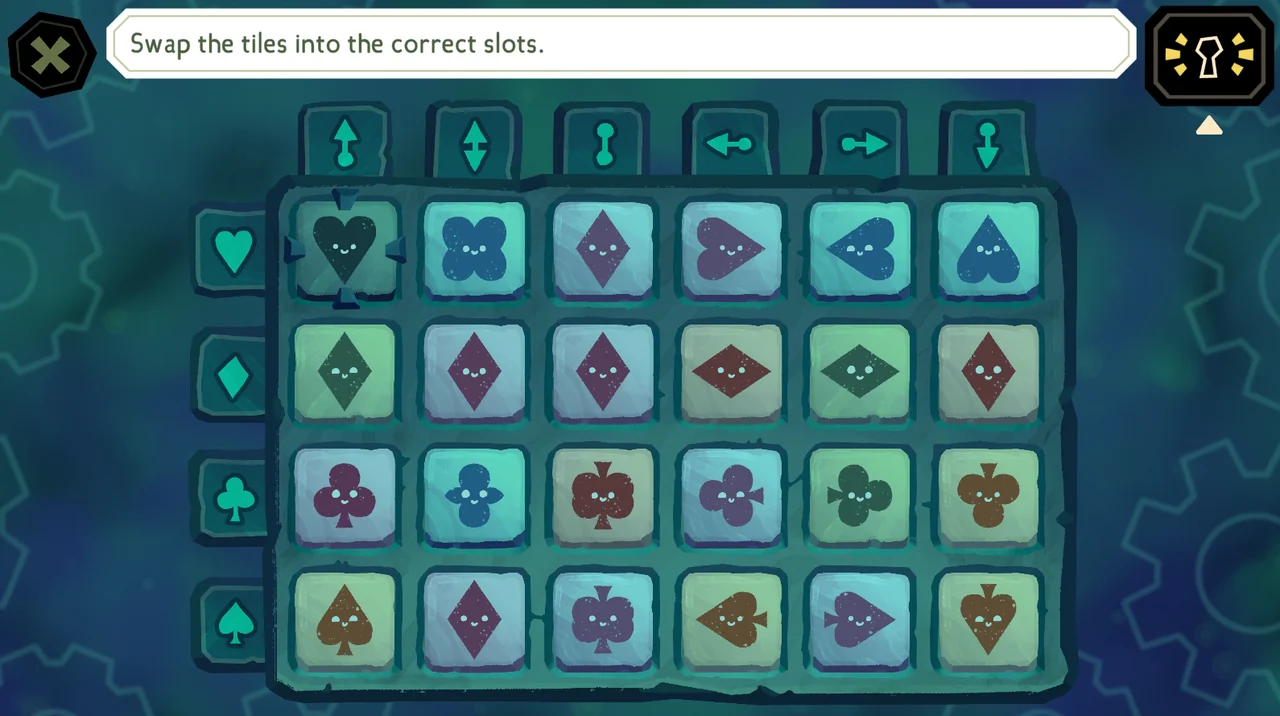
Result: The panel unlocks the Lifesize Doll and Film Projector.
Cargo Hold Mushroom Puzzle Box Solution
Enter the following mushroom totals:
| Mushroom Type | Count | Behavior |
|---|---|---|
| Dayglo | 3 | Glows only when touched by sunlight |
| Evergleam | 2 | Glows during both day and night |
| Illuminight | 4 | Dark during the day and glowing at night |
| Nevergleam | 5 | Never glows |
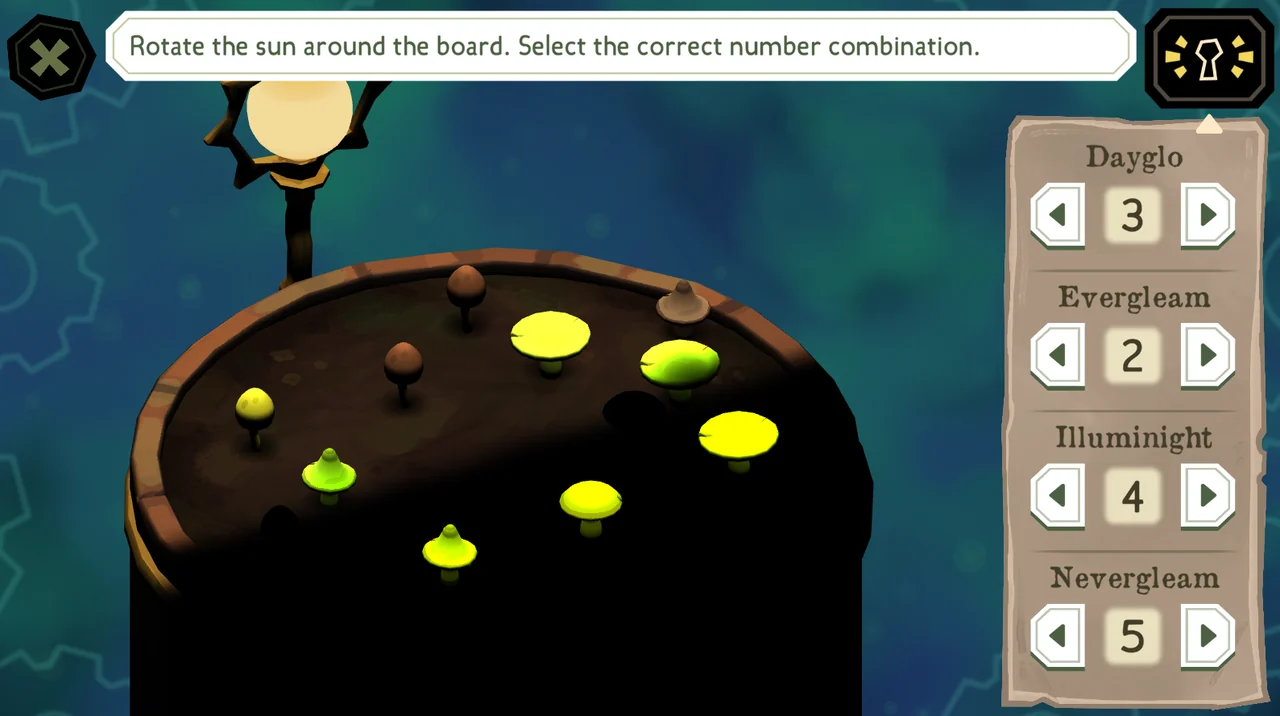
Result: The box contains another dictaphone tape.
Control Room Electronic Panel Puzzle Solution
Drag the tiles into place and reposition their weights until each tile sits at the required angle. Work slowly and listen for the faint buzzing cue after every adjustment.
The exact completed arrangement is shown in the solution image.
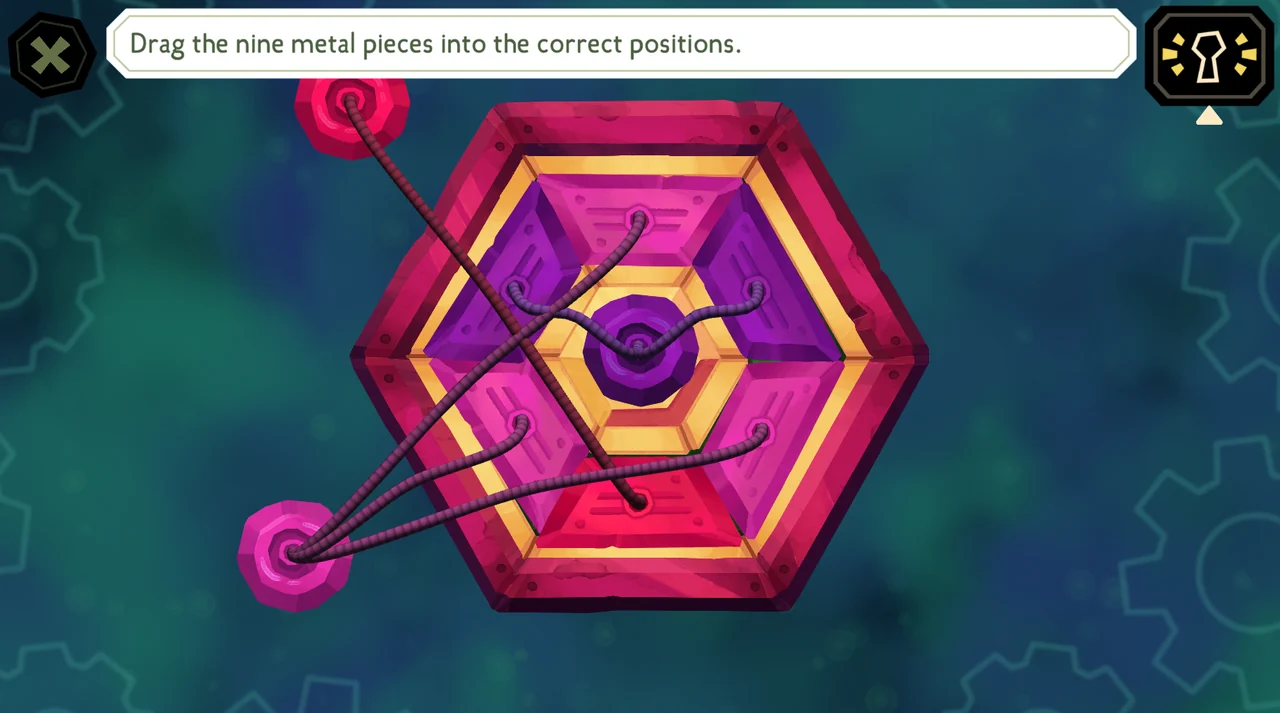
Result: The panel unlocks the second Handheld Radio.
Dome Tank Treasure Chest Puzzle Solution
| Tower | Correct Pirate |
|---|---|
| Blue | Pirate with an eyepatch |
| Red | Pirate wearing a hat |
| Yellow | Pirate with a clear field of vision |
| Green | Pirate using a spyglass |
Place each pirate with the matching flag, then rotate them so they look directly toward the corresponding colored tower.
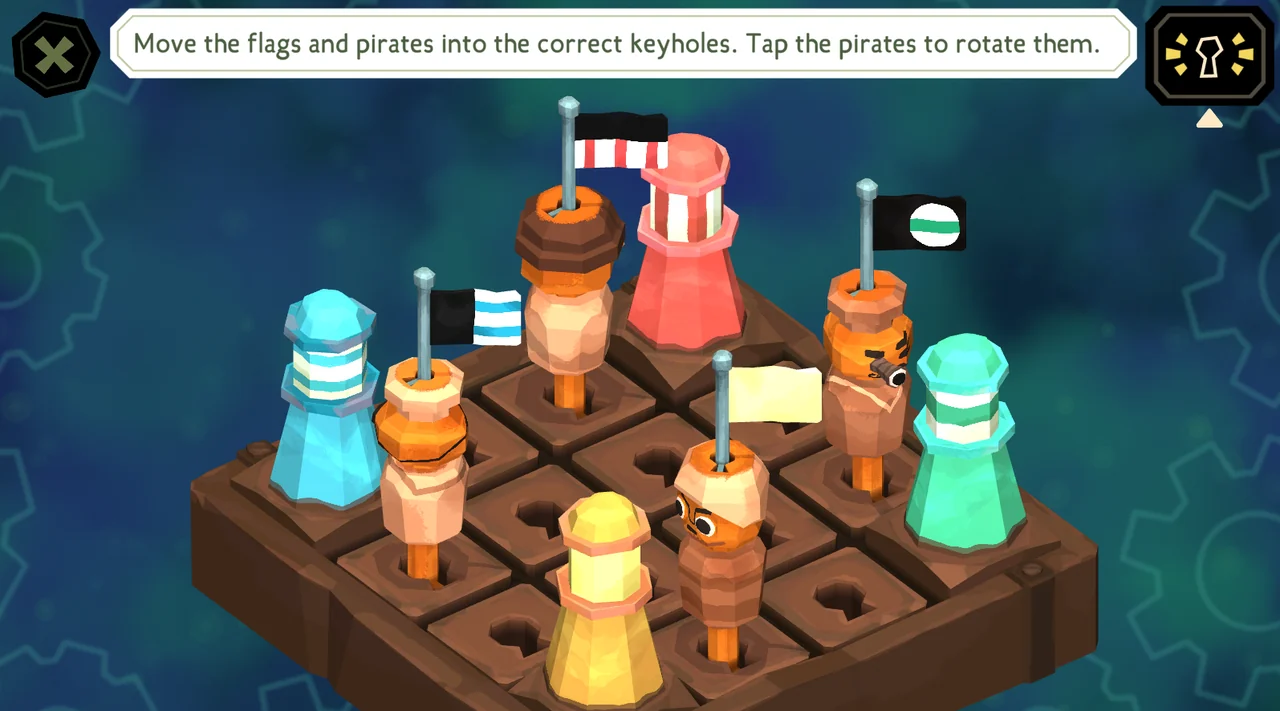
Result: The chest awards the Ocean Treasure.
Cabinet of Curiosities Skull Shelf Puzzle Solution
Move the skulls and labels until they form a consistent grid. Use the skulls with clear eye, jaw, and nose combinations as references, then arrange the remaining characteristics as the labels across the top.
Because the solution depends on several visual feature combinations, copy the final skull and label positions from the image.
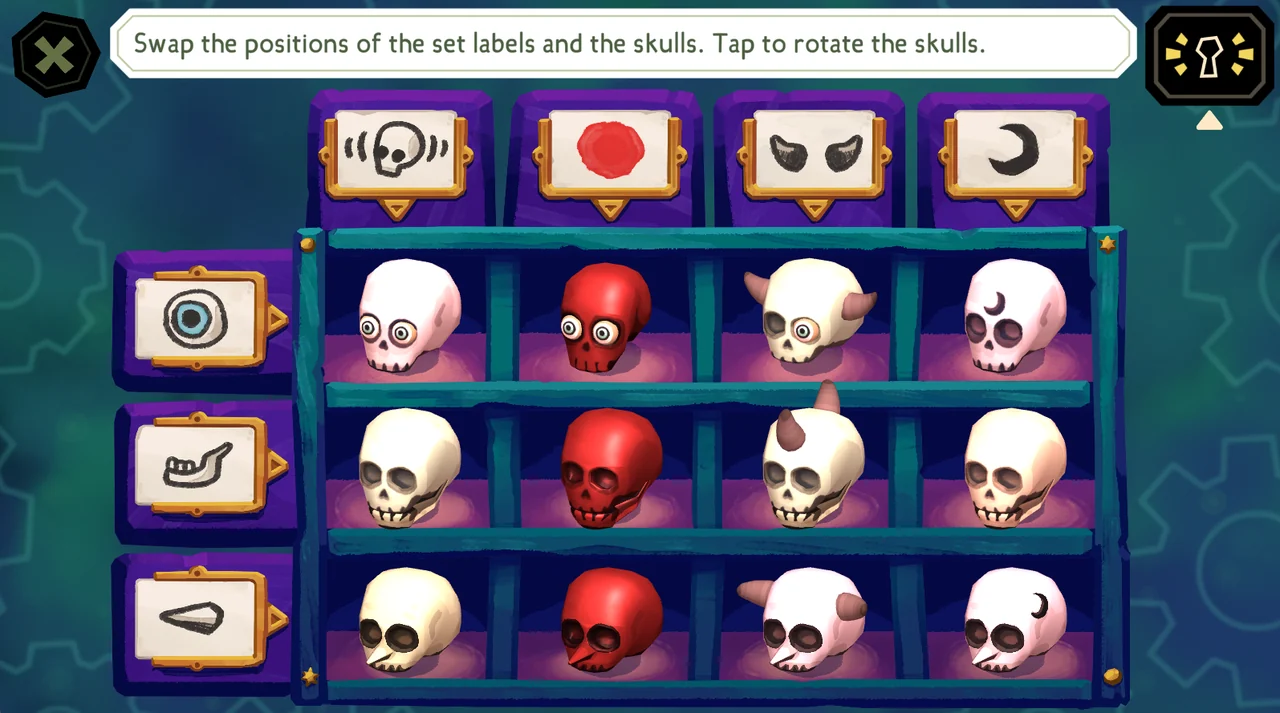
Result: The completed shelf unlocks the Mermaid’s Tongue.