In this walkthrough guide, I will explain the all levels in CHUXIE and what you need to do in full detail.
CHUXIE All Levels Guide
A walkthrough to help with completing the game. There are two things that you need to know about this game: one, it’s not advisable that anyone medically at risk from flashing lights or jump scares play this game, and secondly you should expect to die a lot.
Fortunately the game saves often enough that this shouldn’t be a problem, and death does not typically penalize you in this game. It does however mean you will have to try again.
Level 1 – Basement
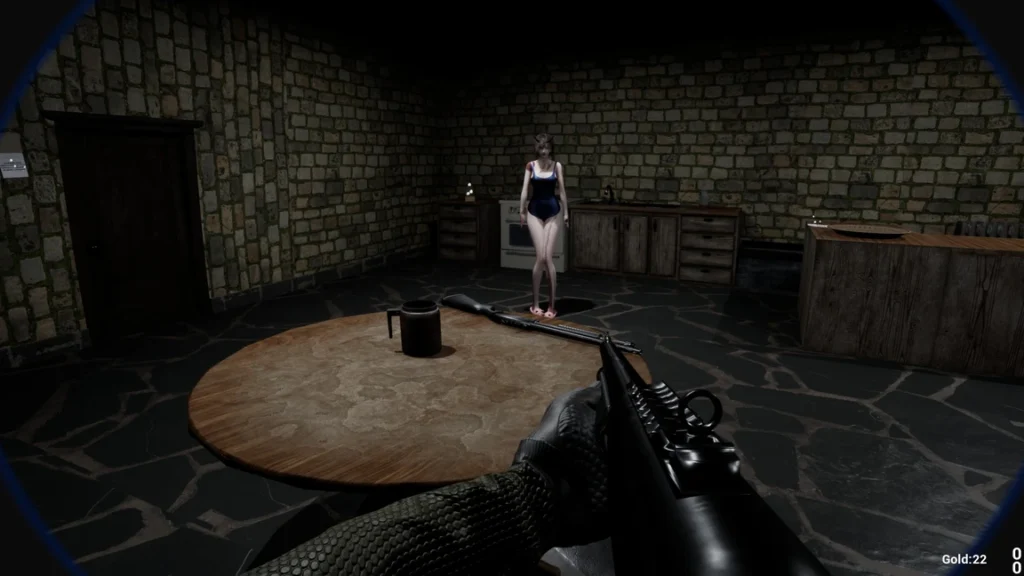
We find our paranormal investigator and his trusty consecrated evil spirit slaying handgun in the storage room of a dank basement. To your left is a gold coin highlighted and a note explaining about coins. To your ahead and slightly left are a pair of notes describing the controls (controller left-most, keyboard right most).
- White = interact-able
- Gold = coin!
You can press F to read the notes and either click the back key or press F again. On a controller, it’s X rather than F but I didn’t have much luck exiting (maybe I’m dumb, so I just ended up exiting and restarting). If you’re familiar with first person shooters the controls for moving and shooting will be familiar whether keyboard/mouse or controller, and I suggest you press T to turn on the flashlight.
Don’t forget to grab the gold coin before you leave. These will come in handy later!
Go through the door. The room on the left has a gold coin in back, you’ll have to crouch to pick it up. Now return to where you entered and follow the passageway with the flickering lights. You will find a note and a door with a red light above it, indicating that it is locked. Look near the bathroom for another gold coin, and then follow the next passage way. Make sure your pistol is loaded.
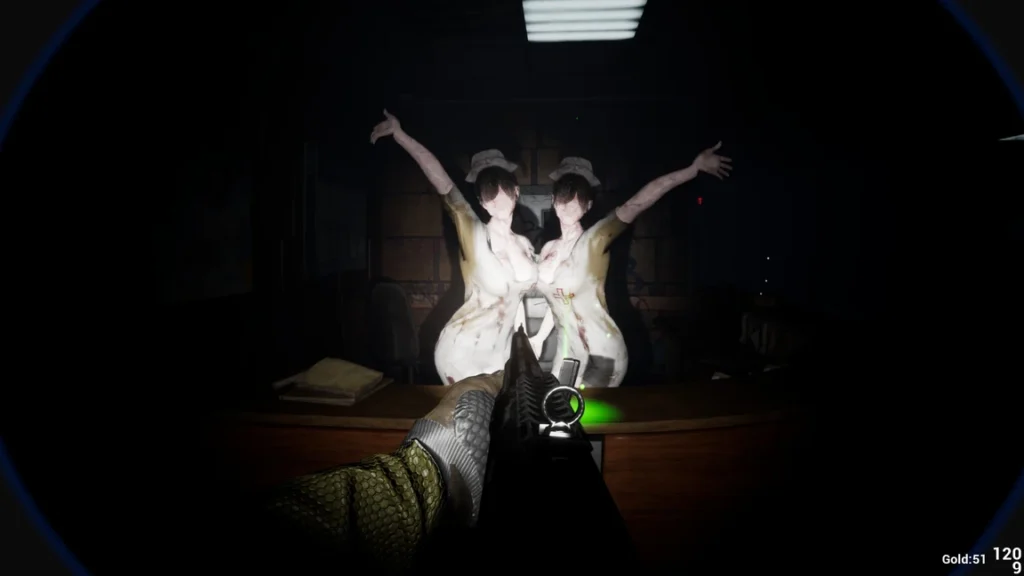
Flick the breaker at the end of the passage and go through the door, that now has a green light indicating it is unlocked. Be ready for your first exorcism with a pistol! If you try the doors in the corridor, they are all locked but we can hear that one knocks back. Look up near the end of the corridor and you will see a clue.
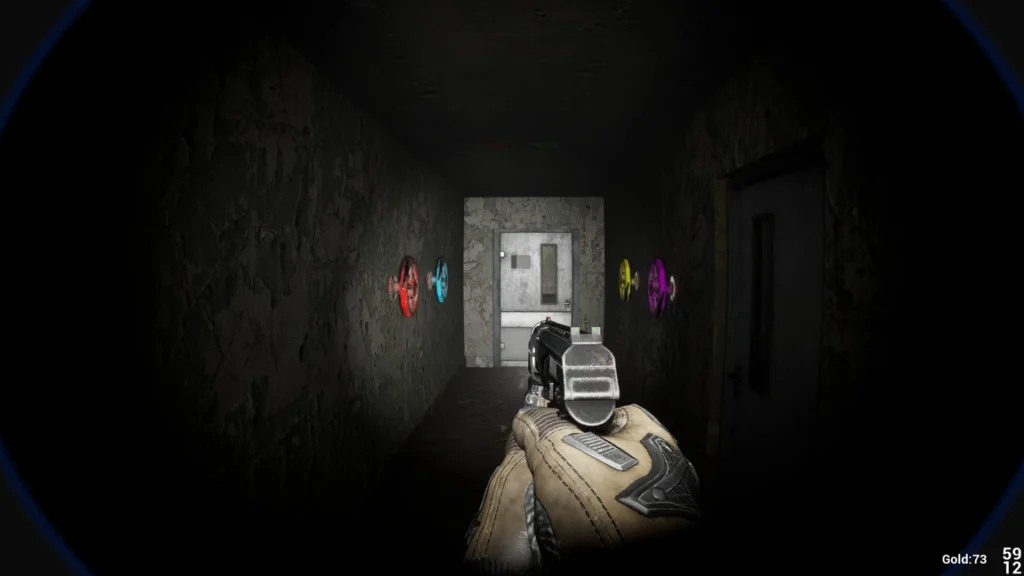
Turn the red wheel and start backing away towards the door at the end of the corridor. You will need to exorcise the spirit coming from the room with the banging, and should be prepared to unload two six round mags into it. Make sure to reload afterward. Be sure to collect the goin coin it drops. Many enemies drop a coin, but not all.
Next turn the wheels corresponding to green. That’s blue and yellow if you don’t recall. Here comes another spirit unhappy to see you, once that is taken care of slap in a fresh mag and check the rooms; you will find a coin in one.
A third door that opened when we turned the last wheels, but before investigating that let’s throw the remaining magenta wheel and make our way through the end of the corridor. Enjoy another greeting. There’s no point in shooting, just run (or find out what happens if it touches you). Be sure to grab the coin in that room.
Now take the door that opened earlier, you’ll recognize the red lights over the door at the far end but this time there are two red markers. That means two buttons this time. Follow the narrow passage, be sure the grab the gold hidden in the painting.
Approach the magic button in the room at the end. If you don’t want to die, press control to crouch and HOLD it to avoid a haircut. Wait for the door to open behind you, and you will now find a secret door has opened across from the painting.
Take the passage. Grab the consecration ammo off the shelves to the right, and make sure to reload if you wasted a bullet earlier. Grab some more ammo off the table at the end of this area, and read the note with a clue. Across from the table is the first breaker, which will turn one of the red lights green. We can’t access the room with the covered dolls until we turn the red wheel located in the room behind the breaker, but that summons trouble. Take care of business, collect the loot, reload and head for the now open door leading to the death shroud covered dolls.
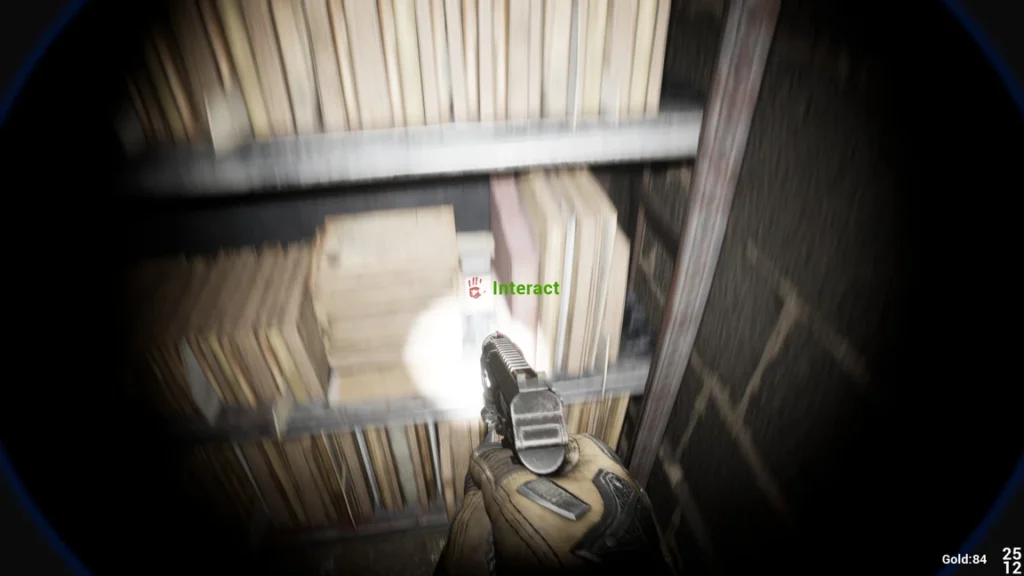
Be sure to enjoy the experience and make your way to the haunted bookshelf. Be sure to have a full magazine, and look for the book that you can interact with. You may need to crouch to spot it. This opens a hidden room to your left, where the other shelf is. Enter it.
Grab the coin, throw the breaker and return back to the locked door with the two lights. Be wary of the enemies. If you haven’t noticed yet, the ammo boxes respawn when you die, and the ammo isn’t too hard to come by but is scarce enough that you should not waste shots.
Go through the unlocked door with the two green lights and follow the janitor. Follow the corridor and grab the ammo. There is a gold coin near the elevators behind some boxes that is easy to miss if you don’t double back later. It’s obvious where to go, but we must find a crowbar to open the air vent.
Level 1 – Subbasement
You might not notice the stairs leading down into the subbasement slash butcher shop near the vent. Collect the ammo, read the notes, and make sure to grab the gold coin behind the waste paper basket.
Enter the next area. Butchers will attack from the right and from behind, but they only take about one magazine a piece. If you haven’t noticed yet, enemies are dead as soon as their death animation starts, and you can empty your pistol in a blink of an eye.
Look through the window by the pipe by the blood, and shove the nearby crate out of the way by walking into it. The big evil egg is not obvious at first, you don’t just press action (F on KB, X on controller) or hold action, you have got to tap action repeatedly until the circle fills and the egg disappears. Don’t forget to collect the booty around the corner before returning through the spider hole. AFAIK, this is the only time you won’t be ambushed for collecting an egg.
Now follow the blood trail. Take out the enemy that attacks, and continue on. There is a gold coin down the left side of the intersection. On the right is the crowbar. Watch out for the big red butcher, he has more health than the others and may kill you in a corner if you’re not reloaded.
Now return to the vent, pry it open and duck waddle your way through with a fully loaded consecrated pistol. When you hear the music and feel the hairs on the bacl of your neck rise, turn around and shoot our pursuer. Be sure to aim low ;). Don’t keep going thinking you can flee, because another one will be waiting around the next corner. At the end of the passage, we encounter the scary little girl for the first time.

Exit the vent and be sure to grab the coin to your left. The doors are locked, and we can’t see what’s going on inside the partially opened room. Go around the corner, grab the ammo, and check the peek hole for a great cut scene. Once the party ends and you’ve taken care of the monster ambushing you, I recommend you cycle back around to that partially open door to see where the party went. Sometimes when you double back, you find content like that in this game :).
Follow the corridors and the red arrows, be prepared to unload your pistol and collect a pair of gold coins before moving on. Welcome to the first real puzzle since the spike room, and perhaps my favorite in the entire game.
Collect the notes, shove the box out of the way, and be sure not to trip and fall into the spike pit at the end. Read the notes for clues. You can shoot the objects if you want, but you only need to shoot the lights in each room and the hallway. There is also a gold coin in the one hidden behind that box. Now stand by the spike pit and turn off your light. Turn it on again and you’ll see the trick, but don’t step out or you’ll die. You have to turn the light off and take a walk of faith down the hall. You will know when it is safe to turn on your light again.
Level 1 – Key Pad
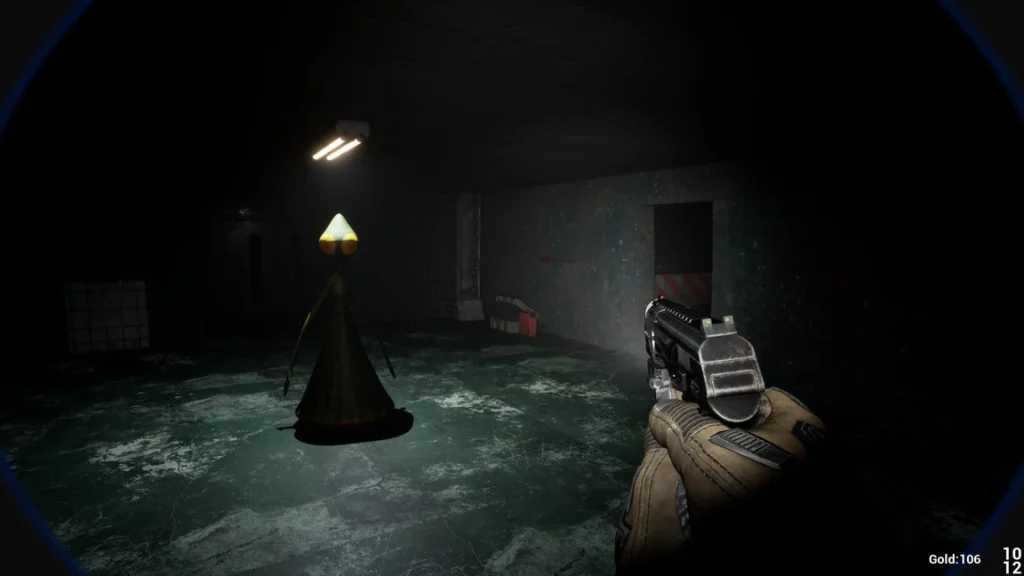
In the next area is the only annoying puzzle. The alien man’s gaze will follow you, and he will teleport. If he touches you then you die and have to start over. When your hear the thud you must LOOK at freaky face or he’ll kill you.
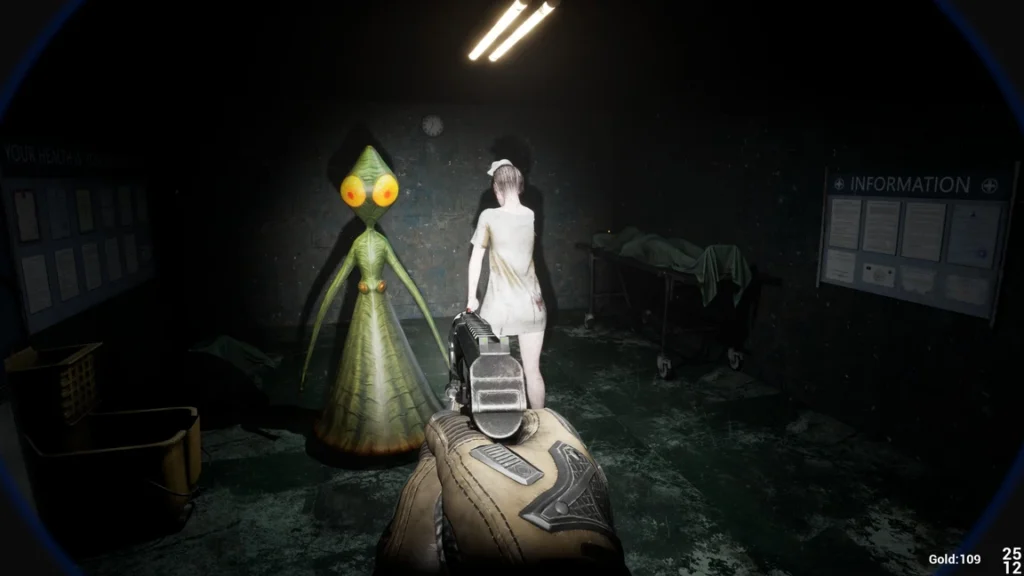
There are two areas, to the left has the first clue but I recommend taking the right first because we need to find the nurse’s arm, some ammo, and some clues. Go right and follow the path until you see the fire alarm like thing hanging in front of the pillar. Turn right and go through the doorway. Grab the nurses arm off the table and turn around.
If freaky faced alien hasn’t chased you yet, you’ll probably see him real soon. I advise you run through this area to cut down on the odds of him appearing out of the corner of your eye and giving lethal hugs before you can get eyes on. Just stare until he disappears, no need to use the gun. You can walk around and do whatever as long as you keep him in sight. Otherwise he will glide towards you like light speed. Kudos to the developer for the head turning animation, it fits this part so well!!!!
Now run straight across to inspect the next area. We are still on the ‘right’ side of the room the alien started in, we’re just checking the last area before heading back. Get the ammo, the two coins, and wait for him to leave. Now run like hell, taking two lefts and run across the room that we first met freaky face in. You’ll arrive at the room to the ‘left’ of where we started and find a nurse missing an arm, which we just found. Interact with her to attach the arm.
Remember the alien will kill you if you stop looking. If you hear the sound, he’s reappeared again. Grab the coin off the gurney, read the note, and give the nurse a helping hand. While making sure not to die by alien attack, look at the wall where she is pointed to review the key code for the exit.
The exit is straight across from where we entered the main room, i.e. when you first saw the alien guy , the door to the hospital is behind him. The key pad is on the right side of the door. Run up to it, interact, and enter the nurse’s code: 12138.
Alien guy will still be able to move while you’re entering the code, so be very quick about it. If you can’t hit retry because you died with the code entry screen open, just press the windows key, close the application, and relaunch and hit continue at the menu. You could also quit the came from the Steam Overlay.
You don’t need to redo things if that happens, just run past the alien and enter the code. Many bothans died to bring us this code. I recommend closing the door behind you, because dunno ’bout you but I don’t want to find out if he will leave that room, lol.
Level 1 – The Swing Champ
Ahead of us are supplies courtesy of Panpan. If you have enough coins, buy the shotgun. You probably will not have enough until a second play through, New Game+ and friendly demon FTW? You’ll get ammo for whichever weapon is equipped when you pick of consecrated ammo. Be sure to read the clue about fighting the Swing Champ. Ammo shouldn’t really be much of a problem from now on. This is our first boss fight of the game and the most fun.
If he touches you then you die and have to begin the fight again. Fortunately, your ammo count is saved and the sweet and kind hearted Panpan provided plenty of ammo. For an easier fight, shoot the champ in the legs. For a harder fight, shoot him in the head. I suggest using the leg method if you only have the pistol. After taking enough damage he will disappear.
When he disappears, move toward the center of the room and start circle strafing and wait for him to reappear. We need to reacquire the champ, and we don’t know from where he will appear. If he gets close: always shoot him in the legs to slow him down! You can turn and run after that to reload – just don’t let him touch you! Usually there is time to reload while he disappears, just make sure you’re scanning the entire room so you see when he comes swinging for ya.
If you have the shotgun: just pump a shell or two in the champ’s legs and then go for the head. You will have time to reload between him disappearing and reappearing. The shotty makes the fight much quicker, but it is quite easy to do with the pistol — but harder to score head shots that way.
Once the champ is down for the count, collect the booty and take the exit. Congratulations on completing level 1!
Level 2 – Hospital Lobby
We finally made it to the hospital. This is the largest level in the game, and we will have to wander around quite a bit, facing many enemies in the name of saving the world. Read the note and enter the hospital, head for the green item on the counter.
Enjoy the nurse’s greeting, they’re friendly and offer you an extended pistol magazine for a mere 15 gold. Definitely buy it if you don’t have the shotgun, it will make life a lot easier. Don’t forget to check the door behind where the nurses appeared and the ammo on the counter. You’re welcome :P.
Notice across from where we entered the hospital is a note and an evil egg that can’t be reached from this side unless you have the jump unlocked for New Game +. Now let’s head back to the nurses station and head down the ward. Look through the exit doors at the end, and you’ll get a much more pleasant surprise and a glimpse of where we need to reach. Take note of the red miasma as it is the best landmark we will find.
In general, you should check every door because sometimes you encounter nice or scary things, or just find cool loot and spirits trying to murder you.
Now follow the corridor, behind the partially opened door is another egg, but we won’t be able to reach it from this side of the ward. The door at the end of the corridor is Passage Door 1 and is of course locked. This is where we need to go, but first a key must be found.
Go around the bend, to the right of the locked door to Passage 1. Note the stairs and the ammo box. Once things get spooky be prepared to use your ears and protect your flank. It may be easier to use your handgun here, if you have the shotgun. If you check the top of the stairs, you’ll find the path is blocked off, but I still encourage you to check everywhere.
Head through the door where the scary lady came crawling from. To the left is a door, to the right is the rest of the corridor with a door jutting out and the evil egg we saw from the lobby. Take care of the first egg. Again, walk up to it and keep pressing the action key. Several spirits will attack. It’s best to place yourself behind the egg, since there will be no room to go anywhere. It’s business as usual with the pistol, or about 4 – 6 shotgun shells. Just breathe, fire, and reload. Don’t forget to take their coins as loot.
Once the spirits are exorcised, go through the nearest door; the one that is jutting out into the corridor. You can use either door, as both the doors we have seen lead into the same room. Take care of business and don’t forget the ammo. The singing spirit is where the key to Passage Door 1 is, take it and return from whence we came through the double doors; or jump the gurney near where the egg was if you’ve unlocked jump for NG+.
Instead of going directly to Passage Door 1, I recommend that you return to the nurses station where the green pistol upgrade was at the beginning of the hospital. This is optional, but well worth it. The door where the scary little girl appeared is now open, enter the room and be prepared to piss your pants. Maybe check the double doors again on your way back too
Level 2 – Passage 1
Now head through the door to Passage 1. If you’ve forgotten it is literally down the hallway from the nurses station, around the bend past the partially open door /w the evil egg visible, and if you walk pas the stairs you went right past it. Once through the door to passage 1, you may as well shut the door behind you because we won’t be back there again.
When the door swings open, enter the room if you want an achievement and some ammo. Try to leave and you’ll be forced to solve the math problem below.
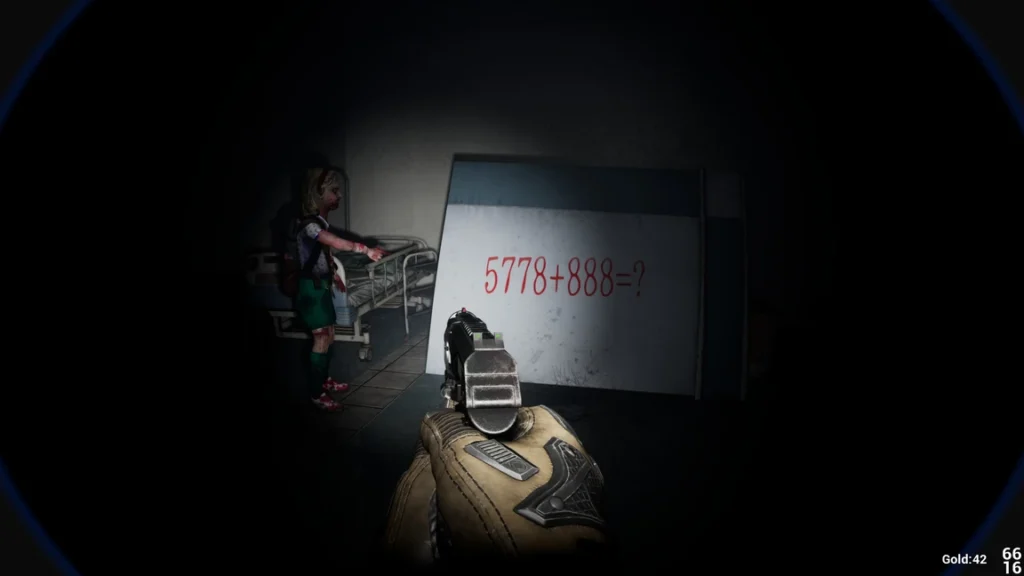
The answer is entered by interacting with the board, and uses the same UI as the key pad that we used in level 1. Now we can leave with our ammo, and continue down the corridor. There’s a note on the wall and the door to Passage 2 is locked. So follow the corridor in search of the key. You’ll know it’s the correct direction when you see the corpse pinned to the wall and the patient down the hallway.
Here’s the first lesson: never look this lady in the eyes! If she appears, keep jerking the mouse away or you’ll eventually die. She is like a randomly appearing or triggered level boss trying to keep us from proceeding. Eventually if you read the notes, you will learn this from a clue, and that she is also bullet proof until we find and destroy her body.
Grab the ammo from near where she first appeared, and go through the emergency room door and destroy the second evil egg. There is a note with a clue about the woman who just terrified you, and more ammo. It’s best to stand behind the egg towards where the ammo was. Several mobs will attack, but only the first is especially dangerous. Coincidentally, this was the egg behind the partially opened door we saw earlier on the way to Passage 1.
Now head back to where we just came from, go down the hall where the body is impaled on the wall and make a left — that’s Passage Door 2. May as well close it behind you because it will make it easier to avoid getting lost.
Level 2 – Passage 2
Entering Passage 2, there is an open door to our left by the information sign and a red exit light at the far end of the corridor. Say hello to the welcoming committee and enter the open door to the left, read the note and grab the ammo. It’s the last clue about the weeping woman with the deadly gaze. Return to the hallway and finish off any enemies you may have missed.
The door under the red exit sign at the far end is the door to the last ward, Passage Door 3, and is of course locked. We need to lend a helping hand and a few other body parts to open this one. Go down the corridor in the middle where the monsters were. With the way we just came behind us, on the right are the CT-Room and X-Ray Room. Both doors are locked.
Keep going and enter the easiest place to get lost. It is a T-Junction and we just entered from the base of the T. Dead ahead is a navigation sign. Be advised that you will eventually encounter the weeping woman, and must avoid looking her in the eye.
Go left towards the Operating Room. On your left will be a green door that you can open, and ahead and on the right will be an open door. Go inside and collect the nurse’s right arm from the sink. Now head back to the corridor and enter the green door I mentioned earlier. To help navigate, the door has a bloody splatter to its right, and if you look left down the top of the T-junction there will be red miasma.
Inside the room with the green door is some ammo and another achievement for solving math.
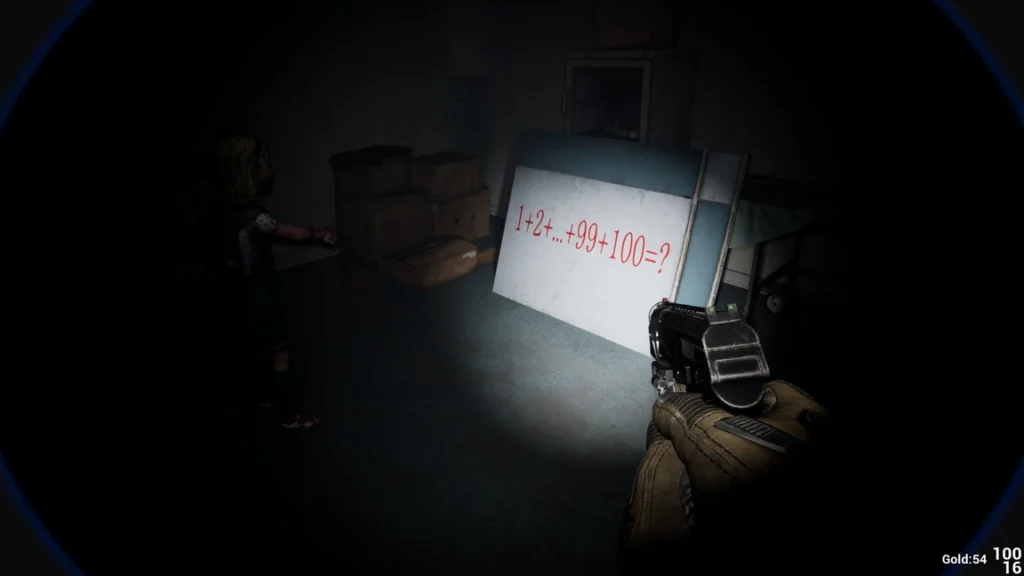
The answer is 5050.
Head back out and head for the miasma. You can tell the corridor we came from at the base of the T-Junction by the flashing red light on the ceiling, which should be on your right if you are looking at the miasma.
Grab the ammo off the chair and duck into the open green room to the left. The sign says Laboratory, and give the nurse her arm. There is also ammo and another note inside this room.
Now head out and continue to your left, down the left side of the T-Junction that we entered earlier. Make sure your gun is loaded. Down the far way is a window with ammo and another corridor. Around the right is an open door and another set of stairs.
Grab the ammo from the room and follow the arrows leading down the stairs. It feels like a trap doesn’t it? At the bottom you will find the third evil egg and the usual monster attacks. Head back up the stairs and go to the window with the ammo box.
Deal with the veiled lady and enter the bathroom she came from. Grab the nurse’s head from the sink, make sure your gun is locked, ♥, and ready to rocket. The pretty lady waiting for you outside is not friendly. You can head back to the laboratory near the red miasma now, or do it on the way back. Either way, we need to continue down this side of the corridor. If you see the miasma ahead turn left.
If you die, the body parts will re-spawn, but the game’s saves will remember that you collected them before the save took place. So the worst case is you get lost.
You know you’re on the right path if you see an obstruction with what looks to be many nurses in a lobby located far in the distance,
Grab the ammo off the chair. There is a closed door across from it that can be opened. It’s easily missed. Inside is ammo. Return the hallway and continue towards the obstacle between you and the crowd of nurses.
Be prepared from trouble. To the left is a path, to the right is s small door by graffiti with a red light over head. Go through the door with the red light. Make sure your gun is loaded and grab the nurse’s left arm. I recommend the pistol here, because it is faster to reload and the shotgun blocks firing or changing weapons during the reload animation.
Now head outside and take the nurse’s leg and the gold coin from the window.
Head back to the laboratory. I.e. from the window, turn around, follow the path to the right, take the first left. You’ll see the stairs from before and be walking towards the red miasma. The nurses are in the Laboratory before you reach the miasma. Give them their remaining limbs. Crouch and collect the X-Ray room key from the crouching nurse. Leave the room and turn left.
Follow the corridor towards the red miasma, and take a left back into the base of the T. Remember to look up for the flashing red light if you need extra help finding it.
Find the locked X-Ray room, unlock it, and enter. Inside are three items of importance: the key to Passage Door 3, the key to the CT-Room down the hallway, and the fourth evil egg. Collect the two keys, stand behind the egg, and get ready to party down like it’s 4/6 evil eggs destroyed, because it should be!
Exit the room and turn left into the corridor.
Unlock the CT-Room and destroy the weeping woman’s body by interacting with it. That takes care of the Level 2 boss / guardian slash trouble maker. Exit the room and turn right, and then right again at the next junction.
Go through the Passage Door 3, it’s the red light / exit we saw earlier on our approach to the T-junction.
Level 2 – Passage 3
Immediately to our right of entering Passage Door 3 is an open door, and we are now standing in the mouth of another T-junction like area. Go through the open door on your right to collect some ammo. Return the corridor of Passage 3.
To the left is a blockage overlooking near where we got the body parts. To the right are the nurses we saw earlier and a flashing light by an open door.
Let’s deal with the open door. Collect the ammo, take out the fifth evil egg, and deal with the many enemies who attack you. It is highly profitable, but you may prefer the handgun for reload speed, or intermixing with the shotgun if you have it.
Go to the right, deal with the monsters, and collect the ammo. The door at the end is our exit but do not use it yet because we still need to take care of another egg. Instead head towards the nurses.
Next to the red flashing light is a door partially blocked by the gurney. Look closely and you will notice a gold coin inside. You’ll have to crouch and carefully navigate around it to retrieve the booty.
Now approach the nurses. Read the note and get the ammo on the left. A gold coin and two more boxes of consecrated ammo are on the right. 4 of 11 nurses will attack you when approaching them. Once that is all handled, take care of the sixth evil egg. The alarm will sound and the scary Girl Scout will show you the way to the exit that we didn’t take earlier. If this doesn’t happen, make sure that you destroyed all 6/6 eggs!
Head through the exit and note the tormented nurses. Before taking the green portal, duck behind the counter and get one more gold coin.
Congratulations on completing level 2.
Level 3 – Panpan’s House
Welcome to level 3 where the helpful nurses offer a variety of upgrades for gold coins. You can buy whatever you want, or save the gold for Panpan in the next room.
| Price | Perk |
|---|---|
| 20 gold | Health +25 |
| 20 gold | Movement speed +10 |
| 25 gold | Pistol damage +7 |
| 25 gold | Shotgun damage +5 |
| 288 gold | Superman |
| 15 gold | Jump |
| 20 gold | Slide the shovel |
I recommend getting the movement speed and the jump, because these make life easier on the next run. You’ll mainly be using the shotgun from here until the completion of the game, so think of the pistol damage as a New Game+ perk if you grab it.
The “Slide the shovel” effectively means the ability to dash forward while running, and can be useful when fleeing and may be more immediately useful than jumping. There is an achievement for getting Superman.
Don’t forget the note. If you want to know how to use jump or shovel, see previous sentence.
In the next room we get to meet the kind and gentle demon, Panpan. She will kindly provide you with a shotgun for the rest of this play through, and will dance for 2 coins a pop. There is an achievement for seeing them all. Don’t worry if you don’t have enough, you will easily have enough gold on the way back.
Read the three notes (table, counter, wall by the door), collect the ammo and the shotgun. It’s 30 shells if you already have it, and a useful tool if it is your first time.
Whenever you collect a box of ammo, it provides ammo for the currently equipped weapon: either the shotgun or the pistol. You won’t really need the pistol much in the area ahead.
Go through the simple wooden door where the note is. It tells you what we need to do. Panpan is hungry, and we need her help, so we need to acquire three chicken feet and two eggs for the pleasure of our benefactor.
Level 3 – Outside Intersection
Go through the door and you will find yourself in an intersection. Behind us is Panpan’s house. Ahead, left, and right are the three Kunkun houses. You can do them in any order.
Directly ahead is a water melon monster who will give you bad hugs. To the right on a bench right when you leave Panpan’s is some ammo. To the left is a mailbox, and another near the fence with a note on it. Down towards the right are mailboxes for the neighborhood with a note and ammo.
Read the notes, kill the baddies, take the ammo, and feel a warmth in your heart as you learn about Panpan’s nature.
You’ll probably get attacked by two monsters when going to the set of mailboxes. The fleshy type are easily dispatched, but the ones with the deer head are best handled with shotgun shells.
Doors to the houses are simply walk through to open, not interact to open. The location of the chicken feet is a random spawn, so just look until you find it. Each house has one Kunkun, which is a lot like the swing champ including the fact that you will die if they touch you. Two of the houses have eggs to interact with to collect from the backyard.
You can do them in any order.
Level 3 – Left House (Chickenfoot 1)
The left house has a deer head roving out front, a fleshy monster and watermelon guard the back. There is a box of ammo behind one of the trees in the back yard and on the back porch. There is ammo near one of the trees in front of the fence in front of the house.
You can enter from the front or the back door, but a floating painting and Kunkun is inside and he will kill you with one touch. The best plan is to get him to come outside and unload the shotgun until he break dances.
Inside the house on the ground level is a box of ammo and a note about Panpan. Upstairs are three gold coins and a pair of ammo boxes. Be sure to check next to the dresser.
Acquire chicken foot 1 from wherever it has randomly spawned.
Level 3 – Center House (Chickenfoot 2)
The center house has a deer head roving around that will attack you if you approach the row of mailboxes, as will a mob from the house to the right.
A floating painting will attack when you near the front door but he’s small potatoes. Watch out from Kunkun in the back yard! Unload the shotgun until he break dances, and don’t let him touch you.
On the back porch is a note about Panpan’s dancing, and a kunkun egg is in the backyard guarded by a watermelon. Also some ammo.
Inside the house on the ground floor are three boxes of ammo and another note. Upstairs is another pair of ammo boxes and a creepy crawler.
Collect chicken foot 2 from wherever it is located inside, and don’t forget the egg in back.
Level 3 – Right House (Chickenfoot 3)
The right house has a fleshy monster and a painting roving around on the porch. Take them out. On the chair on the porch is some ammo. You can go through the door or around back first, doesn’t matter.
Inside the house is another deer head, a note about Panpan, and some ammo on the ground floor. By the stairs is a door to the kitchen and across from the pizza box with ammo is the bathroom. Up the stairs are a pair of creepy crawlies. You can crouch to get under the lamp post, but I have never been able to get up the stairs into the attic space. If the chicken foot is there, just plan on dying by Kunkun so that it respawns somewhere else.
Outside is best accessed from the right side of the house instead of the back door. You’ll see the giant kunkun egg in the back yard, but look out for trouble. KunKun approaches, pop him in the legs until he starts to break dance. Another fleshy monster guards the porch, and is visible through the backdoor if you entered it already. Be sure to read the note near the back porch steps.
Be sure to collect chicken foot 3 from where ever it spawns.
Level 3 – Return to Panpan
Return to Panpan’s house, the big one with the flashing porch light, You should have plenty of gold coins to see all her dances, and a warm feeling in your heart if you read the notes about the kindly demon woman.
You can also acquire upgrades or bank the coin for a future play through. If it’s your first time, you might want to save some to ensure you can get the shotgun during Level 1. The most useful unlock for what comes next is shotgun damage, various movement bonuses, and health.
To get the achievement, just keep giving Panpan coins each time she stops until it unlocks.
Interact with the plate on the counter to make your offering to the sweetheart and then the exit door will open revealing a red portal.
Level 4 – Final Boss
After collecting any last upgrades for this run, enter the red portal and meet the final boss. If Panpan is more like a Japanese oni/ogre or the Berkeley daemon then the final boss is more like something out of DooM 1993.
His attacks are various types of swing with a broadsword and a few combos. His strikes often leave a colored arc of light that will damage you from beyond the blade’s reach. Also, he is built like the bruiser brother’s in terms of shrugging off damage. All around the room are ammo boxes, and you should have plenty of shells to begin with from level 3.
The battle is simple. He will walk after you and attack, you will evade and unload shotgun shells. If you take damage, focus on running away for a few seconds sot hat you can heal. When he’s taken enough damage, a spirit will spawn near the center and try to attack you. Make sure you have enough health and ammo when this happens, because it’s a long slog to take him down, and you’ll have to start over if he or the mobs kill you. At least you get to keep the coins.
I find the best plan is to pump two or three shells while circle strafing, or unload and run off while reloading. But always keep at least 3 or 4 shells loaded to deal with his summons. It’s more important to avoid being damaged long enough to heal than to maximize DPS. This is especially true on your first run through the game.
His movement speed seems to be based off of yours IMHO, which means it will be slower the first time and noticeably faster by the time you have two movement speed upgrades. His strikes are mostly one and two hit combos. They are mostly easy to avoid with circle strafing while you shoot, and reloading while you flee along the walls.
The spirits that he summons to attack you will always spawn in the center of the room so be aware of this when circle strafing. You don’t want to die because either one of them touched you and you weren’t prepared for the summon.
Just keep hammering away with the shotgun until the bad boy goes down. It takes A LOT of shells with a baseline shotgun, but gets easier with an upgrade or two.
Once he’s down, collect the 35 gold and go through the white portal.
Endings
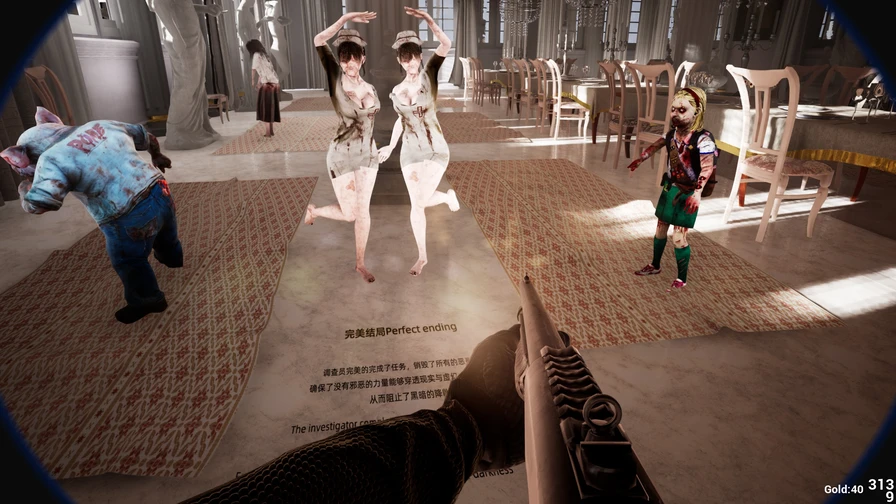
Depending on how many evil eggs you destroyed, you will receive the normal or the good ending. If you missed any eggs, such as those on Level 1 then you will be greeted with the normal ending, encouraging our paranormal investigator to load up his consecrated pistol and take care of unfinished business. If you destroyed them all then you should be welcomed to Panpan’s dinner party with the perfect ending.