Welcome to the KLETKA Guide. It covers a wide range of information, from enemies and items to various rooms and events you may encounter.
We thank NeoFoxxx for the screenshots. You can access the user’s profile through the link.
Table of Contents
KLETKA Guide
KLETKA is where the most dangerous criminals are sent, and your sentence involves descending through the depths of a massive structure called the Gigastructure. You will travel down using a living, hungry elevator known as KLETKA. The key to survival is keeping this elevator functional: it requires constant fuel, repairs, and food. If you are not careful, the elevator itself can kill you.
In this guide, you will learn about:
- KLETKA itself
- Various creatures
- The Gigastructure and its rooms
- Items you can find
The GIGASTRUCTURE
The Gigastructure is the environment you will explore. Most areas are like apartment complexes, but you may also find rooms full of trash, narrow corridors, or even a store where you can spend bottles (the in-game currency).
Anomalies and Special Rooms
The Gigastructure seems infinite and can build itself continuously. Due to this, anomalies can occur. These are often marked with a ⚠︎ symbol.
Some known anomalies include:
- Checkered Corridor: A long, black-and-white checkered hallway with a single fuel can at the end.
- Giant Checkered Pillars: A room filled with massive, checkered pillars.
- Forest Area: Represents a form of “freedom” at the end of your journey.
- Hangman Room: A room with a hanging human body in the center.
- The Backrooms: Inspired by the famous Backrooms concept, including an exclusive creature.
- Error Room: A room missing textures, featuring “ERROR” text instead of normal items.
Special Events
Certain floors may feature unusual environmental conditions:
- Postsamosa: After a SAMOSA event, large piles of sludge appear. These might be radioactive waste, but they will not harm you. There are also magnetic sludge piles that pull you closer.
- Madness: Some items you try to pick up will vanish, paired with unintelligible whispers that create a feeling of insanity.
- AntiGravity: As the name suggests, gravity stops working. Everything floats in the air.
- Storm: Thunder and lightning fill the entire floor, periodically electrifying the ground beneath you.
- Flooded: The floor is covered in water. This conceals traps and can become dangerous if electrical faults charge the water.
- Iced: The floor is slippery and movement becomes difficult. Water drips, and ice forms on walls.
- Inferno: The floor is engulfed in flames, making navigation extremely dangerous.
(Note: Some event names may not be final.)
Structures You May Encounter
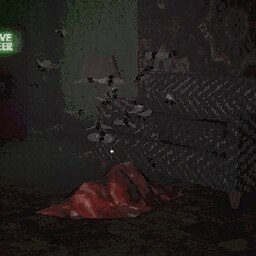
- Live Beer: Requires a certain amount of bottles to activate. It can resurrect any dead players.
- Scramble Gamble: A gambling machine that costs 5 bottles per turn. Possible outcomes:
- Jackpot: 10 bottles
- Refund: 5 bottles
- Partial Refund: 3 bottles
- Food: Food Preservative item
- Music: Cassette Tape
- Nothing: 0 bottles
- Explode: The machine blows up
Understanding KLETKA
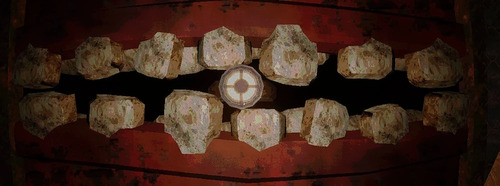
“Kletka” translates to “Cage.” This odd creature takes the form of an elevator and can consume anything, including items and humans. Keeping it operational requires regular maintenance, repairs, and fuel. Remember, there is no going back up—only downward progress.
Inside the elevator, you will find a radio playing various songs (you can unlock more with cassette tapes). Some tracks include:
- N_H – The Call of Khruschevka
- Jangwa – Dark Times
- Claude Debussy – Clair de lune
- Erik Satie – Gymnopedie No 2
- Pyotr Ilyich Tchaikovsky – Valse Sentimentale, Op.51, No. 6
- Mozart – The Marriage of Figaro
While the music might calm you, never forget that you remain a prisoner with a job to do.
Upgrade and Maintaining the Elevator
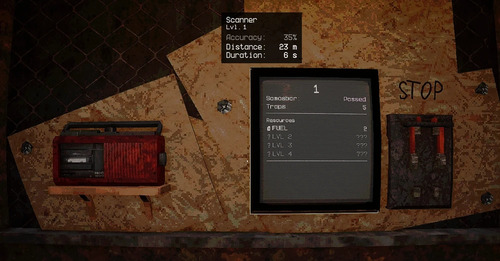
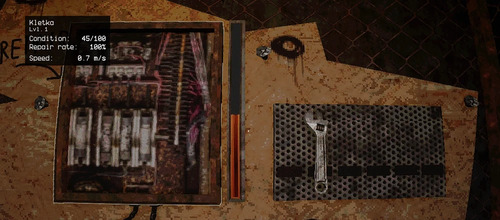
You can upgrade KLETKA using gears found throughout the Gigastructure. To apply these upgrades, you need a wrench. Attempting repairs by hand is risky and not recommended.
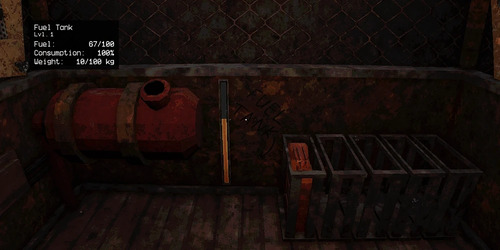
Keep a close eye on the fuel. Without it, you cannot continue descending. Store spare gas tanks in the elevator and refill KLETKA whenever you find fuel.
KLETKA itself might act unpredictably. It may grow tired of stopping and skip multiple floors at once. It may become hungry, demanding flesh. If you do not feed it, it might consume a teammate. Occasionally offering pieces of flesh can keep KLETKA satisfied and cooperative.
KLETKA Items
There are many items to discover, though this guide does not list them all. Here are some known items:
- Bottle: The primary currency. Used for respawning, shopping, or gambling.
- Gas Tank: Used to refuel KLETKA.
- Wrench / Gigawrench: Used to repair KLETKA.
- Bag: Expands your inventory capacity.
- Rake: Increases your attack power.
- Vodka: Temporarily boosts speed, carrying capacity, and damage resistance.
- Schwag: Restores some health and causes a mild intoxicating effect.
- Medkit: Restores 25 health.
- Food Concentrate: Restores a small amount of health.
- Xshroom: Allows you to see through walls.
- Gear / Haste Gear: Used to upgrade KLETKA.
- Gift: Found occasionally inside KLETKA, contains a random item.
- Battery: Powers your flashlight.
- Spray Paint: Lets you mark walls or floors with bright pink paint. Limited uses.
- Guitar: Cannot be picked up, but you can interact with it.
- Shotgun: A very rare “pipe” shotgun.
- Bullwhip: A melee attack weapon.
KLETKA Enemies
Below is a comprehensive look at each enemy you may encounter in the Gigastructure. Alongside their behavior and weaknesses, you’ll find recommended strategies to increase your survival odds. Each entry will be paired with a representative image for easier identification.
Samosbor
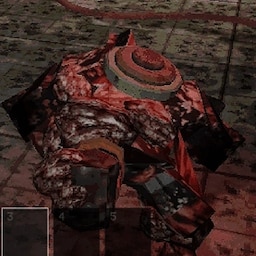
Samosbor is not a typical enemy but a catastrophic event-level anomaly. Once this towering, unstoppable force emerges, nothing survives its presence outside the sanctuary of KLETKA. It floods rooms with toxic purple gas and relentlessly devastates everything in its path.
A colossal, indistinct mass often heralded by blaring sirens and sudden environmental shifts.
Behavior & Tactics:
- Appears unexpectedly, signaled by a piercing siren.
- Fills the area with lethal gas, making staying outside the elevator deadly.
- Does not respond to attacks—impossible to fight directly.
Recommended Strategy:
At the first sound of the siren, abandon all exploration. Run back to KLETKA immediately to avoid instant death. Samosbor is not an enemy you defeat; it’s one you outlast by returning to safety.
Flesh Flies
These small, aggressive insects swarm around piles of decaying flesh. Although weak, they pose a threat if you disturb their feeding grounds. Swarms of buzzing flies circling rotting meat, often found in apartment-like rooms.
Behavior & Tactics:
- Attack when players get too close or attempt to take resources from their feeding spot.
- Scatter when struck, making them easy to chase off.
Weaknesses:
- Light attacks (punches, low-tier melee weapons) can scare them off.
- They have low health and no ranged abilities.
Recommended Strategy: Approach piles of flesh cautiously. If attacked, fend them off with quick melee hits. Once they disperse, collect what you need and move on.
Mushroom Man
A slow, fungal-infected humanoid creature with a mushroom-like head. It deals heavy damage but is easy to outmaneuver. Tall, lumbering figure with a white-and-red fungal “cap” for a head, and pale fungal skin.

Behavior & Tactics:
- Slow movement, powerful melee strikes.
- Predictable, straightforward attack patterns.
- Tends to wander aimlessly until provoked or alerted.
Weaknesses:
- Vulnerable to traps like bear traps and landmines.
- Slow speed makes it easy to kite and ambush from a distance.
Recommended Strategy: Lure it into traps or chip away at its health with ranged weapons. If you lack resources, circle around it and use the environment to your advantage, striking and retreating before it can retaliate.
Cone Spider
Initially indistinguishable from a common traffic cone, Cone Spiders reveal themselves by springing up and attacking unsuspecting victims. Looks identical to a standard traffic cone until it strikes, revealing spindly legs and a predatory stance.
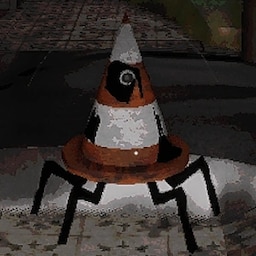
Behavior & Tactics:
- Lies in wait, blending into the environment.
- Launches sudden, close-range attacks with low to moderate damage.
Weaknesses:
- Fragile and can be killed with a few well-placed hits.
- Identifiable if you pay close attention—cones placed in odd locations are suspicious.
Recommended Strategy: Proceed slowly in areas with suspicious cones. Use ranged attacks to test if the cone moves. Once revealed, eliminate it quickly with melee or small arms fire.
Structure Worms
Massive, tunneling worms that burrow through walls and floors. They travel in packs and can quickly overwhelm an unprepared player. Long, segmented, and grotesque. They burst through surfaces without warning.
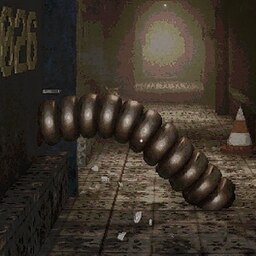
Behavior & Tactics:
- Move in groups, emerging near players to ambush them.
- Extremely fast and relentless.
Weaknesses:
- Vulnerable once surfaced, but their speed makes direct combat risky.
- Can be deterred by retreating to KLETKA, as they rarely follow inside.
Recommended Strategy: If you hear tunneling sounds, be prepared. Setting traps near choke points can help, but the safest option is often to return to KLETKA and leave the infested floor behind.
Mimic Players
These impostors resemble human players, mimicking their movements and habits. However, instead of aiding you, they aim to steal your supplies and vanish. Indistinguishable from players at a glance, but their fake names (e.g., Boba, Bobert, GraXXer, Mista Twista) are a giveaway.
Behavior & Tactics:
- Act like normal players, looting items and avoiding threats.
- Will not typically try to kill you, but they will snatch valuable resources.
Weaknesses:
- Not very aggressive; they often flee if confronted.
- Easy to spot once you know the suspicious names.
Recommended Strategy: Confront them quickly. If you can corner them, reclaim stolen items through force. Otherwise, stay vigilant and keep an eye on your resources.
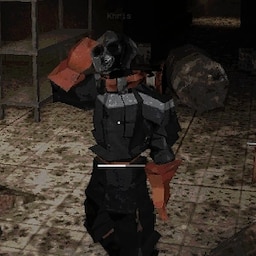
Bomb Crawlers
These charred, human-like creatures carry explosive devices strapped to their backs. Their sole purpose is to rush towards you and detonate, causing massive damage. Hunched, burned figures with a visible explosive pack.
Behavior & Tactics:
- Sprint toward players upon detection.
- Explode on impact, causing severe harm or death.
Weaknesses:
- Extremely vulnerable to long-range attacks, especially before they close the distance.
- Destroyed if they step on traps or if you shoot them early.
Recommended Strategy: Spot them early and use ranged weapons. Keep your distance and target them the moment you see them. Do not engage in close quarters.
Eyeballs
Large, floating eyeballs that roam the corridors. They are passive and do not attack. A single, giant eye that drifts aimlessly through rooms and hallways.
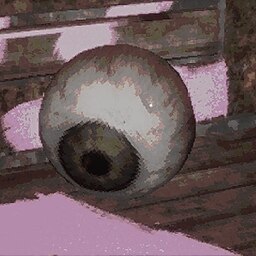
Behavior & Tactics:
- Non-aggressive; they merely float around.
- Can be collected and offered to KLETKA for valuable rewards.
Weaknesses:
- No threat to players, so no combat strategy needed.
Recommended Strategy: Gather Eyeballs whenever safe. Offering them to KLETKA can yield beneficial bonuses or resources.
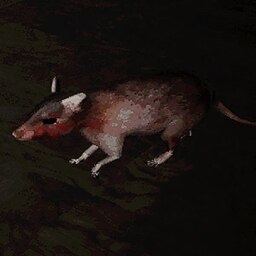
Rats
Common vermin that scurry through many floors. While they pose little threat, they’re an abundant source of flesh. Small, fast-moving rodents found nearly everywhere. Die easily from any weapon.
Hazards
- Landmine: Explodes when stepped on by a human or enemy, usually killing them instantly.
- Tripwires: Injure you and slow you down by breaking your leg.
- Bear Traps: Useful for trapping enemies, but dangerous if you step on one. You must disarm it to free yourself.
- Gas Mine: Similar to a landmine, but releases harmful gas instead of a lethal explosion.
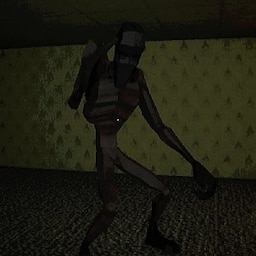
Secret Enemy – Neighbor
A tall, dark, skeletal enemy found in a secret Backrooms level. Reports say it is very fast, very strong, and extremely dangerous.
By following this guide, you now have essential information about exploring the Gigastructure, maintaining KLETKA, facing various anomalies, using items, and dealing with enemies. Stay alert, strategize your approach, and remember your life depends on your actions in KLETKA’s unforgiving depths.