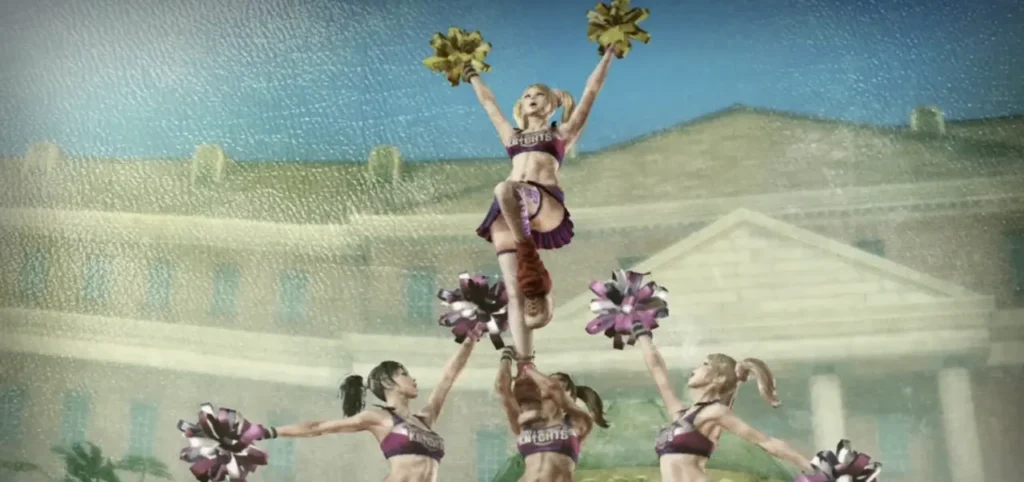
You can find achievements, endings, collectibles and all other details in LOLLIPOP CHAINSAW RePOP in this complete guide.
LOLLIPOP CHAINSAW RePOP Wiki
Endings
Congratulations! Happy Birthday!

To get a happy ending you need to rescue all your classmates during the storyline. You can keep track of how many classmates you need to rescue and how many you missed on each mission. During a mission, click the menu and then click “Rescue” in the context menu. You have a total of 22 classmates to rescue:
- Prologue – 3
- Stage 1 – 8
- Stage 2 – 4
- Stage 3 – 1
- Stage 4 – 3
- Stage 5 – 2
On your first playthrough you probably won’t get this achievement, as it’s hard to rescue all of your classmates without an upgraded Juliete. While getting this achievement you will also get the “Life Guard” and “San Romero Knights Savior” achievements.
When going for the maximum rating during the third playthrough, it is recommended to rescue all classmates. More details about rescuing in the related sections in the guide for each level.
Horrid Birthday

You don’t have to rescue all of your classmates to get the bad ending. On the very first playthrough you will most likely get this achievement because saving everyone on the first playthrough is hard. Because Juliet is not fully upgraded you won’t be able to rescue all of your classmates in the given time before they are killed by zombies. If you do manage to save all your classmates on the very first playthrough, replay the last level again and choose the bad ending at the end.
Characters
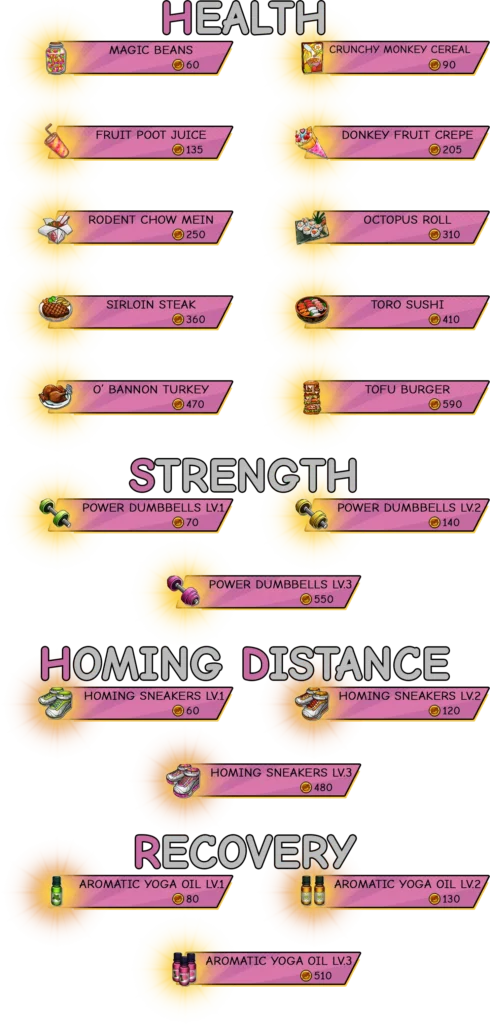
Super Shopper

While getting this achievement, you will also get achievements for collecting 10,000 and 1,000 coins (“Millionaire Hunter” and “Rich Hunter” achievements).
In the shop, you can spend coins to upgrade Juliete’s stats, buy consumables, unlock new combos, and buy collectibles. Priority is to buy passive upgrades for Juliete and new combos, as there are 3 achievements for this. The remaining coins are better spent on buying Nick’s tickets for the longest achievement “Love Nick”.
Perfect Body

It will take a total of 5020 coins to upgrade all of Juliete’s passive stats:
Master Sushi Chef

A total of 4,769 coins will be required. Buying one upgrade gives access to another:
- Nich Shake – 210
- Cheerleader Chain – 100
- Chainsaw Stab – 60
- Chainsaw Full Swing – 140
- Chainsaw Chain – 210
- Armadillo Spin – 120
- This combo is effective to rush into a crowd or safely escape a crowd. With this combo it is easy to make multi-kills for sparkle huntings.
- Final Chainsaw Power Attack – 740
- Maelstorm Spin – 150
- OP skill for controlling crawling zombies. The combo allows you to deal a lot of damage and multi-kills for crawling enemies.
- Lolli-O-Copter – 200
- Chainsaw Paradise – 180
- Jump Stab – 280
- One of the most OP skills in the game. You can use it to quickly escape from a zombie swarm and deal a lot of damage. This combo allows you to deal damage without taking any damage for 3/6 bosses.
- Zombie Grab – 170
- Butt Attack – 210
- Holy Chainsaw – 999
- Body Bash – 220
- Skill required to complete another achievement.
- Brutal Cut – 300
- Chainsaw Drill – 300
- Chainsaw Strike – 190
Combos are unlocked as you progress through the storyline. For purchasing and completing at least one combo you will receive the “Zombie Hunter Apprentice” achievement.
Love Nick

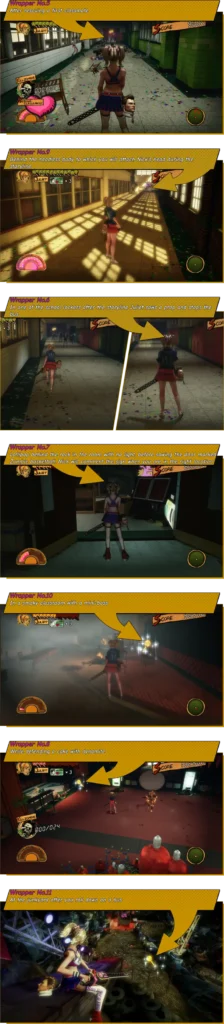
You need to use Nick’s help 100 times. You will need a Nick Ticket to activate the help. You can buy these tickets for 30 coins in the shop, or find them on levels as collectibles. But they are very rare, so the best option is to buy them.
This is the longest achievement, so it’s best to save it for last. On easy and medium difficulty levels you can have 9 tickets, on hard you can have only 5. Once Juliete is fully upgraded, spend all the money to buy Nick Tickets and farm this achievement.
Combat
Sparkle Hunting Master

Easier to complete on Stage 3, in the last arena. In the arena with blue and red barrels. You need to survive 3 waves, with each wave there will be more zombies. Charge Sparkle Hunting beforehand and activate it on the third wave. On the first wave, destroy all the barrels. Stack all zombies and activate Sparkle Hunting.
Another good spot is on Stage 5, in the last arena with 32 more zombies and Lollipop #37.
Endorsed by Cordelia

Completed with a blaster, you will get the blaster in the story at the second stage. A headshot is considered successful if the zombie’s head flew off and there is a flash.
Leapfrog girl

Left one zombie in the arena and jump through it 10 times. You have to jump in a row, if you accidentally do another action, the row is reset (for example, if you accidentally jump sideways).
JULIET51

First unlock the Body Bash combo for 220 coins, then perform it 51 times.
Zombie Slayer?!

While earning this achievement you will also receive the “Groovy Hunter” achievement for killing 500 zombies.
Collectibles
Lollipop Addict

- To collect all the lollipops, you need to play on Hard difficulty level. Some of the collected lollipops will be on the same places on the next walkthrough, but instead of them there will be lollipops that restore health. Achievement lollipops are different from regenerating lollipops by their golden coloring.
- All lollipops have their own sequence number, but in the guide they are sorted from the order in which you can find them. The order number is different because some lollipops are not available on easy and normal difficulty levels. If you want to collect some of the lollipops on easy/normal difficulty level, check the lollipop’s sequence number. If you want to collect lollipops on the hard difficulty level, then follow the order in which they are described in this guide.
- You can replay any chapter at any time. You can keep track of the collected lollipops by clicking the menu during the mission, then click “Juliet’s Stash” -> “Lollipop case” tab in the context menu.
Zombie Fancier

You will unlock all zombies by completing the storyline on the hard difficulty. Zombie #32 can only be found during the ranked mode. On the mission selection map, you can switch between normal and ranked mode. After the first playthrough, you can select any level in any order in any mode. It is important that you kill the zombie, if the zombie explodes from another zombie, the kill will not count in the album.
- George – Prologue
- In front of the school entrance. Unmissable
- Mikaela – Prologue
- In the alley in front with the second lollipop. Unmissable
- Jerry – Prologue
- Final boss of Prologue. Unmissable
- Jay – Stage 1
- In the hallway after a smoke-filled classroom. Be sure it was killed by you and not a zombie with explosives. If the zombie with explosives explodes, the kill will not count. Spawn only on hard/very hard/ranked
- Ryu – Stage 1
- Police zombie, you meet after you rescue a third classmate. Unmissable
- Stephanie – Stage 1
- In a smoke-filled classroom. Unmissable
- Juan – Stage 1
- The next arena after basketball. Unmissable
- Fitzgibbon – Stage 1
- Spawns in the last class you open. Unmissable
- Zed – Stage 1
- Final boss of Stage 1. Unmissable
- Paul – Stage 2
- In one of the rooftop arenas, a pack of zombies will jump from a helicopter. One of those zombies will be Paul. Unmissable
- Alexander – Stage 2
- A zombie rugby player, at the start of the stage. Unmissable
- Danielle – Stage 2
- Zombie at the gym. Unmissable
- Josephine – Stage 2
- In an arena where you need to rescue 3 classmates at the same time. Only spawns on hard/very hard/ranked
- Steven – Stage 2
- Spawn after killing the zombie Alexander, in the same arena. Only spawns on hard/very hard
- Uwe – Stage 2
- Spawn during baseball games and only on hard/very hard
- Vikkie – Stage 2
- Final boss of Stage 2. Unmissable
- Mark – Stage 3
- A fat zombie, after defeating which you will connect Nick’s head to his body. Unmissable
- Chat – Stage 3.
- Zombie chicken in the first limbo. Unmissable
- Mariska – Stage 3
- Final boss of Stage 3. Unmissable
- Tobe – Stage 4
- After the first mini-game. Unmissable
- Anastasia – Stage 4
- At the start of the stage. Unmissable
- Wesley – Stage 4
- A zombie with a boombox on the roof, after the third mini-game. Unmissable
- Lucid – Stage 4
- On the scene between the second and third mini-game. Unmissable
- Josey – Stage 4
- Final boss of Stage 4. Unmissable
- Bill – Stage 5
- In the parking lot after you meet your sister. Only spawns on hard/very hard
- Christina – Stage 5
- During the storyline, you need to survive in the parking lot until your sister blows the exit. After the exit becomes available stay in the parking lot to kill zombies until the required zombie is spawned. Only spawns on hard/very hard
- Brett – Stage 5
- In the last arena. Make sure that this zombie was killed by you and the kill counted in the album. Unmissable
- Samantha – Stage 5
- In the last arena. Make sure that this zombie was killed by you and the kill counted in the album. Unmissable
- Peter – Stage 5
- In the arena between the first and second Rosalind’s encounter. Unmissable
- Lewis – Stage 5
- Final boss of Stage 5. Unmissable
- Killabilly – Stage 6
- Final boss of Stage 6. Unmissable
- Jack – Stage 6
- A zombie chicken that can only be found during ranked mode
- Roberta – Stage 2
- In a smoke-filled classroom. Spawns only on hard/very hard/ranked
- Marie – Stage 6
- After building and crossing the first ramp. Spawns only on hard/very hard
- David – Stage 6
- After building and crossing the first ramp. Spawns only on hard/very hard
OMG, Music Is Soooo Coooool

You unlock some of the albums automatically by beat dad’s score on each level. The other part of the albums must be bought in the store for platinum coins. There are 44 albums in total.
- 84-86 – Prologue storyrelated
- 87-89 92 118 – Stage 1
- 93-97 – Stage 2
- 101-105 – Stage 3
- 110-114 – Stage 4
- 120-124 – Stage 5
- 98 99 107 116 125 – Stage 6
- 83 90 91 100 106 108 109 115 117 119 126 – Purchase
Always On The Phone

You will collect all the telephone messages during the storyline.
| Prologue | Stage 1 | Stage 2 | Stage 3 | Stage 4 | Stage 5 | Stage 6 |
|---|---|---|---|---|---|---|
| №01 | №02 | №07 | №08 | №04 | №03 | №06 |
| №18 | №05 | №10 | №15 | №13 | №21 | №09 |
| №19 | №16 | №14 | №11 | |||
| №20 | №12 |
Miscellaneous
I Swear! I Did It By Mistake!

Pull the camera down and wait a couple of seconds.
International Zombie Hunter

After completing each story level, you can replay it in ranked mode. To do this, go to the level selection map and switch the mode to rating mode. To achieve you need to complete all 7 stages in this mode for any score. Combine completing this achievement with completing the max rating achievement.
Accidental Vandalism

Destroy objects to get coins on the first playthrough to upgrade Juliete faster. While collecting lollipop wrappers you will get this achievement as you will need to destroy objects to get to some of the lollipops.
Prologue
Collectables
Score
nOOb Zombie Hunter

You can only beat Dad’s score on Normal or Hard difficulty. Both difficulty levels have the same requirements, so it is easier to complete all the achievements on score on Normal difficulty. There is no difference in score between Normal and Hard. The final score is formed from several factors:
The score in the upper right corner with which you finished the mission;
- The number of gold coins collected;
- Number of platinum coins collected;
- Number of sparkle hunts completed;
- Number of restarts;
- Time spent per level.
Pay more attention to the score in the upper right corner, time spent and completed sparkle hunting, as they are the highest multipliers. Avoid deaths and restarts from the menus, as they are penalized in the final score. Optionally rescue your classmates, they will reward you with gold coins for saving them. There are no penalties in the game for using consumables to regenerate health.
Scores are calculated as follows:
Your score+(Zombie medals20)+(Platinum medals400)+(Sparke hunting300)+(24000-(Your time in seconds20))-(Continues*5000)=Total score
Prologue Dad’s score:
| Completion Time | Total Score | Sparkle Hunting | Gold Medals | Platinum Medals |
|---|---|---|---|---|
| 11:04 | 119,700 | 20 | 401 | 15 |
From the start, you can complete a few multi-kills and earn platinum coins. Save the chainsaw charge for the next arena after rescuing the third classmate, there are 25 zombies. Perform sparkle hunting in this arena. It is important not to restart the level once and save all three classmates to guarantee to beat Dad’s score.
San Romero Knights Savior

If you were failed to rescue a classmate, then restart from checkpoint. You will get a different achievement for rescuing all the classmates in the prologue. There are only 3 classmates in this level.
It will be more difficult to rescue the third classmate. His rescue is divided into 2 arenas. In the first arena you have to kill all the zombies before the classmate falls. In the second arena, you must successfully escort him to the evacuation point.
Stage 1
Achievements
Watch Out For The Balls

Completed on the third phase of the boss (after the phase with the columns). Sometimes Zed will launch red projectiles at you, dodge them. If you successfully dodge them, a QTE will start, in which you have to press a button. If you did everything correctly, the projectiles will return to the boss and stun him. You need to do this 15 times.
Zed’s Dead, Baby, Zed’s Dead

The boss has 3 phase.
In phase 1, the deal damage after he runs a circle and hits 1 time. If he stands in the center and starts singing, just avoid his projectiles, don’t use the dodge button as the dodge animation is further away and you will catch another projectile. It’s better to just run away from the projectiles.
In the second phase, only destroy the columns that Zed is standing on. The rest of the columns he will respawn. Every time he jumps on a column he throws a red projectile, lock on to the boss and as soon as the locker is moved – click the dodge button.
The third phase is similar to the first, but adds 1 more attack – throwing a red projectile. You can wait for the boss to circle and hit, or dodge his red projectile and then counterattack this projectile to stun Zed.
Collectibles
Score
Beginner Zombie Hunter

You can only beat Dad’s score on Normal or Hard difficulty. Both difficulty levels have the same requirements, so it is easier to complete all the achievements on score on Normal difficulty. There is no difference in score between Normal and Hard.
The final score is formed from several factors:
- The score in the upper right corner with which you finished the mission;
- The number of gold coins collected;
- Number of platinum coins collected;
- Number of sparkle hunts completed;
- Number of restarts;
- Time spent per level.
Pay more attention to the score in the upper right corner, time spent and completed sparkle hunting, as they are the highest multipliers. Avoid deaths and restarts from the menus, as they are penalized in the final score. Optionally rescue your classmates, they will reward you with gold coins for saving them. There are no penalties in the game for using consumables to regenerate health.
- Your score+(Zombie medals20)+(Platinum medals400)+(Sparke hunting300)+(48000-(Your time in seconds20))-(Continues*5000)=Total score
Stage 1 Dad’s score:
| Completion Time | Total Score | Sparkle Hunting | Gold Medals | Platinum Medals |
|---|---|---|---|---|
| 31:33 | 214,500 | 29 | 681 | 20 |
During the rescue of the first classmate, activate the chainsaw to kill 7 zombies with sparkle hunting, after rescuing the classmate, 7 more zombies will come immediately. The chainsaw charge will be enough for this wave of zombies. Destroy school lockers to get gold coins. Kill all optional zombies in your way, as the multiplier of score for kills is greater than for time spent. There is a penalty for restarting from a checkpoint. The most difficult segment in this level is to protect the cake. Save the maximum chainsaw charge for this segment. At the junkyard location, don’t forget to kill the optional zombies.
San Romero Knights Savior

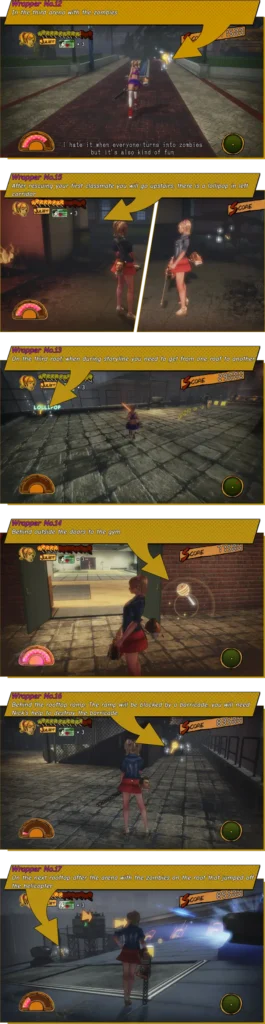
If you were unable to save a classmate, then load from the checkpoint. There are only 8 classmates in this level.
- After a cutscene in which your classmate is attacked, run to the other side of the corridor and kill the zombies that attack him first, and then the others.
- To save the fourth classmate you need to kill 6 zombies as soon as possible, this classmate rescue is on a timer. If you don’t kill all the zombies in time, the classmate will fall from the window.
- There are 3 classmates in the classroom with a pole for Juliet. Don’t forget to touch each of the 3 classmates to make everyone count.
Stage 2
Achievements
Go, Medal Racer, Go!

You don’t have to collect all the coins by running the chainsaw. You can jam it by driving it into the wall. This way you can guarantee to collect all the coins. Start the chainsaw only to jump on the ramps. Before the last ramp, there is a point of no return. Be sure to collect all the coins in the air. Otherwise, you’ll have to replay the stage again. There are only 2 segments on the roof where you need to collect coins.
Gunn Struck

Despite the fact that in the cutscene on the first roof, you will be shown that lightning can strike the roof, but it really can’t. Lightning can only hit you when you hit the roof for the second time. Lightning hits certain spots, supply lollipops to regenerate health after getting hit by lightning. It is easier to complete in the arena where you will be attacked by zombies from a helicopter, this arena has 4 spots that lightning strikes, you will have time to take 3 of them to get the achievement as quickly as possible.
Cheerleader Overboard!

- On the second boss phase, when you cut him into two pieces. Go to the edge of the ship and wait for its bottom boss piece to push you off the ship. Complete the QTE and climb back up to the ship to get the achievement.
Viking Metal Rules!

- The boss has 3 phases.
- In the first phase, you can deal damage to the boss after it does an attack. After each of his attacks, you have the opportunity to damage him. If the boss stands blocked, deal damage with your blaster.
- In the second and third phase, combine ranged and melee attacks, depending on the distance to the enemy.
Collectibles
Score
Intermediate Zombie Hunter

You can only beat Dad’s score on Normal or Hard difficulty. Both difficulty levels have the same requirements, so it is easier to complete all the achievements on score on Normal difficulty. There is no difference in score between Normal and Hard.
The final score is formed from several factors:
- The score in the upper right corner with which you finished the mission;
- The number of gold coins collected;
- Number of platinum coins collected;
- Number of sparkle hunts completed;
- Number of restarts;
- Time spent per level.
Pay more attention to the score in the upper right corner, time spent and completed sparkle hunting, as they are the highest multipliers. Avoid deaths and restarts from the menus, as they are penalized in the final score. Optionally rescue your classmates, they will reward you with gold coins for saving them. There are no penalties in the game for using consumables to regenerate health.
- Your score+(Zombie medals20)+(Platinum medals400)+(Sparke hunting300)+(45600-(Your time in seconds20))-(Continues*5000)=Total score
Stage 2 Dad’s score:
| Completion Time | Total Score | Sparkle Hunting | Gold Medals | Platinum Medals |
|---|---|---|---|---|
| 26:39 | 161,100 | 20 | 635 | 14 |
- Sparkle huntings are the easiest way to increase your score on this level, in addition to sparkle hunting and the final score, you will also get platinum coins.
- In the arena with 12-15 crawling zombies, perform multi kills to get sparkle hunting. Farm sparkle hunting on rooftops by running up on chainsaw and killing 3 zombies at a time. In the story you will get a blaster in this chapter. Use it for multi-kills during baseball, there zombies spawn endlessly. Ammo spawns quickly, but it’s not infinite.
San Romero Knights Savior
If you were unable to save a classmate, then load from the checkpoint. There are only 4 classmates in this level.
Classmates #2-4 are in the same place and they need to be rescued at the same time. After the cutscene, in which you will be shown three classmates who need help, jump down and hit all the zombies at least once, so that they will attack Juliet instead of the classmates. It is preferable to save the maximum chainsaw charge just for this arena. After killing 4 zombies, don’t forget to reach each of the three classmates and pick up the reward to make the rescue count.
Stage 3
Achievements
Legendary harvester

Complete when you are driving the combine harvester for the first time. Leave one zombie alive, if you kill all 100 zombies you will be automatically teleported to the farm. Cut the grass in a spiral so that the last surviving zombie goes from the center to the edge of the field, which you have already cut and does not bother you.
Third Eye

Mariska only has 2 attacks – a rainbow balloon and a combiner that chases you. To get this achievement, you must defeat the boss with almost no damage taken.
Dirty Hippy

The boss has 3 phases, but the tactics are the same in all phases. In the first phase, the boss attacks only with rainbow balloons. In the second phase, the boss summons a combiner that chases you. You can either just run in the opposite side of it, or shoot it 1 time. In the third phase, Mariska will split into 8 more copies, but no new attacks will be added. In all three phases, only use your blaster to deal damage. Use chainsaw ride to get close to the boss when you need to saw her off.
Collectibles
Score
Advanced Zombie Hunter

You can only beat Dad’s score on Normal or Hard difficulty. Both difficulty levels have the same requirements, so it is easier to complete all the achievements on score on Normal difficulty. There is no difference in score between Normal and Hard.
The final score is formed from several factors:
- The score in the upper right corner with which you finished the mission;
- The number of gold coins collected;
- Number of platinum coins collected;
- Number of sparkle hunts completed;
- Number of restarts;
- Time spent per level.
Pay more attention to the score in the upper right corner, time spent and completed sparkle hunting, as they are the highest multipliers. Avoid deaths and restarts from the menus, as they are penalized in the final score. Optionally rescue your classmates, they will reward you with gold coins for saving them. There are no penalties in the game for using consumables to regenerate health.
- Your score+(Zombie medals20)+(Platinum medals400)+(Sparke hunting300)+(54000-(Your time in seconds20))-(Continues*5000)=Total score
Stage 3 Dad’s score:
| Completion Time | Total Score | Sparkle Hunting | Gold Medals | Platinum Medals |
|---|---|---|---|---|
| 36:31 | 294,900 | 39 | 882 | 27 |
Kill all optional zombies and zombie animals because scores are awarded for them. Try to collect all the gold coins behind barns, fences, etc. Leave the chainsaw charge for the last arena with red and blue barrels. Do sparkle hunting in this arena. Try to complete all arenas as soon as possible to get extra points for time, because you will spend a lot of time collecting gold coins. Use chainsaw ride to move around large locations.
San Romero Knights Savior
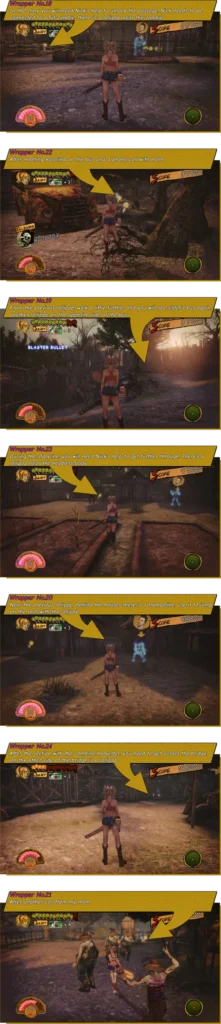
If you were unable to save a classmate, then load from the checkpoint. There are only 1 classmate in this level.
In the arena with your classmate, don’t follow the hint and don’t blast the stone. If the stone falls, the classmate will die together with the zombie.
Stage 4
Achievements
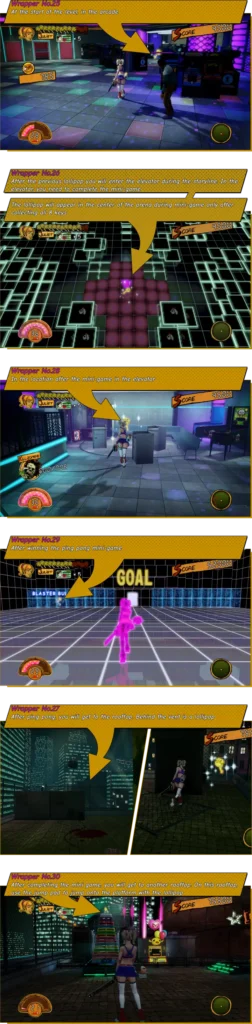
No Fear Of Heights

- The fourth mini-game in which you have to climb up to the top avoiding obstacles. The playthrough is randomized, as enemies can drop projectiles at the same time and you can’t dodge them without shooting. If you accidentally shoot but don’t destroy anything, the achievement will count for you.
- The optimal route is marked in yellow. These mini-games are randomized and the route may change depending on how enemies will throw projectiles down.
- Tiles that open and close are marked in black. It is best to avoid them throughout the entire climb up, except for the finish. There you must wait until they are closed to get to the finish line.
Tiles on which enemies are standing and dropping shells down are marked in blue. - Critical UFO Finish
Performed on the second stage of the boss. After the boss battle will be on his UFO, where you will need to destroy the crystals. First destroy all the crystals and then wait for the timer to expire. After destroying the crystals, the boss will not attack you. After destroying the crystals you will need to saw the boss, Juliete will saw the boss for exactly 10 seconds. So start sawing the boss when the timer is ~10-20 seconds.
Disco’s Dead

- The boss battle is split into 2 phase.
- When the boss shoots, you can only dodge. When the boss rides on his UFO like a circular saw, you can just step sideways. Similarly in the situation when he drops bombs. Deal damage after successfully dodging the boss’ attack when he tries to jump on you. If he misses, he will be stunned for a couple seconds.
- At the phase where the ladder goes up and the boss is flying away, then climb the ladder. On each of the ladders there are ammunition. Pick them up and at the top of the stairs you can see the boss. Shoot him and dodge the bombs. If you stun the boss and take damage from explosives, don’t try to approach him, because you won’t have time. In this situation, deal damage with your blaster. You will only have to deal damage if you don’t take damage from bombs. To get a closer to the boss and deal damage, use a chainsaw ride (like you did in the second mission to move across the rooftops).
In the second phase, first destroy the crystals and then saw the boss. No difficulty in this phase.
Collectibles
Score
Super Zombie Hunter

You can only beat Dad’s score on Normal or Hard difficulty. Both difficulty levels have the same requirements, so it is easier to complete all the achievements on score on Normal difficulty. There is no difference in score between Normal and Hard. The final score is formed from several factors:
- The score in the upper right corner with which you finished the mission;
- The number of gold coins collected;
- Number of platinum coins collected;
- Number of sparkle hunts completed;
- Number of restarts;
- Time spent per level.
Pay more attention to the score in the upper right corner, time spent and completed sparkle hunting, as they are the highest multipliers. Avoid deaths and restarts from the menus, as they are penalized in the final score. Optionally rescue your classmates, they will reward you with gold coins for saving them. There are no penalties in the game for using consumables to regenerate health.
- Your score+(Zombie medals20)+(Platinum medals400)+(Sparke hunting300)+(42000-(Your time in seconds20))-(Continues*5000)=Total score
Stage 4 Dad’s score:
| Completion Time | Total Score | Sparkle Hunting | Gold Medals | Platinum Medals |
|---|---|---|---|---|
| 26:32 | 127,600 | 15 | 583 | 9 |
- To beat Dad’s score you must complete the level without restarting. On the rooftop, make sure you have ammo for your blaster, because if you don’t shoot down the helicopter in time, you will have to restart from the checkpoint. The hardest segment in this level is the fourth mini game, “Gondola”, where you need to climb up to the top. Use the saw button to shoot. You can only destroy small objects with your shot that are dropped by the blue enemies .
- During the second elevator mini-game, there will be 8 zombies spawning on the fifth floor in a small corridor. Pull them into a corner and perform a multi-kill to get sparkle hunting.
- During the third ping-pong mini-game, kill the yellow zombies first. The mini-game will end if you kill the zombie with the boombox. For extra points, kill them last.
San Romero Knights Savior
If you were unable to save a classmate, then load from the checkpoint. There are only 3 classmates in this level.
2 classmates are near each other, after the first mini-game. You need to rescue them as fast as possible, this rescue is on a timer. These two classmates are surrounded by only 2 zombies. After the rescue don’t forget to reach the first and second classmate to get the reward.
Stage 5
Achievements
Little Sisters Are The Worst!

There are only 2 arenas in which you don’t need to take damage from wrecking ball. The first arena is when you first meet Rosalind. Keep an eye on the ball and don’t get hit by it. Don’t stay focused on one zombie for too long. If the ball hits you, then rstart from the checkpoint. You will appear near the arena. The second arena Rosalind will be in is the arena where she will be attacked. Shoot off all enemies with your blaster and stay away from Rosalind. Bullets will spawn on both sides, stand near the bullets, this area will not be attacked by the ball. After the second arena you should get the achievement.
Elephant Tamer

It is completed on the first phase of the boss. After the first time you lower his health bar he will fall off the bike and needs to be sawed off. Do nothing instead. If you don’t saw him off in time, he will jump on the bike again. You need to kick him off the bike 10 times.
Rock’n Roll Isn’t Here Anymore

The boss battle consists of 3 phases.
In the first phase he rides in a circle and sometimes rides into the center of the arena. Deal damage to him when he drives into the center of the arena. Deal saw damage in mid-air with a “Jump Stumb” combo. This way you will avoid any damage from the boss.
The tactics for phase two and phase three are the same. Keep a medium distance from the robot. This way you can dodge ranged/melee attacks and quickly approach if the robot overheats. After a series of attacks, Lewis’s robot will overheat. Deal damage then the robot is overheated.
Collectibles
Score
Excellent Zombie Hunter

You can only beat Dad’s score on Normal or Hard difficulty. Both difficulty levels have the same requirements, so it is easier to complete all the achievements on score on Normal difficulty. There is no difference in score between Normal and Hard.The final score is formed from several factors:
- The score in the upper right corner with which you finished the mission;
- The number of gold coins collected;
- Number of platinum coins collected;
- Number of sparkle hunts completed;
- Number of restarts;
- Time spent per level.
Pay more attention to the score in the upper right corner, time spent and completed sparkle hunting, as they are the highest multipliers. Avoid deaths and restarts from the menus, as they are penalized in the final score. Optionally rescue your classmates, they will reward you with gold coins for saving them. There are no penalties in the game for using consumables to regenerate health.
- Your score+(Zombie medals20)+(Platinum medals400)+(Sparke hunting300)+(54000-(Your time in seconds20))-(Continues*5000)=Total score
Stage 5 Dad’s score:
| Completion Time | Total Score | Sparkle Hunting | Gold Medals | Platinum Medals |
|---|---|---|---|---|
| 36:31 | 366,800 | 39 | 1,888 | 27 |
There is a lot of ammo in this level, farm sparkle hunting with blaster by doing multi kills. Be sure to save the maximum chainsaw charge for the last arena with 32 zombies. By completing 70+ multi-kills without a single restart you are guaranteed to beat Dad’s score. Multikills with the blaster are very easy and fast, as this mission spawns a lot of blaster ammo.
San Romero Knights Savior
If you were unable to save a classmate, then load from the checkpoint. There are only 2 classmates in this level.
After rescuing the first classmate, you will be able to go further. Instead, follow the path from where you entered the parking lot. There will be your rescued classmate near the truck, approach him to make the rescue count.
You will meet the second classmate after cutting down the pillar by the scaffolding. Blow up the far barrels after the phone call, so that they don’t explode near your classmate. While the classmate is going to the exit, shoot the rest of the zombies with the blaster or stun the zombies using Nick Ticket until the classmate is rescued.
Stage 6
Achievements
Aced Auto-shop Class

For this achievement, you need to not take any damage from the cars that the boss throws at you. If you fail to dodge a car, you must successfully saw it with a chainsaw in QTE.
Fingered

In the second phase of the boss, cut off his 20 fingers as he puts his hands on the roof of the building.
I Came, I Saw, I Kicked Its Ass

The boss has two phases. All phases are random. In the first phase you need to shoot Killabilly in the face with a blaster. You can change the position of the boss’s arm. Find the position where his face is not covered.
In the second phase, wait for him to put his hands on the roof and then deal damage. The time he will keep his hands on the roof and the time he will spawn enemies is random.
Collectibles
Score
Master Zombie Hunter

You can only beat Dad’s score on Normal or Hard difficulty. Both difficulty levels have the same requirements, so it is easier to complete all the achievements on score on Normal difficulty. There is no difference in score between Normal and Hard. The final score is formed from several factors:
- The score in the upper right corner with which you finished the mission;
- The number of gold coins collected;
- Number of platinum coins collected;
- Number of sparkle hunts completed;
- Number of restarts;
- Time spent per level.
Pay more attention to the score in the upper right corner, time spent and completed sparkle hunting, as they are the highest multipliers. Avoid deaths and restarts from the menus, as they are penalized in the final score. There are no penalties in the game for using consumables to regenerate health.
- Your score+(Zombie medals20)+(Platinum medals400)+(Sparke hunting300)+(36000-(Your time in seconds20))-(Continues*5000)=Total score
Stage 6 Dad’s score:
| Completion Time | Total Score | Sparkle Hunting | Gold Medals | Platinum Medals |
|---|---|---|---|---|
| 22:47 | 80,700 | 13 | 219 | 8 |
After the first time creating a ramp from cars you will get to the other side. Kill all optional zombies on the other side. Before the boss battle you will already have 80,000 score, which is already more than the Dad’s score.